
eRacks Systems Tech Blog
Open Source Experts Since 1999
HAMR vs CMR: 32TB NAS Drives and What They Mean for Your Storage Budget
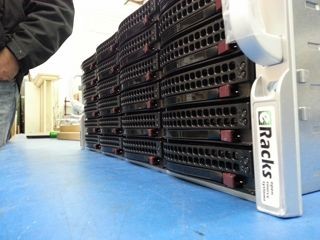
A quiet but significant update landed in the eRacks configurator this week: 32TB HAMR drives are now available across the full NAS product line. For organizations that measure their storage needs in petabytes, this matters. The 102-bay eRacks/NAS100 can now be configured with 3.264 petabytes of raw capacity in a single 4U chassis – up from 2.6PB with the previous generation of 30TB CMR drives.
That is not a rounding difference. It is an additional 664 terabytes in the same footprint, with no extra rack space, no additional power circuits, and no change to the chassis.
What HAMR Actually Means
Hard drives have been using conventional magnetic recording (CMR) for decades. In CMR, a write head magnetizes small regions of a spinning platter to store data. The physics of that process set a ceiling on how densely bits can be packed – push the magnetic grains too close together and they become thermally unstable, meaning data can corrupt itself over time.
Heat-Assisted Magnetic Recording (HAMR) breaks through that ceiling by using a tiny laser to briefly heat a precise spot on the platter to around 450 degrees Celsius at the moment of writing. At that temperature, the magnetic material becomes temporarily easier to flip, allowing much smaller, more stable grains to be written reliably. Once the spot cools – which happens in nanoseconds – the written data is locked in place more durably than conventional CMR recording allows.
The practical result is higher areal density: more data per square millimeter of platter surface. Seagate’s current 32TB HAMR drives achieve this without increasing the drive’s physical dimensions. The same 3.5-inch form factor, the same power envelope, the same standard SATA interface – just significantly more capacity per bay.
For NAS applications running ZFS, this translates directly into larger pools, longer time-to-failure curves on RAIDZ arrays, and more headroom before an expansion shelf becomes necessary.
The Capacity Math
The eRacks NAS lineup runs from 4 bays to 102 bays. Here is what 32TB HAMR drives unlock at a few points in the range:
- NAS12 (12 bays): 384TB raw
- NAS24 (24 bays): 768TB raw
- NAS50 (50 bays): 1.6PB raw
- NAS72 (72 bays): 2.304PB raw
- NAS100 (102 bays): 3.264PB raw
These are raw figures. Usable capacity after RAIDZ2 parity and filesystem overhead will be lower – typically around 60-70% of raw depending on configuration – but the density improvement carries through regardless of the protection scheme you choose.
Where On-Premise Storage Still Wins on Cost
The cost argument for owning your storage rather than renting it has not changed, but the HAMR upgrade sharpens it. As a reference point: 100TB of object storage on Amazon S3 Standard runs roughly $27,600 per year in storage fees alone, before factoring in egress charges when you actually retrieve data.
An eRacks/NAS24 configured with enough capacity to cover that same 100TB – with room to grow – starts at $8,995. That is a one-time capital cost. In year two, cloud egress still costs what it costs. The NAS does not send an invoice.
For organizations in regulated industries – healthcare, finance, legal, government – the calculus has an additional dimension. Data sovereignty means knowing exactly where your data is, who has access to it, and under what legal jurisdiction it sits. Cloud storage agreements involve shared infrastructure, third-party subprocessors, and terms of service that can change. An on-premise NAS running ZFS on hardware you own answers those questions conclusively.
Available Now in the Configurator
The 32TB HAMR option is live in the eRacks online configurator for all NAS models. You can select drive size, drive count, RAID level, operating system (TrueNAS, Ubuntu, Rocky Linux, or Debian), and connectivity options at the time of order. Every system ships assembled and tested from Los Angeles.
eRacks has been building custom rackmount storage since 1999. The NAS line ranges from the 4-bay NAS4 at $1,995 to the 102-bay NAS100 at $29,995. All systems are open-source-friendly, built to order, and designed for data center or on-premise deployment.
Configure your system at eracks.com/products/rackmount-nas-servers/ or contact us to discuss capacity planning for your environment.
joe May 15th, 2026
Posted In: FreeBSD, Linux, NAS Storage, NAS24, News, Storage
Tags: 32TB drives, cloud vs on-premise, data sovereignty, HAMR drives, NAS servers, network attached storage, on-premise storage, ZFS
TrueOS Now Available
 The former PC-BSD Desktop offering from ixSystems has now morphed into TrueOS Desktop –
It’s a rolling-release BSD Distro based on FreeBSD-CURRENT with many improvements, changes, and enhancements including security, LibreSSL, drivers, and more – Read about it, here: https://www.trueos.org/
We’re currently doing an eRacks/HUMBOLDT for a customer with it – Exciting!
j
joe November 1st, 2016
Posted In: Development, FreeBSD, New products, Operating Systems
Tags: BSD, freebsd, HUMBOLDT, LibreSSL, Rolling Release, TrueOS
eRacks/ZENBOOK15.UHD With Open Source: Powerful And Elegant
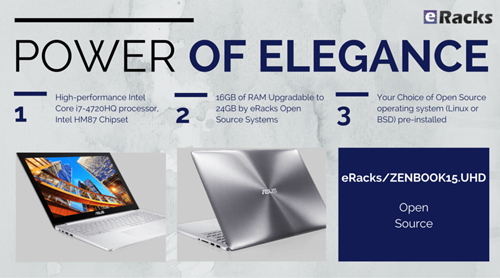
Introducing eRacks/ZENBOOK15.UHD 4D resolution, high power Ultrabook with Linux or BSD operating system
We wanted to start the month in style. So, we thought what better way there is than introducing a great looking Ultrabook with powerful specification? Then the light bulb went on: “eRacks/ZENBOOK15.UHD”.
This really stylish and elegant eRacks/ZENBOOK15.UHD laptop that comes with a screen resolution of 3840 by 2160 — four times FHD (full high-definition) resolution – really started looking mighty good.
This Ultrabook by Asus can be delivered by eRacks with up to 24 Gigabytes of RAM and up to 1 or even 2 Terabytes of SSD hard disk space. As a matter of fact this ultrabook has been ranked the number one among all of ultrabooks that you can find online, this is according to gadget reviews, which is a good indication that it will really serve it’s purpose and will cope up with your expectation. With its 15.6 inch 4K Ultra High Definition IPS screen and a view angle of about 170 degrees, eRacks/ZENBOOK15.UHD is really a great looking and powerful Ultrabook.
As with all eRacks Systems products, this elegant looking Ultrabook will be delivered with your choice of Open Source operating system & software pre-installed and pre-configured. The operating system can be any flavor of Linux or BSD (We can even do other OSes like Haiku, etc on request). We will install and configure the OS fully before packaging your Ultrabook and sending it off your way.
In fact, you can be sure that with your Ultrabook ordered through us, you will receive a powerful open source system, configured to the highest specifications according to your requirements. And you can also be sure that no one else can or will offer anything close to the laptop you will get from us.
So, why not expand your laptop computing power to the next level with us. Contact us and ask about eRacks/ZENBOOK15.UHD. We’ll be happy to hear from you.
info@eracks.com
Ron October 8th, 2015
Posted In: FreeBSD, Laptop cookbooks, New products, News, Products, Upgrades, Zenbook
Tags: 4K, BSD, FLOSS, laptop, linux, Open Source Computing, Powerbook, UHD, Ultrabook, Zenbook
LSI Logic 6Gbps mps Driver for FreeBSD 8.2-RELEASE
EDIT: Binary modules have now also been provided for 7.4, 8.1 and 8.0. The instructions below should apply to all three, with the exception that you’ll want to download either mps-bin-7.4.tar.gz, mps-bin-8.1.tar.gz or mps-bin-8.0.tar.gz.
Unfortunately, the mps driver, which supports LSI Logic’s 6Gbps series of RAID controllers, didn’t make it into the FreeBSD kernel until after 8.2-RELEASE. As a result, FreeBSD users who require this driver are forced to either install 8-STABLE — which, despite the name, is a development branch — or pull the driver’s source code from 8-STABLE and build it on FreeBSD 8.2-RELEASE. Since we recently needed to use the mps driver and had to stick with a production-ready release, we opted for the second option. Along the way, we decided to bundle up the driver’s source to make the task easier for those who don’t want to install a development branch, and to pre-compile binary modules for those who wish to install 8.2-RELEASE directly to the hardware RAID array.
If you have a separate hard drive for the operating system that’s not on a 6Gbps LSI controller and simply use the hardware RAID for additional storage, you can do a normal install of FreeBSD 8.2-RELEASE to the hard drive, boot into the new system and perform the following steps:
1) Download mps.tar.gz
2) Extract it, cd to the ‘mps’ directory and type make && make install
3) Edit /boot/loader.conf and add the following line at the end: mps_load="YES"
4) Reboot (or type kldload mps.ko without rebooting)
If instead you want to install 8.2-RELEASE directly to an array on your 6Gbps LSI controller, a few extra steps are required.
First, download mps-bin.tar.gz, extract it by typing tar -zvxf mps-bin.tar.gz and place the contents on some form of removable media mountable by FreeBSD. A USB thumb drive, a floppy disk or a CD will suffice (though, a CD would be an awful waste of space… :))
Second, make sure to download the FreeBSD DVD and not the CD. We will require the live filesystem that’s contained only on the larger DVD. Once the installer is running, choose your language as usual, then select “Fixit” instead of the usual installation method. Choose the CDROM/DVD option.
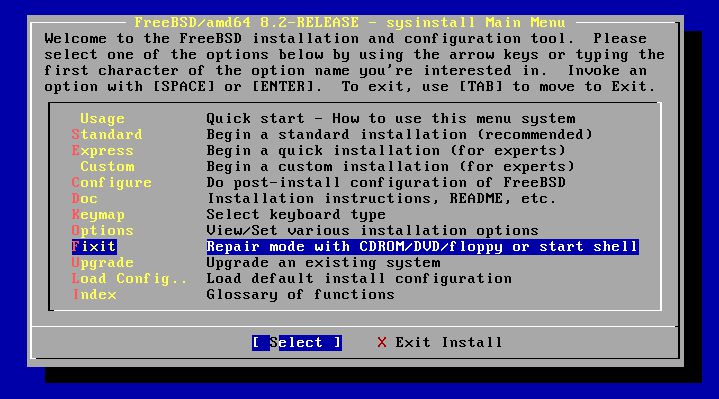
Figure 1: Select 'Fixit' instead of an installation method
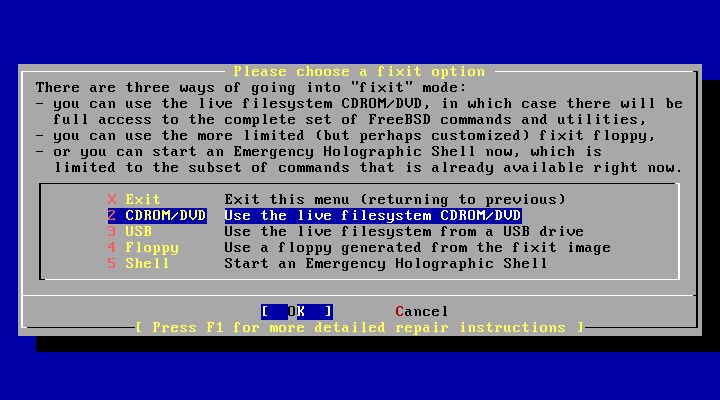
Figure 2: Select 'CDROM/DVD'
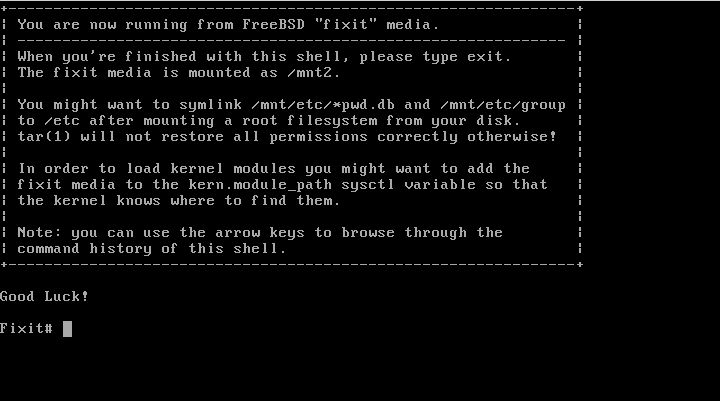
Figure 3: The 'Fixit' Prompt
Now, insert your removable media. For our example, we’ll assume a USB thumb drive with a device node on /dev/da0.
Before continuing, let me first warn you that the ordinary mount command will most likely not work. Usually, mount will determine the filesystem type and automatically call the appropriate binary. However, the way the live filesystem is setup, this doesn’t work — or at least, it didn’t work on my machine. So instead, you’ll want to call the command for your filesystem type directly. If it’s a CD, that command will be mount_cd9660. If you’re using a USB thumb drive with a FAT32 filesystem on it (as we will be in our example), the command will be mount_msdosfs.
Assuming our example with the USB thumb drive, you’ll issue the following commands:
#mount_msdosfs /dev/da0 /mnt
#cd /mnt/mps-bin/i386 for 32-bit (or #cd /mnt/mps-bin/amd64 for 64-bit)
#kldload ./mps.ko
#exit
At this point, you’ll be returned to the FreeBSD installer. Make sure to re-insert the DVD, then continue with the installation as usual. Once the installation is complete, don’t reboot! If you do, you won’t be able to start up FreeBSD, as we still have to install our kernel module and tell the boot loader to load it on boot.
So, now that the installation is finished, re-insert the DVD and return to the Fixit prompt. Once again, choose the ‘CDROM/DVD’ option. Assuming our USB thumb drive on /dev/da0 from before — the commands you use will differ based on the media you choose — type the following commands:
#mount_msdosfs /dev/da0 /mnt
#cd /mnt/mps-bin/i386 for 32-bit (or #cd /mnt/mps-bin/amd64 for 64-bit)
#./install.sh
If all goes well, the shell script will terminate without any output. Incidentally, it’s worth mentioning that the newly installed root filesystem is mounted on / when you enter the Fixit environment after installation. Now that we have the kernel module installed, we just need to tell FreeBSD to load it on boot. To do so, we just have one last command:
#echo 'mps_load="YES"' >> /boot/loader.conf
That’s it! Just unmount your media and exit the Fixit prompt.
#umount /mnt

#exit
At this point, you can exit the installer as usual and reboot. Once the system starts, you should find yourself face to face with a shiny new instance of FreeBSD 🙂
james August 10th, 2011
Posted In: FreeBSD, How-To, Open Source
Tags: 6gbps, 7.4-release, 8-stable, 8.0-release, 8.1-release, 8.2, 8.2-release, binary, driver, freebsd, howto, kernel, kernel module, lsi, lsi logic, module, mps, Open Source, raid, source, stable, tutorial
Complete GPT Support Coming to FreeBSD 9.0

According to the release notes for FreeBSD 9.0 CURRENT:
[amd64, i386] A new gptboot boot loader has been added to support
booting from a GPT labeled disk. A new boot command has been added to
gpt(8), which makes a GPT disk bootable by writing the required bits of
the boot loader, creating a new boot partition if required. [MERGED]
This is excellent news for those who wish to boot directly from hard drives larger than 2TB. GPT has been partially supported for some time by previous versions of FreeBSD, but this will be the first release in which booting from a GPT partition table is supported. At the moment, 9.0 is a “bleeding edge” development branch and has not yet been released. However, it’s likely to be sometime this summer. Stay tuned!
james July 1st, 2011
Tags: boot, boot loader, bootloader, freebsd, gpt, guid partition table, operating system, partition, partition table