
eRacks Systems Tech Blog
Open Source Experts Since 1999
eRacks Expands NAS Lineup: 11 Models, 4 Bays to 100 Bays, From $1,995
eRacks Open Source Systems has expanded its rackmount NAS server lineup to 11 models, spanning from the 4-bay NAS4 at $1,995 to the 100-bay NAS100 at $29,995. The expansion targets the accelerating cost pressure of cloud storage subscriptions versus on-premise alternatives, with full Linux, ZFS, TrueNAS, and Ceph support across the entire range – and zero per-TB licensing fees.
The math behind on-premise NAS in 2026
Storing 100 terabytes on Amazon S3 costs roughly $27,600 per year in standard-tier fees. The same 100 TB sitting on an eRacks NAS24 – 24 bays, ~480 TB raw capacity – is a one-time $8,995 purchase. Payback is under four months.
Then there are egress fees. A single 100 TB pull from AWS to your office costs around $9,000 just to get your own data back. Cloud storage made sense when the data was small. At terabyte and petabyte scale, the math has flipped.
The lineup at a glance
| Model | Bays | Form Factor | Price (starting) | Best for |
|---|---|---|---|---|
| NAS4 | 4 | 1U or desktop | $1,995 | Branch office, dev team |
| NAS6 | 6 | 1U | $2,995 | Small office, light backup |
| NAS8 | 8 | 2U | $4,995 | SMB primary file server |
| NAS12 | 12 | 2U | $5,995 | SMB with growth headroom |
| NAS16 | 16 | 3U | $6,995 | Mid-tier file + backup |
| NAS24 | 24 | 4U | $8,995 | Mid-enterprise (the bestseller) |
| NAS36 | 36 | 4U | $10,995 | Mid-large workloads, scale-out node |
| NAS50 | 50 | 4U top-load | $14,995 | Media production, surveillance |
| NAS60 | 60 | 4U top-load | $19,995 | High-density archive, large backup |
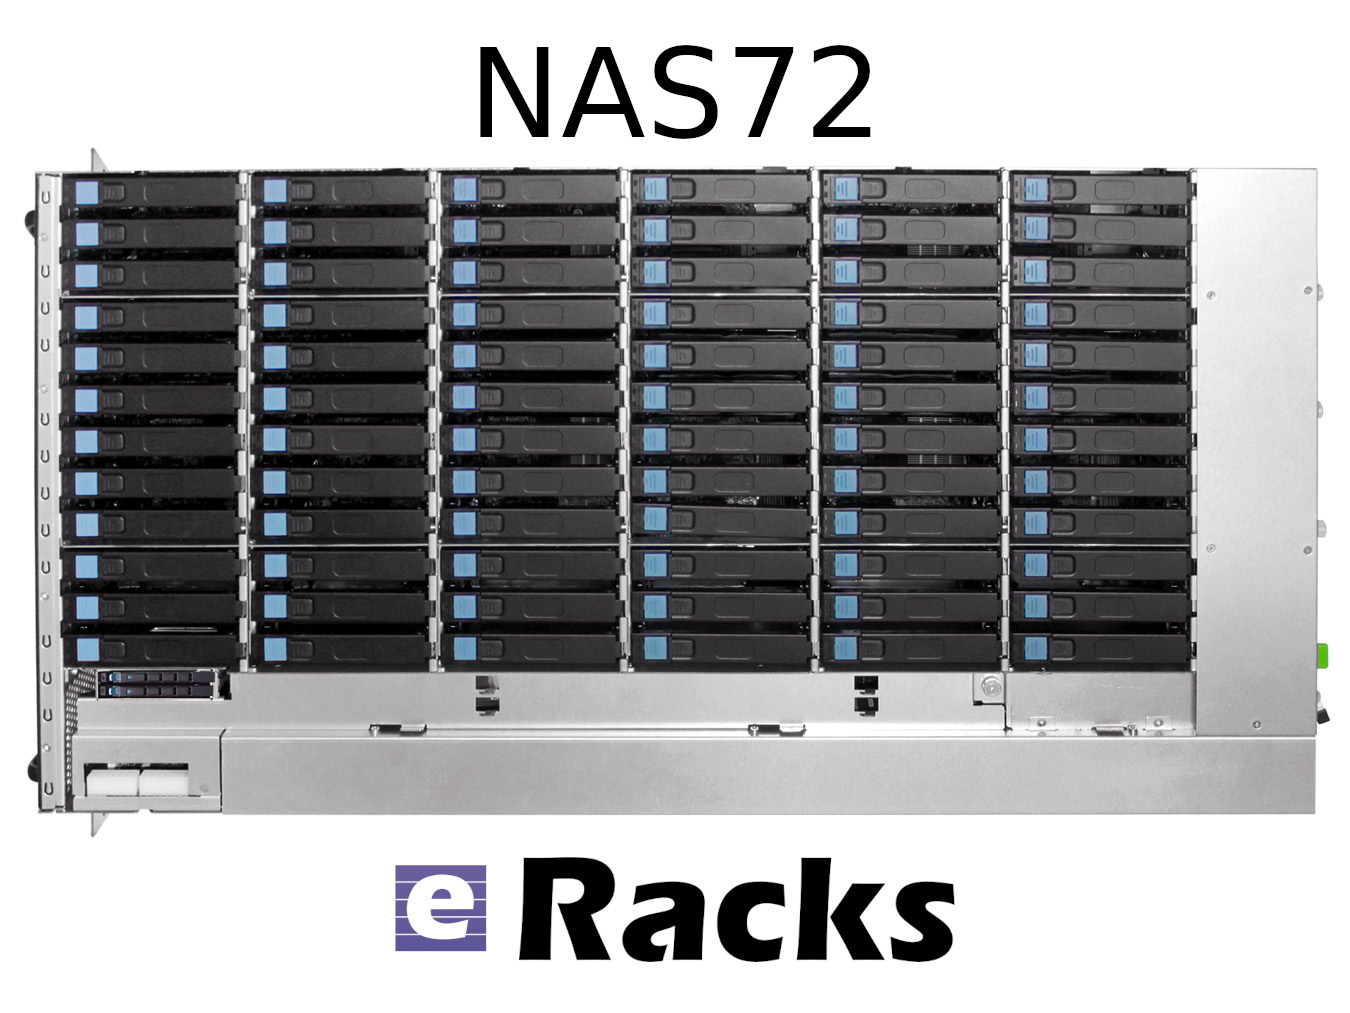
| NAS72 | 72 | 4U top-load | $24,995 | Broadcast, large-scale archive |
| NAS100 | 100 | 4U top-load | $29,995 | Petabyte-class, Ceph nodes |
Plus a parallel all-flash NAS lineup for performance-tier workloads: FLASH10 ($5,995), FLASH20 ($9,895), FLASH24 ($8,995), FLASH48 ($15,995), and FLASH72 ($19,985) – all-NVMe arrays for database backends, AI training datasets, virtualization storage, and any workload that needs IOPS rather than raw capacity.
Open source the whole way down
Every eRacks NAS ships with full Linux – not a locked appliance OS – and supports your choice of:
- ZFS with ECC RAM for data integrity
- TrueNAS Scale for the friendly web UI experience
- Ceph for clustered scale-out
- MinIO for S3-compatible object storage
- Nextcloud for private cloud file sharing
- OpenMediaVault for the lightweight option
- Proxmox if you want NAS + VMs in one box
No vendor licenses. No per-TB fees. Full root access. You own the OS, you own the data, you own the hardware.
Hardware standards across the line
ECC RAM as standard. Hot-swap drive bays throughout. Redundant power supply options on NAS12 and above. NVMe SSD caching on larger models for accelerated reads. 25 GbE networking on demand for AI training workloads, video production pipelines, and large-scale backup.
The lineup also scales without chassis replacement. A NAS50 shipping with 24 drives today expands to 50 as needs grow – no forklift upgrade required.
When does it pay off?
For most organizations storing more than 5 TB of business data, on-premise NAS is cheaper than cloud subscriptions in year one. For HIPAA-aligned healthcare deployments, law firms protecting privileged data, or any organization with data sovereignty requirements, on-premise is not just cheaper – it is the right architecture.
Custom-built since 1999
eRacks Open Source Systems has designed, built, and shipped custom Linux servers since 1999. Every system is configured to order, burn-in tested before shipping, and supported directly by engineers who built it. No call centers, no upsell scripts, no per-feature licensing.
Get a quote
The full NAS lineup is at eracks.com/products/rackmount-nas-servers. Contact us for a custom quote sized to your specific capacity, performance, and software-stack requirements.
joe April 29th, 2026
Posted In: Backups, Linux, NAS24, NAS50, NAS72, Storage
Tags: backup, Best-Practices, Cloud Storage Server, eRacks/NAS24, eRacks/NAS50, NAS, NAS24, NAS72, near-line storage, Storage, Storage Server
From 144TB to 2.6PB: The 2026 Storage Market and Why On-Premise NAS Is Back

The data storage market in 2026 is doing something unusual: it’s both growing fast and getting cheaper per terabyte at the same time. Global storage requirements are projected to nearly double by 2029, hitting roughly 20,000 exabytes. The NAS hardware market alone is forecast to grow from $55B today to $173B+ by 2034 – a 15.5% CAGR. And while all that’s happening, 30TB+ enterprise SATA drives have become genuinely mainstream, with retail prices that put petabyte-scale on-premise storage within reach of mid-sized organizations for the first time.
Meanwhile, the cloud-storage decade is hitting a wall. Egress fees on AWS, Azure and GCP have only gone up. Ransomware losses keep climbing. Healthcare, legal, finance, and government buyers are all asking the same question they used to leave for the IT department: where, exactly, is our data? The answer “somewhere in us-east-1” doesn’t satisfy a HIPAA auditor, a SOC 2 attestation, or a court order anymore.
The on-premise comeback is a hardware story
For years, the argument against running storage in your own rack was capex vs opex – “cloud is cheaper because you don’t buy hardware.” That math has flipped for any organization storing more than a few hundred TB. A 36-bay NAS loaded with 24TB drives gives you nearly a petabyte of raw storage for the price of about 8-10 months of equivalent S3 storage at production-tier rates – and the hardware keeps working for 5-7 years after that.
Three things made it flip:
- HDD prices at historic lows. 28TB and 30TB enterprise drives now sell for under $20/TB. A decade ago, that was 2TB-drive territory.
- ZFS and modern Linux file systems matured. ZFS in particular – with built-in checksumming, snapshots, replication, and dedup – has become the default storage layer for serious on-premise deployments. No vendor lock-in, no licensing tax.
- Cloud egress is the new vendor lock. Pulling 100TB out of S3 to migrate workloads costs more than the hardware that would store it locally for 5 years.
The eRacks NAS lineup
Our rackmount NAS line covers everything from a small workgroup file server to true petabyte-scale storage chassis. All ship with real Ubuntu Linux (your choice of file system – ZFS, XFS, or Btrfs), enterprise components (ECC RAM, redundant power supplies, hot-swap bays), and zero proprietary management software. The OS is yours, the data is yours, the hardware is yours.
| Model | Form | Bays | Max Raw | Starting |
|---|---|---|---|---|
| NAS4 | 1U | 4 | 144TB | $1,895 |
| NAS6 | 2U | 6 | 180TB | $2,795 |
| NAS8 | 2U | 8 | 240TB+ | $3,695 |
| NAS12 | 2U | 12 | 360TB | $4,695 |
| NAS16 | 3U | 16+2 | 288TB | $6,595 |
| NAS24 | 4U | 24 | 720TB | $8,995 |
| NAS36 | 4U | 36 | ~1PB | $10,495 |
| NAS50 | 9U | 50 | 1.3PB | $13,595 |
| NAS60 | 4U | 60 | ~2PB | $15,995 |
| NAS72 | 4U | 72 | 1.5PB+ | $19,995 |
| NAS100 | 4U | 102 | 2.6PB | $24,995 |
Starting prices are barebones (chassis, motherboard, PSU); add drives, RAM, OS choice at configuration. Custom builds welcome.
What you actually run on it
Because we don’t ship a proprietary OS, you get to pick the storage stack that matches your workload. Common combinations our customers deploy:
- File systems: ZFS (default for most deployments), XFS, Btrfs
- NAS / file sharing: TrueNAS, OpenMediaVault, Samba, NFS, iSCSI
- Distributed storage: Ceph, BeeGFS, MooseFS, LizardFS – for multi-node clusters and HPC workloads
- Object storage: MinIO (S3-compatible) – increasingly popular as a local target for AI/ML training datasets
- Private cloud: NextCloud, Seafile, OwnCloud, Proxmox VE, CloudStack
- Backup & sync: Bacula, BorgBackup, restic, rsync, Duplicati
Pre-installed and tested before shipping, or shipped bare for you to provision however you like – your call at order time.
Who’s actually buying these in 2026
Six segments dominate our NAS pipeline this year:
- SMBs and mid-market IT trying to escape per-GB cloud bills that have crept past the cost of hardware ownership
- Media and production companies with growing 4K/8K video libraries (one production house can fill a 720TB NAS24 in a year)
- Healthcare and medical practices with HIPAA and patient-data sovereignty requirements that rule out major cloud providers
- Legal firms archiving case files, depositions, and discovery materials that simply cannot leave the building
- AI/ML teams needing local high-speed datasets for training – typically pairing a NAS24 or NAS36 with our AI server line for the GPU compute side
- MSPs and IT consultancies building private cloud infrastructure for clients who want SaaS economics without surrendering data ownership
What we don’t do
We don’t build consumer NAS appliances. There’s no fancy iOS app to manage your photos. We don’t license a proprietary OS or lock you into a vendor ecosystem. If you want a four-bay desktop box with a slick web UI for your home media collection, we’re not your shop – and that’s fine, lots of good vendors serve that market.
What we do build: enterprise rackmount storage on standard Linux, configurable to your exact spec, that you fully own and can replace any component on. The same approach we’ve taken since 1999.
Get the configuration right
Drive count, RAID level, networking (10/25/100GbE), RAM (1GB per TB is the rule of thumb for ZFS), and OS choice all matter. Reply to this post or hit our contact page with rough requirements and we’ll spec it for you – usually same day.
joe April 8th, 2026
Posted In: Backups, Linux, Open Source, Rackmount Servers, servers, Storage
Tags: backup, ceph, Cloud Storage Server, eRacks, eRacks signature service, eRacks/NAS24, eRacks/NAS36, eRacks/NAS50, MooseFS, NAS, NAS24, NAS36, NAS50, NAS72, Privacy, Rackmount, sata
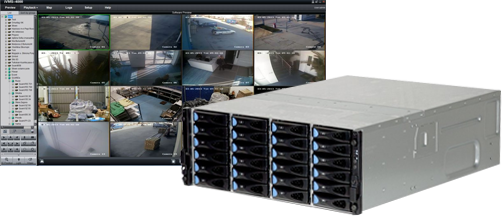
eRacks Releases Surveillance and Security systems
Worried about your choice of surveillance system for your premises, not sure what system is more suitable to your needs? Confused where to invest your hard-earned money for your security apparatus? We at eRacks got you covered!
Our top of the line products and their tech are briefly described for you because we at eRacks believe a market educated consumer is a happy and long-term customer. Besides, not one shoe fits all, so why should one system be used for all your needs?.
eRacks has always emphasized on its diversity in its products.
“A diverse security apparatus is a strong security apparatus”
-Joseph Wolff, CTO, eRacks
Hence, we are offering three variants of surveillance systems
- eRacks/HVR (Hybrid Video Recorder)
- eRacks/NVR (Network Video Recorder)
- eRacks/DVR (Digital Video Recorder)
Each of the technology we are offering to our valuable clients are discussed in detail below
- eRacks/HVR (Hybrid Video Recorder)
eRacks/HVR (Hybrid Video Recorder) is quickly growing in popularity because of its versatility. Hybrid video recorders (eRacks/HVR) are compatible with both standard analog signal and IP network cameras, allowing the users to continue using their current installed analog security system while gradually shifting to the latest network IP technology. It grants the flexibility to upgrade the existing surveillance system to IP equipment according to the user’s budget and specifications.
A hybrid system integrates existing analog cameras into an IP network, providing the user with all the advantages of an IP system excluding the HD resolution of IP cameras. In a hybrid CCTV system, footage is recorded in analogue quality however the IP network features of indexing, bookmarking, and retrieval are made available through the Hybrid eRacks/DVR.
eRacks/HVR (Hybrid Video Recorder) is best suited to record video footage in a digital format to storage array. It accommodates both IP and analog cameras and captures video/images through an Ethernet network via Cat5 / Cat6 cables from IP cameras as well as coaxial cables from analog cameras. It is mostly used for physical security applications. This option is a good choice when planning for future expansion into an IP video surveillance system as the existing analog cameras can be reused and incorporated into the system without any drop in coverage.
eRacks/HVR comes with a variety of channel counts, and storage capacities to ideally suit many applications. It also supports smart features, including event search, event log, and email notification; a free mobile app that allows users to watch live or playback video from their smartphone. Multi-site video management from anywhere in the world can be done using eRacks/HVR as well.
- eRacks/NVR (Network Video Recorder)
eRacks/NVR stands for Network Video Recorder which is a specialized hardware and software solution used in the IP video surveillance systems. This system records and store video footage directly from the network it lives on for the purpose of their storage and subsequent playback. They work with an advanced type of camera, called IP cameras. IP cameras can actually capture and process video and audio data themselves by using either an Ethernet cable or wirelessly via an existing Wi-Fi network. The eRacks/NVR does not contain any special equipment for capturing video because it receives the video streams already encoded by the IP cameras in a digital format. To support the expanded set of features and user-friendliness, the eRacks/NVR uses standard computers with standard operating systems.
eRacks/NVR systems process the video data on the camera rather than on the recorder by using IP cameras which are standalone image capturing devices. IP cameras have a chipset which processes the video data which is then transmitted to a recorder. It is capable of recording and sending audio as well as video. The more powerful hardware on IP cameras also enables improved smart functionality and video analytics, such as facial recognition. eRacks/NVR systems connect the camera to the recorder, but this is done using standard Ethernet cables, such as cat5e and cat6, to transmit data. eRacks/NVR recorders are only used for storing and viewing the footage.
eRacks/NVR systems are inherently more flexible because security cameras don’t necessarily have to be physically connected directly to the recorder. Instead, IP cameras only have to be on the same network. The video quality is also better as eRacks/NVR recorders receive a pure digital signal from the cameras. All cameras with microphones can record audio to the eRacks/NVR because Ethernet cables carry audio. eRacks/NVR systems tend to have better picture quality, as well as easier installation, are reliable, stable, provide increased flexibility, have a user-friendly interface for day-to-day use, and native support for audio on every camera that has a microphone. However, eRacks/NVR systems also tend to be quite a bit more expensive which is a huge constraint for budget conscious people.
- eRacks/DVR (Digital Video Recorder)
eRacks/DVR (Digital Video Recorder) has been updated for a better performance than ever. It is mostly used for physical security applications. These eRacks/DVR solutions are highly scalable and can be tailored according to the client’s needs. They can also be configured for home to enterprise class support. eRacks/DVR is a little lower priced than other available systems which makes it more attractive.
The eRacks/DVR (Digital Video Recorder) is a specialized computer system that records video in a digital format and stores it in disk drives or other mass storage devices. This updated version provides 432 TB of Surveillance Storage Drives along with optimized Digital Video recording and viewing. It normally uses analog cameras that are also called CCTV cameras, for recording. The cameras and eRacks/DVR are connected using a coaxial cable which are not very costly. Coaxial cables that were previously installed for other security systems can also be used for eRacks/DVR. This combination is more cost-effective and easier to set up; however, the resolution is usually limited to D1 (720×480). Proximity is a limitation as the analog cameras cannot be more than 700-1000 feet away from the eRacks/DVR without visible degradation in video quality.
The eRacks/DVR recorder relies on a chipset that is called AD Encoder for processing the raw data streaming from the camera into legible video recordings. eRacks/DVR systems also have different requirements when it comes to the recorder i.e., the user must connect every camera directly to the recorder. Moreover, the recorder is not responsible for providing power to the cameras. Each camera connection needs a splitter that supplies power which in turn enable cameras to function. eRacks/DVR systems can only use wired security cameras. eRacks/DVR systems also have less flexible mounting solutions because routing coaxial cable can be more difficult in tight situations and a power outlet is required for each camera. Coaxial cables don’t natively transmit an audio signal, and eRacks/DVR recorders usually have a limited number of audio input ports. eRacks/DVR Home surveillance systems are easy to set up and can be accessed through a web browser. The user is notified by email if an alarm is triggered. eRacks/DVR Server offers standard 1year full / 3year limited warranty and come with pre-configured latest Open-Source software based on the user’s specifications.
Hamza April 16th, 2021
Posted In: Products, security, servers, Storage, Technology
Tags: Archive Drives, backup, CCTV, closed circuit, Cloud, firewall, network, New products, operating system, seagate, security, Storage, surveillance, Technology
How to Avoid Pain and Suffering when Upgrading Desktop-Oriented Linux Distributions
This article is geared toward eRacks customers who have a desktop or laptop system, i.e. a personal workstation. It is not intended to serve as a guide for customers wishing to upgrade a server.
With the above in mind, for those who use Linux on such a machine, your choice of distributions that cater to this niche is growing nicely. You have the “Big Boys” such as Ubuntu, Fedora, Mandriva or OpenSUSE, as well as a host of more specialized distributions, the main focus of most being on user friendliness and “up-to-dateness.” What this usually leads to is a faster upgrade cycle than what you would typically find on a server oriented distro such as Debian (stable), RedHat Enterprise, SuSE Enterprise or CentOS.
I myself have been tracking RedHat (including Fedora) since version 5.0, doing a mix of upgrades and fresh installs. I have also kept up with Ubuntu since 6.04, and have had similar experiences with it. I have found that one way of making regular upgrades easier is to keep a separate /home partition. This way, you have a choice of an upgrade or a fresh install, without losing valuable data.
My experience, and that of many other salty seasoned Linux gurus, is that upgrading from a previous version tends to be a bit messier and usually takes longer to do than a fresh install. This can be true, especially if you use third party repositories, if you install software not maintained by your distro package manager (DEB or RPM) or if you do a lot of tweaking. Doing so may leave you looking at a broken system when the upgrade finishes. For this reason, it is usually more desirable to do a clean installation and install your third party applications afterward.
How then to keep from losing your data? Many system admins would suggest the multiple partition method, which has been used on servers a lot, yet not so much on the desktop. The multiple partition method can have advantages and disadvantages, but since hard drives are so big these days, many of the disadvantages are no longer prevalent.
While most modern desktop distros have a default partitioning scheme that gives you just a swap partition (usually about 2x the amount of RAM, or physical memory) and a large root partition for everything else, most server configurations have multiple partitions for directories like /usr or /var, which can have many advantages. For example: if you wanted to have /usr mounted as read-only to prevent unauthorized system-wide software installs, if you wanted to keep /boot separate for a RAID array or if you wanted to keep /var and /tmp separate to avoid corrupting the core system files; these are all examples of why one might want to make use of multiple partitions. In this case, however, the partitioning must be very carefully planned according to the intended use of the server, what programs need to be installed, how many users will be logging in, etc.
Luckily, there is a happy medium that works well for desktops, and that is to use a swap partition with 2x the amount of RAM, a root partition for your operating system and a very large /home partition for all your data. When you do a fresh install, all you have to do is make sure you don’t format /home, and your data will be safe across installations. If you want to save any system-wide tweaks, you will, of course, also have to backup important configuration files and check them against their replacements, making changes where necessary.
In my case, I have a 120GB hard drive for Linux, which makes use of the following partition scheme:
20GB /
75GB /home
1GB /swap
14GB “other” (at times it has a Gentoo install, other times it has FreeBSD, depends on my mood…)
I have found through experience that this setup works well.
When I do an OS update, such as my recent one to Fedora 9, I usually backup important configuration files to /home, do a fresh install and finally install any third party programs I need.
In the past, when upgrading systems without doing a fresh install, things for me have tended to get rather wonky. However, I have recently tried upgrading Ubuntu, and I must say that the recently improved Upgrade Manager, a graphical front end to the apt-get dist-upgrade functionality, is a nice touch. It allows you to upgrade to the next version of Ubuntu, while still allowing you to run your system so you can go about your business as it downloads and installs all the packages. When it’s done, you simply reboot, and voila, new version! Upgrades on Fedora, by contrast, are still usually done by the tried and true method of booting the install disk and running the upgrade procedure. Fedora does have the capability to do upgrades using the yum package manager, but that functionality isn’t as mature as apt-get dist-upgrade, and thus is not for the faint of heart.
So now, what if you have an existing Linux installation utilizing only a single partition and you want to do a fresh install while keeping your data safe?
Of course, you could just back your data up to a large external hard drive, but not everyone has one at their disposal. In this case, what you could try is resizing your root partition, create a new partition for /home and copy your personal data to it before starting the upgrade. Then, just run through the installation as usual. This is, of course, only if you have enough space to resize. If not, you may still require an external drive, at least temporarily, to copy your data to before starting the installer.
If you want to make use of multiple partitions on a new eRacks system purchase, just ask for it during your order. This way, your system will be ready when the next OS update rolls around!
Matt
Matt June 27th, 2008
Posted In: How-To, Laptop cookbooks, Upgrades
Useful commands for backing up filesystems
Have you ever needed to backup the contents of one or more filesystems to another machine, yet you only had a single hard drive in the machine being backed up and found that you lacked the temporary disk space necessary to create your backup before shuttling it across the network to its final destination?
As an example, when I backup my laptop, I have too many gigabytes of data to realistically store my data on DVD-R’s, and my only option is to create a tarball of the root filesystem and store it on another machine on my network. The problem is that if I try to create a backup of my laptop’s contents, I find that the resulting tarball backup is too large to fit on the hard drive along with all the data.
One solution that I’ve found to this problem is to avoid storing the backup on the source machine altogether. Through stdin and stdout, along with the magic of *NIX pipes, we can stream the data in realtime over to its destination, and only then write it to disk.
Before we begin, it is very important to note that in most situations, you’ll have to boot into another environment and manually mount your partition before proceeding, particularly when dealing with an operating system’s root filesystem. Otherwise, not only will tar choke on certain directories like /proc and /dev, the contents of the disk will also continue to change as the backup is being made, leading to inconsistencies between the data on your filesystem and the data in the backup.
With that in mind, assuming that you have ssh installed and configured correctly on both the source and destination computers, you can create a backup with the following commands (as root):
#cd /path/to/your/mounted/filesystem
#tar -jcvp | ssh username@destination “cat > /path/to/backup.tar.bz2”
If you prefer to use gzip as opposed to bzip2, replace the above tar command with the following:
#tar -zcvp | ssh username@destination “cat > /path/to/backup.tar.gz”
Now, let’s say that you’ve created a new partition and want to restore a previous backup. Again, assuming that ssh is configured properly on the source and the destination machines, and assuming that you’ve mounted your partition, you would recover your backup with the following commands (again, as root):
#cd /path/to/your/mounted/filesystem
#ssh username@destination “cat /path/to/backup.tar.bz2” | tar -jvxp
If the backup is a gzipped archive, then replace the above tar command with the following:
#ssh username@destination “cat /path/to/backup.tar.gz” | tar -zvxp
Note that the user specified by ‘username’ above should have read/write permissions on the directory where the backup is to be stored for this procedure to work.
The astute reader will probably notice the missing -f option, which one usually passes to tar. The reason for this is that it tells tar to write its data to, or read its data from, a file. However, by ommitting it, we tell tar to send its output to stdout, or to receive its data from stdin when reading from an archive, which allows us to make use of pipes. It’s situations like these where the power of *NIX really shines!
james May 28th, 2008
Posted In: Backups
Tags: backup, bzip, bzip2, filesystem, gzip, partition, ssh, zip