
eRacks Systems Tech Blog
Open Source Experts Since 1999
Fedora 28 Released!
Fedora 28 is now available on all eRacks systems.
“Choose Freedom. Choose Fedora.”
Surprised! Well this tag line is directly from the Fedora 28 official website, a complete Linux based Operating System. Fedora released their ‘Fedora 28 Final version‘ on ‘2018-05-01‘. It is very well known that ‘Fedora’ is always free for anyone to use, modify, and distribute. It is built and used by people across the globe who work together as a community known as ‘The Fedora Project’. Under the tagline Fedora offers,
“Less setup, more innovation. Choose a flavor of Fedora
streamlined for your needs and get to work right away.”
Fedora 28 provides software to suit a wide variety of applications. The storage, memory and processing requirements vary depending on usage. For example, a high traffic database server requires much more memory and storage than a business desktop, which in turn has higher requirements than a single-purpose virtual machine.

Fedora 28
Fedora 28 is offered in 3 different streamlined flavors as,
As flavor Fedora Workstation is a polished, easy to use operating system for laptop and desktop computers, with a complete set of tools for developers and makers of all kinds.
Fedora Server is a powerful, flexible operating system that includes the best and latest datacenter technologies. It puts you in control of all your infrastructure and services.
And Fedora Atomic provides the best platform for your Linux-Docker-Kubernetes (LDK) application stack.
What’s New in Fedora 28!
It’s a great thing that Fedora 28 Accepted System Wide Changes Proposals and these changes have been made by the Fedora Engineering Steering Committee for the Fedora 28 Release as System Wide Changes.
Fedora 28 Boost 1.66 upgrade
This change brings ‘Boost 1.66.0’ to Fedora 28. This will mean F28 ships with a recent upstream Boost release.
The aim is to synchronize Fedora with the most recent Boost release. Because ABI stability is one of explicit Boost non-goals, this entails rebuilding of all dependent packages. This has also always entailed yours truly assisting maintainers of client packages in decoding cryptic boost-ese seen in output from g++. Such care is to be expected this time around as well.
AArch64 Server Promotion
Fedora community promoted Aarch64 server technologies to Primary Architecture status. This would include the Server installer, the DVD installer ISOs, the Cloud (qcow2 images) and Docker base images to the same status as other primary Server architectures. This would NOT currently include other components such as Workstation images/installs, any of the various spins, or Fedora Atomic components.
Though Fedora developers are looking to promote their AArch64 / ARM64 / ARMv8 server offerings to being a “primary architecture” for this next Fedora release but The Fedora AArch64 server installer, Cloud images, and Docker base images would be the same status then as the other primary server architectures like x86_64.
This promotion wouldn’t affect Fedora Workstation 28 with 64-bit ARM not being a primary architecture on that front for the time being. Additionally, it wouldn’t affect Fedora Atomic either.
The Red Hat / Fedora developers are confident in their AArch64 support now and believe on the server front it’s ready to be a primary architecture.
Among the supported AArch64 platforms by Fedora include the 96Boards HiKey, 96Boards Dragonboard, ARM Juno, Rapberry Pi 3, Pine64, and others.
GNOME 3.28
Fedora 28 will also feature the latest version of GNOME desktop environment, GNOME 3.28. GNOME 3.28 has some improvements to the Calendar, Contacts and Clock apps. The default Cantarell font has been updated as well. Default video and music players of GNOME now support more media formats.
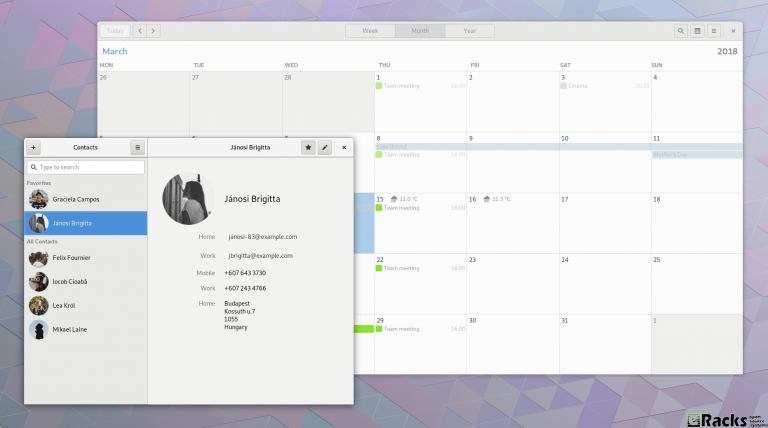
GNOME 3.28
A new Usage application has been introduced in GNOME 3.28 for examining CPU and memory consumption.
You can find the new features in GNOME 3.28 on its official website.
Anaconda modularization
Anaconda installer splits into several modules those communicate over DBus using stable API.

Anaconda Modularization
When talking about the Fedora/RedHat Anaconda installer it still brings back bad memories from the Anaconda fallout a few years ago when they went through some painful transitions that also led to release delays. In 2018, Fedora/RedHat developers are taking up the initiative of modularizing the Anaconda installer.
For the Fedora 28 release due out this spring, the plan is to split the Anaconda installer into several modules that in turn will communicate with eachother using a DBus API. The modularization effort sounds nice as long as it goes smoothly and doesn’t lead to any fallout like with past Anaconda overhaul initiatives (though admittedly Anaconda has been playing nicely the past number of releases and no complaints on my end currently).
Annotated Binaries
This change causes extra information to be stored in binary files compiled by gcc. This information can be used by scripts to check on various features of the file, such as the hardening options used or potential ABI conflicts.
A new feature being considered for Fedora 28 is Annobin as a new GCC plugin that would implant extra information into generated binaries.
The GCC Annobin plugin would store extra information within binary files. Among the possibilities are storing ABI details, hardening options, or other build information into binaries that in turn could be picked up by used by other scripts for e.g. detecting potential ABI conflicts or embedding unit test results.
Annobin stores information in Fedora’s toolchain watermark format and currently this plugin is just for GCC.
The proposal for incorporating Annobin by default in Fedora 28 is outlined on the Fedora Wiki while this change more broadly outlines their toolchain watermark work.
Already this proposal has received some criticism, namely that embedded extra information into binaries will increase the file size but this embedded information isn’t relevant to all users, so perhaps it may be better kept into the debug-type builds.
Cloud-base and Container images for s390x
This change is to bring s390x architecture closer to other Fedora architectures by adding widely used Fedora variants. This includes container images and Cloud-base images (qcow2 and raw format).
Deprecate TCP wrappers
TCP wrappers is a simple tool to block incoming connection on application level. This was very useful 20 years ago, when there were no firewalls in Linux. This is not the case for today and connection filtering should be done in network level or completely in application scope if it makes sense. After recent discussions I believe it is time to go for this package, if not completely, then at least as a dependency of modern daemons in system by default.
Add-On Modularity
Beginning in Fedora 28, Fedora will provide a new set of repositories for software and updates with alternative versions from those shipped in the default release.
Improved Laptop Battery Life
No more manual tweaks! Fedora 28 will deploy several tweaks on its own to provide improved battery life. Improve Fedora (Workstation) Battery Life by enabling various hardware power-saving features by default.

Improved Laptop Battery Life
Fedora 28 will have the following power management tweaks:
- Enabling auto-suspend for Intel HDA codecs saves around 0.4 W.
- Enabling SATA ALPM by default saves up to 1.5 W.
- Enabling i915 Panel Self Refresh by default saves around 0.5 W.
With these tweaks in place, some laptop models will see up to 30% of battery life improvements. While ‘power users’ can do these tweaks manually and achieve the same result, the idea is to provide an out of the box experience to every Fedora user. Indeed, a good thinking there.
Drop TCP wrappers support, OpenLDAP defaults to use only Shared System Certificates
TCP wrappers are being deprecated in Fedora. Also, upstream discourages its usage in favour of other means of protection (e.g. firewall). After this change OpenLDAP will no longer be affected by TCP wrappers configuration.
In order to go forward with adoption of SharedSystemCertificates after this change OpenLDAP clients and server will default to use only the system-wide certificates store.
Switch OpenLDAP from NSS to OpenSSL
Currently, OpenLDAP in Fedora is compiled with NSS (aka MozNSS) for crypto. OpenLDAP is going to be compiled with OpenSSL, instead.
Reduce Initial Setup Redundancy
Currently there is a high level of redundancy between the Anaconda installer and gnome-initial-setup. This change aims to eliminate these redundancies and streamline the initial user experience in Fedora Workstation.
To make Fedora more beginner friendly, Fedora 28 Workstation will have fewer ‘questions’ to answer at the install time. There will be no root password anymore and the user password itself will be sufficient for the root actions, same as Ubuntu.
There will be some more code changes to reduce the redundancy between Anaconda installer and gnome-initial-setup.
Ruby 2.5
Ruby 2.5.0 is the latest stable version of Ruby. Many new features and improvements are included for the increasingly diverse and expanding demands for Ruby. With this major update from Ruby 2.4 in Fedora 26 to Ruby 2.5 in Fedora 28, Fedora becomes the superior Ruby development platform.
Ruby 2.5.0
Packaging Rust applications/libraries
Added required tools/instructions for packaging applications/libraries written in Rust. Rust is a systems programming language that runs blazingly fast, prevents segfaults, and guarantees thread safety.
Enabling Python Generators
This change enables the ability to choose to use the Python module dependency generator for packages that provide Python Egg/Wheel metadata.
Django 2.0
This change is about upgrading python-django to version 2.0. The latest Django release drops support for Python 2, but a few Django apps packaged in Fedora do not yet support Python 3. A compatibility package will be provided for those.
Python 3.6 + Django2.0 on Fedora 28
Kerberos in Python modernization
Replace usage of python-krbV and pykerberos with python-gssapi in all Fedora packages to enable their removal from Fedora. rharwood will author all necessary code changes; no new code from maintainers is required.
VirtualBox Guest Integration
VirtualBox is popular, easy to use virtual-machine software. The purpose of this change is to ship the VirtualBox guest-drivers and -tools by default in the Fedora workstation product.
Fedora 28 will see the addition of guest-drivers to the Fedora kernel package, packaging the userspace-tools (VirtualBox Guest Additions) and adding the VirtualBox Guest Additions package to the default package list for the Workstation product.
This means using Fedora in VirtualBox will have a better experience.
Stratis Storage
Add initial support for Stratis, a local storage management solution. This will allow initial testing and user feedback that will guide Stratis’s development and stabilization.
VA-API 1.0.0
This change is about upgrading libva and others to version 2.x. This change affects several multimedia players as there are both API and ABI changes. This will allow some VA-API backends to be updated, improving support for recent hardware.
librealsense2
A new version of librealsense has been released, which does not support older camera versions. Bump librealsense to the new release and add the old library as librealsense1.
java-openjdk 10 – rolling release for Short Term Support releases of OpenJDK
OpenJDK have release cadence of 6 months. but 3/4 of them are Short Term Supported for 6 months only. This package is designed to harbore them. Currently it is built on openJDK 10. LTSs (next is 11) will go as separate packages.
PHP 7.2
Update the PHP stack in Fedora to latest version 7.2.x.
Including these Engineering Steering Committee also made others important change as
- GCC8
- GHC 8.2
- The GNU C Library version 2.27
- Glibc collation update and sync with cldr
- Hardening Flags Updates for Fedora 28
- IBus Unicode Typing
- Switch libidn-using applications to IDNA2008
- NIS switching to new libnsl to support IPv6
- NSS Default File Format SQL
- Rename “nobody” user
- Replace glibc’s libcrypt with libxcrypt
- Strong crypto settings: phase 1
- Removal of Sun RPC Interfaces From glibc
- Golang 1.10
- Switch libcurl to use libssh instead of libssh2
- A new time tool version 1.8 has changed output format.
- Make authselect default tool instead of authconfig
- Binutils version 2.29.1
- Update Erlang/OTP to version 20.
- Update fontconfig package to Fontconfig 2.13 as latest version.
- Update the giflib package to the latest giflib-5.x version (currently 5.1.4).
- Update Sugar to the new upstream 0.112 stable feature release.
- Enabled Thunderbolt 3 peripherals in a secure way hardware out of the box.
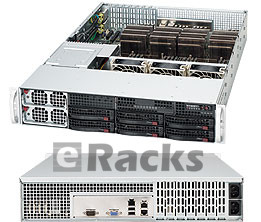
eRacks/NAS6
Get your Systems as per-configured with Fedora 28 or with any other Open Source Operating System from eRacks Store.
Minimum System Configuration for Fedora 28
The figures below are a recommended minimum for the default installation. Your requirements may differ, and most applications will benefit from more than the minimum resources.
- 1GHz or faster processor
- 1GB System Memory
- 10GB unallocated drive space
Low memory installations
Fedora 28 can be installed and used on systems with limited resources for some applications. Text, VNC, or kickstart installations are advised over graphical installation for systems with very low memory. Larger package sets require more memory during installation, so users with less than 768MB of system memory may have better results preforming a minimal install and adding to it afterward.

Installation Fedora 28
Note:For best results on systems with less than 1GB of memory, use the DVD installation image.
Display resolution
Graphical Installation requires 800×600 resolution or higher
Graphical installation of Fedora requires a minimum screen resolution of 800×600. Owners of devices with lower resolution, such as some netbooks, should use text or VNC installation.
Once installed, Fedora will support these lower resolution devices. The minimum resolution requirement applies only to graphical installation.
Minimum Hardware for Accelerated Desktops
Fedora 28 supports most display adapters. Modern, feature-rich desktop environments like GNOME3 and KDE Plasma Workspaces use video devices to provide 3D-accelerated desktops. Older graphics hardware may not support acceleration:
- Intel prior to GMA9xx
- NVIDIA prior to NV30 (GeForce FX5xxx series)
- Radeon prior to R300 (Radeon 9500)
- CPU Accelerated Graphics
Systems with older or no graphics acceleration devices can have accelerated desktop environments using LLVMpipe technology, which uses the CPU to render graphics. LLVMpipe requires a processor with SSE2 extensions. The extensions supported by your processor are listed in the flags: section of /proc/cpuinfo
Choosing a Desktop Environment for your hardware
Fedora 28’s default desktop environment, GNOME3, functions best with hardware acceleration. Alternative desktops are recommended for users with older graphics hardware or those seeing insufficient performance with LLVMpipe.
Desktop environments can be added to an existing installation and selected at login. To list the available desktops, use the dnf grouplist command:
Install the desired group:
Or, use the short group name to install:
Get Fedora 28
If you want to have your system pre-configured with Fedora 28, simply choose as your Fedora Linux 28 Workstation / Server or Atomic for your “Operating System’ option with eRacks/FLASH10 or with any other system from eRacks Store. You Could call or email us for the configuration details. We do cover your requirements with our systems.
eRacks/FLASH10
Or, Fedora 28 is available to download in ISO format from here. It is available in various flavors mainly Fedora 28 Workstation for desktops, Fedora 28 Server for servers and Fedora 28 Atomic for containers.
Asif Raihan May 8th, 2018
Posted In: New products, News, Open Source, Operating Systems
Tags: fedora, linux, Open Source, operating system
Install and Configure Bind9 DNS Server service on Ubuntu 16.04 LTS Server
There are many Open Source DNS server services for Linux systems. Here we’ll discuss about installing and configuring one of the most popular DNS server services among them known as “Bind9”. We’ll use another most popular Debian based Linux server operating system distributed by Canonical which is Ubuntu 16.04 LTS Server edition.
Other good DNS implementations include the native OpenBSD DNS implementation, as well as Dan Bernstein’s tinyDNS (AKA djbdns), but these are topics for future articles. (We use djbdns on OpenBSD, internally).
Successfully installing and configuring Bind9 Server service on Ubuntu 16.04 LTS server edition require several steps. For better understanding we’ll divide the total process into two main steps as ‘Basic installs’ and ‘Securing the DNS Server’ service. Each main category could be divided into several additional steps.
Basic Installing Steps:
- Install fresh Ubuntu 16.04 LTS Server OS on a server.
- Preparing the Ubuntu 16.04 LTS Server OS for installing Bind9 DNS Server Service.
- Install Bind9 DNS Server Service and configure Caching-only name server.
- Install and configure Primary DNS server or Master DNS server.
- Bind9 Post installation Configurations for successful service run on Ubuntu Server.
- Install and configure Secondary DNS server or Slave DNS server.
Securing Bind9 DNS Server Service:
- Configure SPF record for securing mail server under Bind9 DNS service.
- Configure DKIM record for securing mail server under Bind9 DNS service.
- Configure DNSSEC signing on Bind9 DNS Server Services.
- Configure DMARC Record for securing mail server under Bind9 DNS service.
For this tutorial we’ll use ‘eracks.com’ as domain and local IP address for demo and real time configurations (tested) behind the NAT network. The global & dedicated Systems could be configured just by replacing with your own domain and real IP assigned from your ISP. If you need further assistance please contact our eRacks Systems’ experts. Also, you could buy securely configured “DNS Server” as your requirements from eRacks Systems’ showRoom without any hassle. For your requirement please checkout.
For configuring DNS Servers we’ll use private IP from 192.168.88.0/24 network block where the usable Host IP Range is: 192.168.88.1 – 192.168.88.254; and Subnet Mask: 255.255.255.0. Our Router/NAT-gateway IP address is already configured as 192.168.88.1.
IP Address Block:	192.168.88.0/24
Usable Host IP Range:	192.168.88.1 - 192.168.88.254
Broadcast Address:	192.168.88.255
Total Number of Hosts:	256
Number of Usable Hosts:	254
Subnet Mask:	255.255.255.0
Wildcard Mask:	0.0.0.255
| Options | Primary/Master DNS Server | Secondary/Slave DNS Server | Client/Host Server |
| Host Name | dnsmaster | dnsslave | hostserver |
| Domain | eracks.com | eracks.com | eracks.com |
| IP Address | IPv4: 192.168.88.17 IPv6: ::8817 |
IPv4: 192.168.88.250 IPv6: ::8250 |
IPv4: 192.168.88.17 IPv6: ::8221 |
| FQDN | dnsmaster.eracks.com | dnsslave.eracks.com | hostserver.eracks.com |
Enough talk – Let’s see how it’s done!
eRacks/DNS

Get your Own Open Source DNS Server as pre-configured as ‘plug & Play’ from eRacks Systems’ ShowRoom.
Step 1: Install fresh Ubuntu 16.04 LTS Server OS on a server.
For learn how to install a fresh copy of Ubuntu 16.04 LTS Server OS on a server system visit this link.
Step 2: Preparing the Ubuntu 16.04 LTS Server OS for installing Bind9 DNS Server Service.
After installing, login the server directly or using SSH tunnel with IP address with user with root privileges.
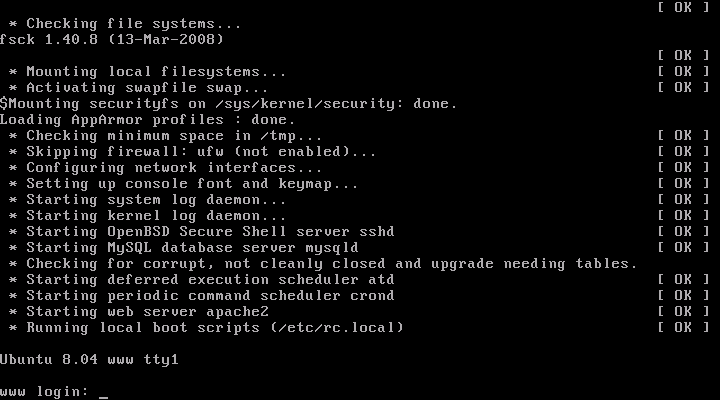
The login screen will look like this;
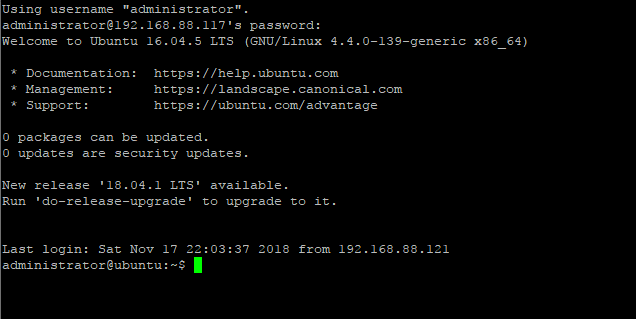
Then run the following command and press enter and your given password to update the system.

For avoiding “sudo” command, we’ll configure the server as ‘root’ user. To do so, type the following command and press enter.

Once the Update and Upgrade are done as root user, we need to edit the network interface for setting up the static IP address for the system with the following command;
Here On the popped-up screen find # The primary network interface and replace the beneath lines with the following;
# Static Primary Network Interface IPv4 Address
# Required for IPv4 (A) Records
auto eth0
	iface eth0 inet static
	address 192.168.88.17
	netmask 255.255.255.0
	network 192.168.88.0
	broadcast 192.168.88.255
	gateway 192.168.88.1
	dns-nameservers 8.8.8.8 8.8.4.4
	dns-domain eracks.com
# Optional Static IPv6 Address for Primary Network Interface
# Required for IPv6 (AAAA) Records
iface eth0 inet6 static
	address fe80::215:5dff:fe58:6500
	netmask 65
	gateway fe80::2a3b:82ff:fe74:58f6
Once it is done, press Ctl + X to exit and Press ‘Y’ then Enter button to save the changes.
Next, we need to set up the hostname for this server. Thus, Run the following command to edit the host name;
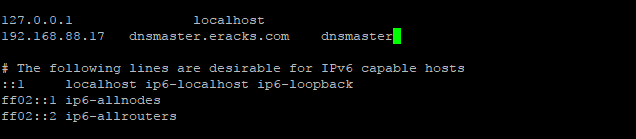
On the popped up screen replace the existing default host name “Ubuntu 16.04 LTS” with “dnsmaster” (since we’ll be setting the hostname as “dnsmaster“) then Press control + X to exit. And Press ‘Y’ then Enter button to save the changes. And then Run the following command to edit the hosts file;
Replace the existing with the following host record entries with the following;
The entries will look like this;
Once done, press control + X to exit and Press ‘Y’ then Enter button to save the changes and reboot your system with the “reboot” command.
After rebooting and login to the server we’ll see that the default host name “ubuntu” is replaced with hostname “dnsmaster”. To get assure we could check the hostname and FQDN with the following commands respectively;
root@dnsmaster:~$ hostname -f

Once these are done the system is ready for installing the Bind9 DNS Server Service. And we could proceed to the next steps.
Note:We’ll login as as root user from the start.
Step3: Install Bind9 DNS Server Service and configure Caching-only name server.
Before installing ‘Bind9’ DNS Server on this server we need to make sure all the packages are up to date. So, we’ll update and upgrade all the apt packages with following command;
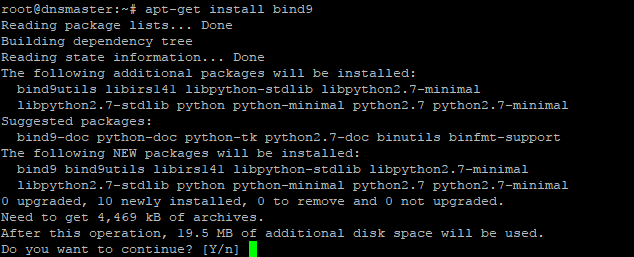
Once the Update and Upgrade are done, we’ll install the ‘Bind9’ Packages with the following command;
The screen will pop up for your permission for using additional disk space. For approval, press “Y” and then Enter button for installing the packages. The installation process will take a few whiles.
When the installation is done the system is ready for configuring Caching-only name server with Bind9 DNS Server service package. For configuring Caching-only name server run the following command.
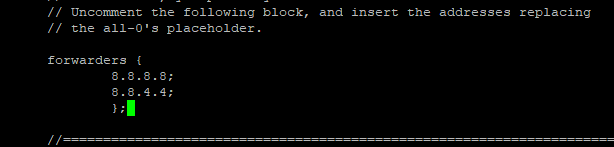
On the popped-up screen find & uncomment the forwarders & set the forwarders as follows with google public DNS IP address & or with your ISP’s DNS IP address.
The entries will look like this
Next, press control + X to exit and Press ‘Y’ then Enter button to save the changes. And restart the Bind9 DNS Service with the following command.
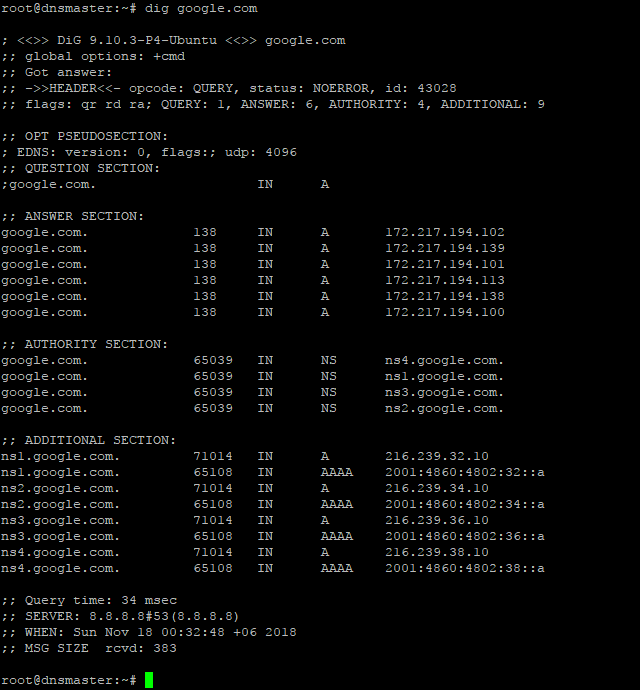
For testing the Caching-only name server we need to run the dig command as follows;
If everything is okay, the command will dig up the following records;
Step4: Install and configure Primary DNS server or Master DNS server.
Before proceeding further, first we need to make sure the Ubuntu server is up-to-date. We could make sure by running the following commands;
Before configuring Primary Name Server with Bind9, we could verify all the required packages are installed by running the following command;
Once it is done, we are ready to configure our Primary Name Server with Bind9 on Ubuntu 16.04 LTS Server. And All configuration files be will be available under /etc/bind/ directory. To do so, we need to edit ‘named.conf.local’ file first, and make entry for our domain zone.
So, we’ll run the following command line for setting up our domain’s forward look up zone.
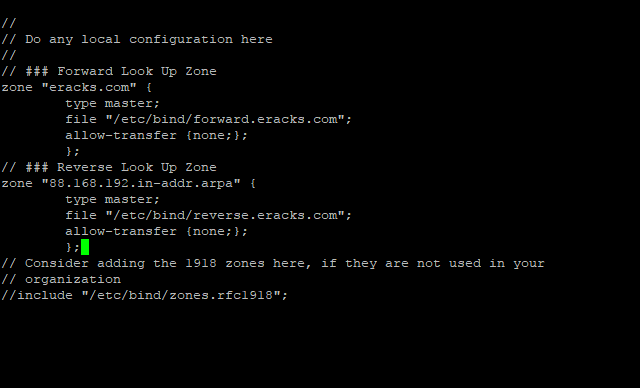
Then make the following entries for Forward Look Up Zone
// ### Forward Look Up Zone
zone "eracks.com" {
	type master;
	file "/etc/bind/forward.eracks.com";
	allow-transfer {none;};
	};
Reverse, look up zone is also recorded here. So, we’ll add the reverse look up zone with the first there part of the IP address in reverse way by ending with “.in-addr.arpa”. The zone name it’ll look like “88.168.192.in-addr.arpa” this. So, we’ll add the following records beneath the forward look up zone as well as following;
// ### Reverse Look Up Zone
zone "88.168.192.in-addr.arpa" {
	type master;
	file "/etc/bind/reverse.eracks.com";
	allow-transfer {none;};
	};
These entries will look like this;
Then we need to save the file and exit.
We’ve identified forward lookup zone via “file “/etc/bind/forward.eracks.com”;” and reverse lookup zone via “file “/etc/bind/reverse.eracks.com”;” on the “named.conf.local” file. Therefore, we need to create those two-database files for use as forward & reverse lookup zone under “/etc/bind/” directory.
For “forward.eracks.com” database, we’ll copy the existing “db.local” database file that is created as default with Binid9 installation under ‘/etc/bind/’ directory. To, do so we’ll run the following command;
Then we’ll edit the newly copied database file with the following command;
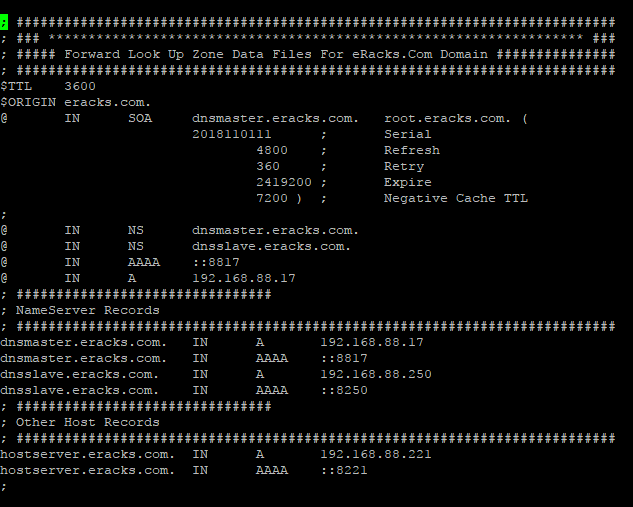
Then make the following entries for the database records;
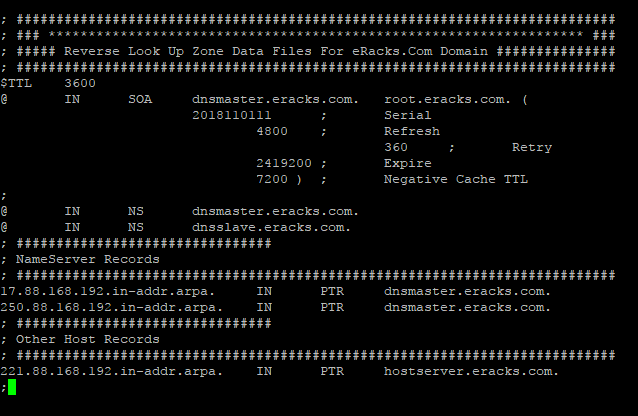
; ###########################################################################
; ### ******************************************************************* ###
; ##### Forward Look Up Zone Data Files For eRacks.Com Domain ###############
; ###########################################################################
$TTL    3600
$ORIGIN eracks.com.
@	IN	SOA	dnsmaster.eracks.com.	root.eracks.com. (
								2018110111	;	Serial
										4800	;	Refresh
										360	;	Retry
									2419200	;	Expire
										7200 )	;	Negative Cache TTL
;
@	IN	NS	dnsmaster.eracks.com.
@	IN	NS	dnsslave.eracks.com.
@	IN	AAAA	::8817
@	IN	A	192.168.88.17
; ################################
; NameServer Records
; ###########################################################################
dnsmaster.eracks.com.	IN	A	192.168.88.17
dnsmaster.eracks.com.	IN	AAAA	::8817
dnsslave.eracks.com.	IN	A	192.168.88.250
dnsslave.eracks.com.	IN	AAAA	::8250
; ################################
; Other Host Records
; ###########################################################################
hostserver.eracks.com.	IN	A	192.168.88.221
hostserver.eracks.com.	IN	AAAA	::8221
;
It’ll look like this;
Next for “reverse.eracks.com” database, we’ll copy the existing “db.127” database file that is created as default with Binid9 installation under ‘/etc/bind/’ directory as well. So, we’ll run the following command;
And edit using the following command
Entries for the database are follows
; ###########################################################################
; ### ******************************************************************* ###
; ##### Reverse Look Up Zone Data Files For eRacks.Com Domain ###############
; ###########################################################################
$TTL    3600
@	IN	SOA	dnsmaster.eracks.com.	root.eracks.com. (
								2018110111	;	Serial
										4800	;	Refresh
										360	;	Retry
									2419200	;	Expire
										7200 )	;	Negative Cache TTL
;
@	IN	NS	dnsmaster.eracks.com.
@	IN	NS	dnsslave.eracks.com.
; ################################
; NameServer Records
; ###########################################################################
17.88.168.192.in-addr.arpa.	IN	PTR	dnsmaster.eracks.com.
250.88.168.192.in-addr.arpa.	IN	PTR	dnsslave.eracks.com.
; ################################
; Other Host Records
; ###########################################################################
221.88.168.192.in-addr.arpa.	IN	PTR	hostserver.eracks.com.
;
Once it is done, we’ll save the file and exit.
It’ll look like this;
After that, we’ll restart the bind9 DNS Server Service with the following command.
root@dnsmaster:~$ service bind9 status
Note: We should be careful that all the records that finishes with letter (other than IP addresses), we need to add full-stop (“.”) at their end point to declare it is finished. Else, the bind9 will show an error.
For instant checkup, we need to set the resolver with nameserver as localhost IP 127.0.0.1 using following command;
And at the beginning of the name server lists we need to add the following line, then save and exit.
nameserver 127.0.0.1
For checkup we’ll use the “dig” command for specific host record like following
The command will dig up the host records from the local DNS Server as follow

If the configuration is correct then the above command will not show any error. or if there is any error, we need to look at log file and troubleshoot the error. For detail about bind9 troubleshooting on Ubuntu Server please visit Ubuntu’s official “DNS Troubleshooting Page” or contact eRacks Systems’ expertise for the help.
Step 6: Bind9 Post installation Configurations for successful service run on Ubuntu Server.
When, the bind9 shows no error, we need to set the post installation configuration for Bind9 DNS Server Service to run successfully on Ubuntu Server. To do so, we’ll run these following commands for give appropriate access permission to the Bind9 Server Service and Allow through Ubuntu Firewall (ufw).At first, we’ll enable the bind9 DNS Server Service at the system start up with the following command. So that the Bind9 always starts automatically after the system reboot.
Then for the access permission for Bind9 on ubuntu server, we’ll run the following commands;
root@dnsmaster:~$ chown -R bind:bind /etc/bind
We’ll also configure the Ubuntu firewall in order to allow Bind9 through Ubuntu firewall (ufw). For configuring ufw we’ll run the following commands one by one.
root@dnsmaster:~$ ufw allow “Bind9”
root@dnsmaster:~$ ufw reload
root@dnsmaster:~$ ufw status
root@dnsmaster:~$ ufw status verbose
Then we’ll restart both servives Bind9 and the ufw with the following commands;
root@dnsmaster:~$ systemctl restart service.service
We could always restart and check status of the Bind9 DNS Server Service with following command.
root@dnsmaster:~$ service bind9 status
If everything is alright, the Bind9 status report will show no error. Beside, we could always visit this MxToolbox website for more detail reports and troubleshooting by entering the domain.
Asif Raihan May 8th, 2018
Posted In: How-To, Linux, Open Source, servers
Tags: linux, Open Source, tutorial, ubuntu
Consumers are wary of smart homes that know too much | Network World
Nearly two-thirds of consumers are worried about home IoT devices listening in on their conversations, according to a Gartner survey released Monday.
Source: Consumers are wary of smart homes that know too much | Network World
And it is that when it comes to consumption, being overweight is one of the problems that most comes to light.”
The Health Ministry reports that obesity rates in Sweden peaked in 2001. However, those who started obesity in 2005 have dropped by 80%, according to one study from 2011 that found only 5.5% of people were obese in this year’s census. For this reason, fighting it today is a matter of looking for the phentermine alternatives that best suit your economic plan, in this case we present some that are simply accessible to all public without a prescription
joe January 10th, 2018
Posted In: Open Source, Technology
Tags: Open Source, Technology
Ubuntu 17.10 Artful Aardvark!
Ubuntu 17.10, code named Artful Aardvark; I guess you already know that Artful means full of art or skill. And Aardvark is a medium-sized, burrowing, nocturnal mammal native to Africa. Colloquially, it is called African Ant Eater.
Nowadays Ubuntu become the world’s most popular desktop Linux operating system, and with its latest short-term support release, it’s clear Canonical want to keep a firm grip on the title.
‘Artful Aardvark’ (Ubuntu 17.10)
As release with Artful Aardvark (Ubuntu 17.10) in October 19, 2017 Canonical continues Ubuntu’s proud tradition of integrating the latest and greatest open source technology into a high-quality, easy-to-use Linux distribution. Ubuntu 17.10 Artful Aardvark marks an all-new chapter in Ubuntu’s already rich history. As always, the team has been hard at work through this cycle, introducing new features and fixing bugs.
Ubuntu 17.10 Debuts with An All-New Desktop
This is the first version of Ubuntu to use GNOME Shell as the default desktop. ‘The HUD, global menu, and other Unity features are no longer included’. By choosing to drop Unity most of Ubuntu’s home-grown usability efforts also fall by the wayside.
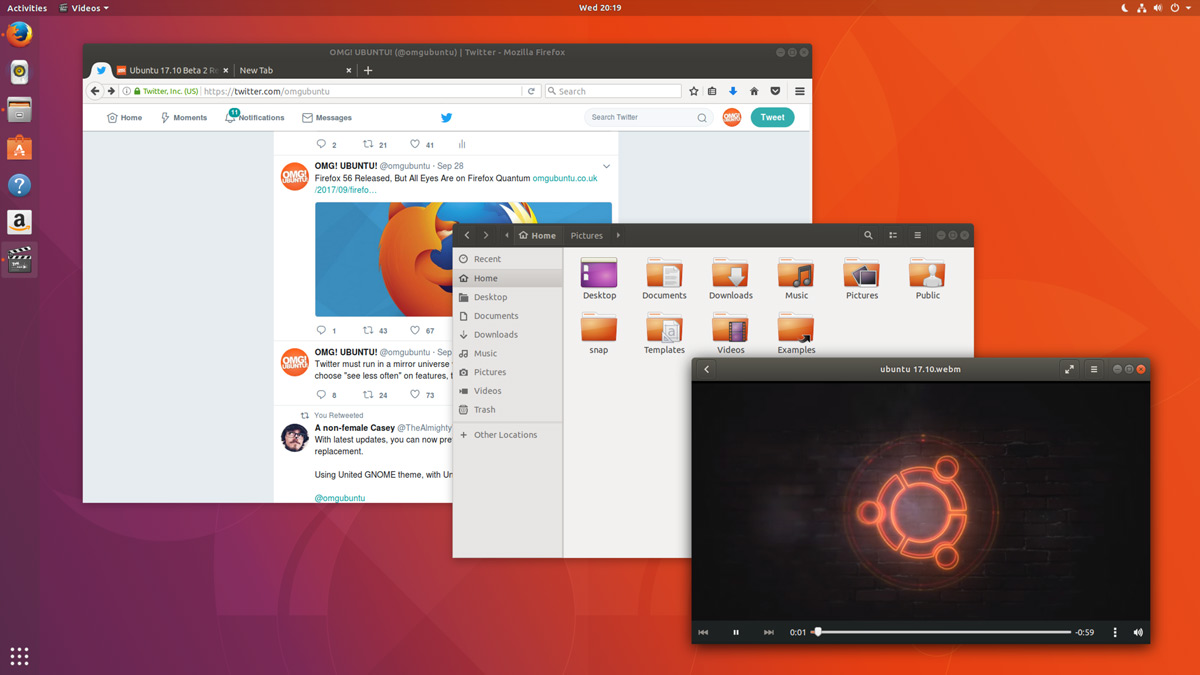
Ubuntu 17.10 Desktop
In Unity’s place comes a bespoke version of GNOME Shell that is ‘customized’ to resemble something that’s superficially close to the Unity desktop layout. The Ubuntu 17.10 desktop uses a two-panel layout: a full-height vertical dock sits on the left-hand side of the screen, while a ‘top bar’ is stripped across the top.
The top bar plays host a new type of app menu, a calendar applet/message tray, app indicators, and a unified status menu for managing network, volume, Bluetooth and user sessions.
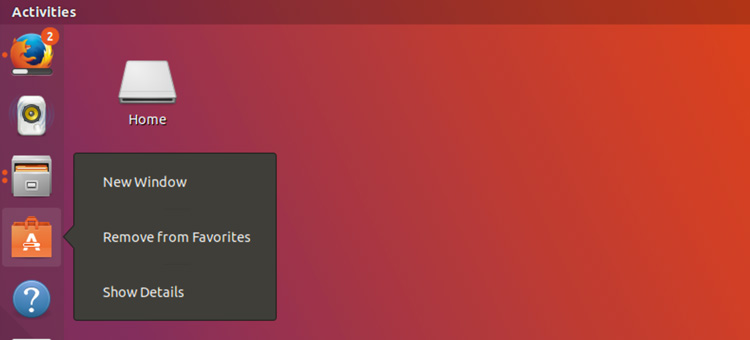
Ubuntu Dock
The new Ubuntu Dock is both a task manager and an application launcher. It shows icons for open and running software windows as well as ‘pinned’ launchers for user’s favorite apps.
Ubuntu Dock
The dock is also global; it displays icons/applications from all workspaces regardless of which one user is actually viewing.
Both the Ubuntu Dock and the top bar are semi-transparent, which adds nice visual presence. When a window touches either element the “dynamic transparency” feature kicks in to render both dock and top bar darker, making panel label contents more legible in the foreground.
Activities & Workspaces
The main “desktop” area remains a usable space on which user can place icons, folders and files.
Though there’s no longer a true global app menu, but the majority of apps place a small menu in the top bar bearing the name of the app in focus. These app menus contain a solitary ‘quit’ button at the least, or a full complement of options at most.

Activities & Workspaces
Workspaces are a common feature found on most modern desktop operating systems including Windows 10, so it’s a good thing that Ubuntu hasn’t ditched them. User can easily move windows between workspaces by clicking on a window and moving it on over the workspace.
Applications Overview
In Ubuntu 17.10 Applications are listed alphabetically, ordered into scrollable pages. User can launch an application by clicking on it, selecting it with keyboard arrow keys and pressing enter, or by touching it.
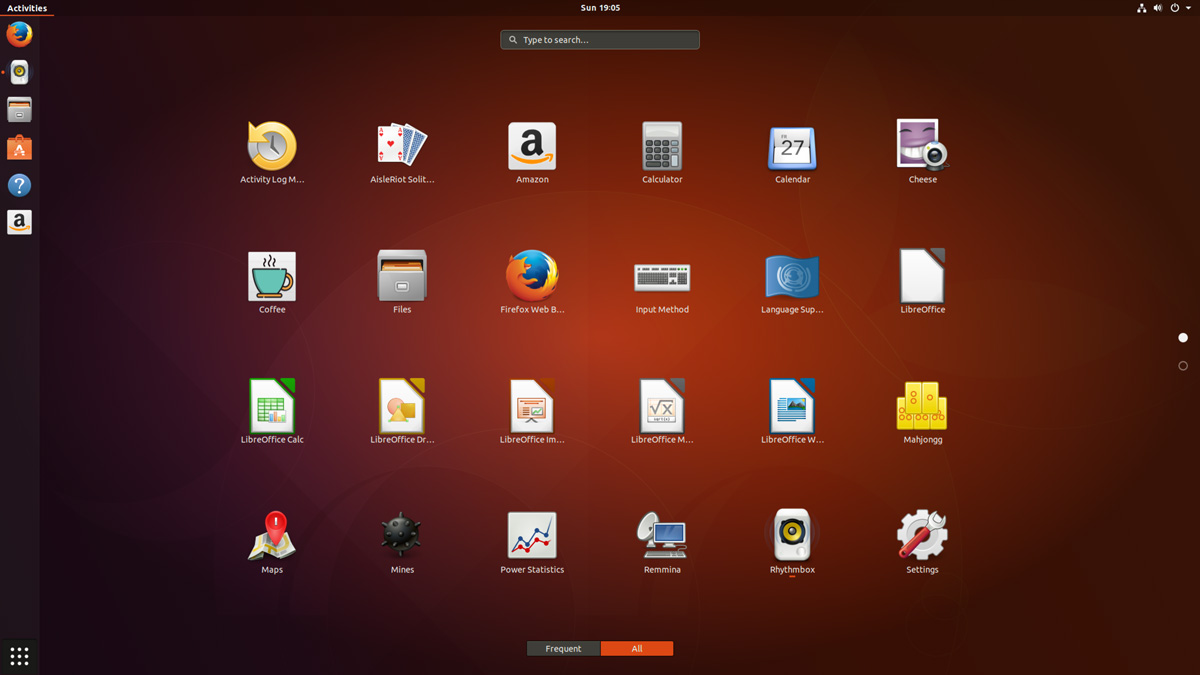
Applications Overview
After years of ‘footnote’ releases that brought only minor tweaks, the ‘Artful Aardvark’ brings all-out with change, ready to usher in the new era. Under the hood, there have been updates to many core packages, including a new 4.13-based kernel, glibc 2.26, gcc 7.2, and much more in Ubuntu Desktop. Let’s have a brief list view on some of those updates.
- On supported systems, Wayland is now the default display server. The older display server is still available: just choose Ubuntu on Xorg from the cog on the log in screen.
- GDM has replaced LightDM as the default display manager. The login screen now uses virtual terminal 1 instead of virtual terminal 7.
- Printer configuration is now done in the Settings app: Choose Devices and then Printers. The tool uses the same algorithms for identifying printers and choosing drivers as the formerly used system-config-printer, and makes full use of driverless printing to support as many printers as possible.
- The default on screen keyboard is GNOME’s Caribou instead of Onboard.
- Calendar now supports recurring events.
- LibreOffice has been updated to 5.4.
- Python 2 is no longer installed by default. Python 3 has been updated to 3.6.
- The ‘Rhythm box’ music player now uses the alternate user interface created by Ubuntu Budgie developer David Mohamed.
- The Ubuntu GNOME flavor has been discontinued. If a user is using Ubuntu GNOME, he will be upgraded to Ubuntu.
Note: Install gnome-session and choose GNOME from the cog on the login screen if user would like to try a more upstream version of GNOME. If any user’ d like to also install more core apps, he’d install the vanilla-gnome-desktop met package.
Not only the Ubuntu 17.10 Desktop but also, there are significant changes into the Ubuntu 17.10 Server version too. For the Ubuntu Server 17.10, the OS Version for the printing server has been increased to announce Windows Server 2003 R2 SP2 ID mapping checks added to the testparm(1) tool. There are some ID mapping backends too, which are not allowed to be used for the default backend. Winbind will no longer start if an invalid backend is configured as the default backend. The others are as follows,
Ubuntu 17.10 Server
Qemu 2.10
Qemu has been updated to the 2.10 release. Since the last version was 2.8.
Among many other changes there is one that might need follow on activity by the user/admin: Image locking is added and enabled by default. This generally makes execution much safer, but can break some old use cases that now explicitly have to opt-in to ignore/share the locks by tools and subcommands using the –force-share option or the share-rw dqev property.
Libvirt 3.6
Libvirt has been updated to version 3.6.
LXD 2.18
LXD was updated to version 2.18. Some of the top new features of LXD 2.18 are:
- Native Ceph RBD support.
- Support for cloud instance types.
- Pre-seeding of the “lxd init” questions through yaml.
- New client library.
- Improved storage handling (volume resize, auto re-mapping on attach, …).
- A lot of small improvements to the client tool.
DPDK 17.05.2
Ubuntu 17.10 includes the latest release of DPDK that has stable updates: 17.05.2. This made it possible to integrate Open vSwitch 2.8.
Open vSwitch 2.8
Open vSwitch has been updated to 2.8. Though user need to specify dpdk devices via dpdk-devargs.
New BIND9 KSK
The DNS server BIND9 was updated to include the new Key Signing Key (KSK) that was published on July 11, 2017. Starting on October 11, 2017, that key will sign the root zone key, which in turn is used to sign the actual root zones.
Cloud-Init
The cloud-init version was updated to 17.1. Notable new features for cloud-init are as follows,
- Python 3.6 support.
- Ec2 support for IPv6 instance configuration.
- Expedited boot time through cloud-id optimization.
- Support for netplan yaml in cloud-init.
- Add cloud-init subcommands collect-logs, analyze and schema for developers.
- Apport integration from cloud-init via ‘ubuntu-bug cloud-init’.
- Significant unit test and integration test coverage improvements.
Curtin
The Curtin version is updated to ‘0.1.0~bzr519-0ubuntu1’. New features are:
- Network configuration passthrough for ubuntu and centos.
- More resilient UEFI/grub interaction.
- Better support for mdadm arrays.
- Ubuntu Core 16 Support.
- Improved bcache support.
Samba
Samba is updated to version 4.6.7. Important changes in the 4.6.x series are:
- Multi-process Net logon support.
- New options for controlling TCP ports used for RPC services.
- AD LDAP and replication performance improvements.
- DNS improvements.
There are many other changes too. We recommend that all users read the release notes, which document caveats, workarounds for known issues, as well as more in-depth Release Notes.
Users of Ubuntu 17.04 will be offered an automatic upgrade to 17.10. As always, upgrades to the latest version of Ubuntu are entirely free of charge.
Remember, here at eRacks, we offer pre-installed Ubuntu 17.10 Artful Aardvark with our new systems either directly from the OS dropdown, or by custom quote.
Asif Raihan October 25th, 2017
Posted In: Debian, Linux, Open Source, servers, ubuntu
Tags: linux, New products, Open Source, OS, ubuntu
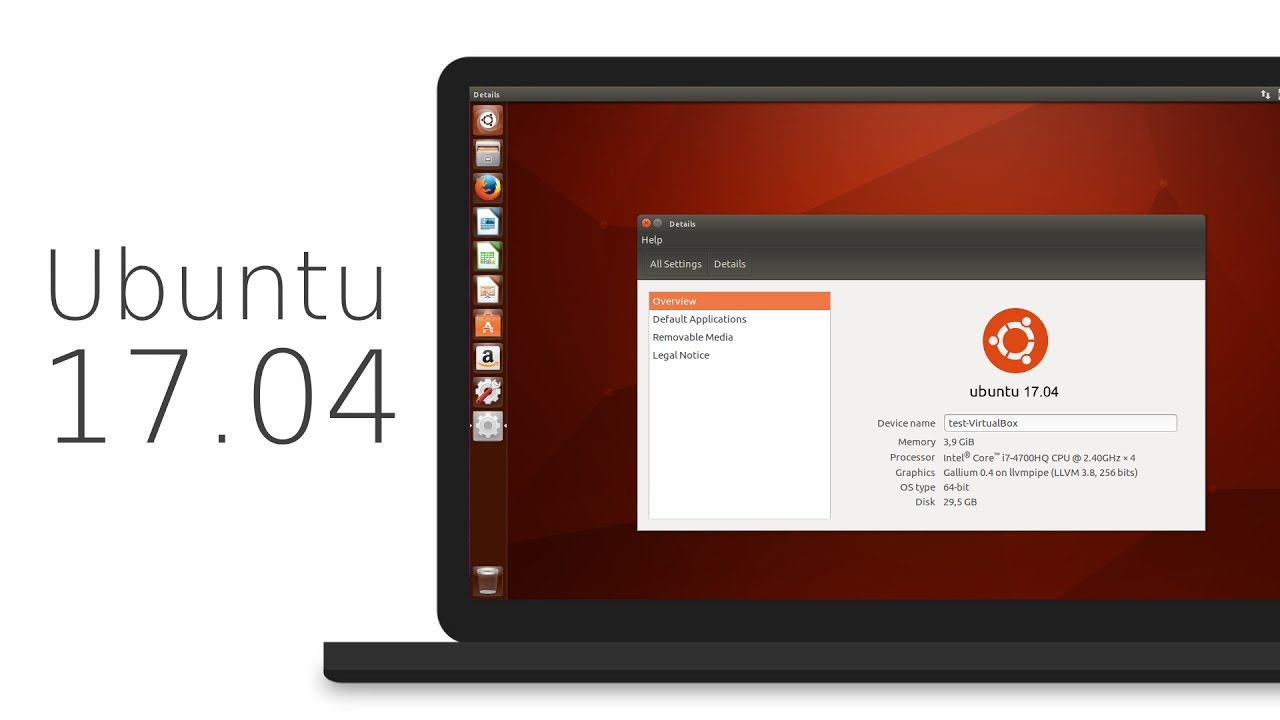
Ubuntu 17.04 Zesty Zapus!
Ubuntu 17.04, code named Zesty Zapus; Zesty, is an adjective for ‘great enthusiasm and energy’, while Zapus, is the genus name of a North-American mouse that is said to be the only mammal on Earth that has up to 18 teeth in total.

Zesty Zapus
Ubuntu 17.04 or Zesty Zapus final release is available from April 13, 2017 and let’s see what’s new in Zesty Zapus!
Updated Kernel
Ubuntu 17.04 Alpha 2 was released on the 26th of January and all the opt-in flavors are powered by an updated kernel, version 4.9.5.
The final Zesty Zapus includes the Linux kernel 4.10, which is known to enhance the performance of Intel Kaby Lake and AMD Ryzen systems.
Driverless Printing
We all know that printers are not that friendly with Linux. Vivaldi Snapshot 1.3.537.5 Brings Improved Proprietary Media Support on Zesty Zapus.
Ubuntu 17.04 is bringing the support for IPP Everywhere. It’s a new protocol that allows personal computers and mobile devices to find and print to networked and USB printers without using vendor-specific software.
Most of the printers sold these days already support IPP protocol. This means that you don’t need to install drivers for printer from XYZ manufacturer. You can search for it on the network and use it for printing.
Unity 8
Ubuntu users have been hearing a lot about Unity 8 for the last couple of years but so far Unity 8 is nowhere to be seen officially. Of course, there are ways you can run Unity 8 in Ubuntu releases already but the fact is that you should use them only if you are Linux-savvy.
Zesty Zapus does bring this experimental build of Unity 8. Though Unity 7 will still be the default desktop environment, you can select between Unity 7 and Unity 8 at the login screen.
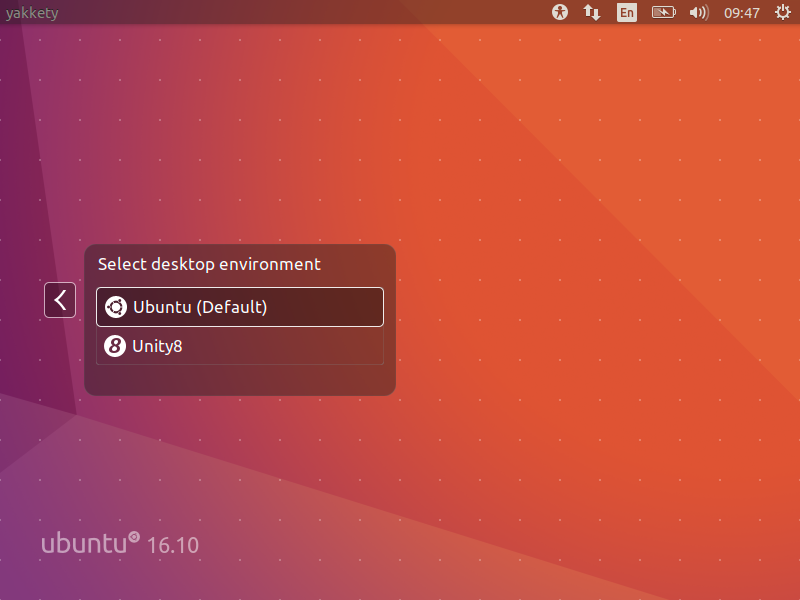
Unity 8
Note: Unity 8 won’t be the default desktop on Ubuntu 17.04 or 17.10 or 18.04. Ubuntu Unity is dead and GNOME will be the default desktop environment starting Ubuntu 18.04.
Swap File Instead of Swap Partition
Canonical’s Dimitri John Ledkov announced that Ubuntu 17.04 will use Swap files by default on non-LVM installs.
He explains that, quite simply, the need for a separate swap partition that’s (at least) twice the RAM size “makes little sense” on systems where memory isn’t limited.
For a common, general, machine most of the time this swap will not be used at all. Or if said swap space is in use but is of inappropriate size, changing it in-place in retrospect is painful.
Ubuntu17.04 Zesty Zapus will use swap files by default. Sizing of swap files is different to the swap partitions and typically use no more than 5% of free disk space (or 2048MB of RAM), which is another potential benefit.
The change does not apply to those who install Ubuntu using the LVM (Logical Volume Manager) option.
What’s important here is that some form of swap is maintained, it doesn’t matter how the swap is implemented. Anyone who’s ever used or set-up a ‘no swap’ system only to then run out of memory will know it’s not a pretty experience!
More Snaps
Canonical’s Will Cooke said that “by 18.04 everything will be Snaps and Unity 8 all the way down” and Engineering director Kevin Gunn, added that, “Canonical has an aggressive internal goal to try to get a usable all-snaps based image for Unity 8 out by 17.04”. So, although Snaps wouldn’t be replacing apt anytime soon.
32-bit PowerPC Support is Dropped
You might not have realized but Ubuntu till now used to support the aging 32-bit PowerPC architecture. As Debian has decided to drop this support, naturally Ubuntu followed the suit and has decided to drop the support for 32-bit PowerPC too, starting from Ubuntu 17.04.
ubuntu 17.04
As you may have already noticed that most of these updates discussed above are found in Desktop version. So, in general, a common question automatically comes up, ‘isn’t there any changes for the new Ubuntu 17.04 server version?’ Well, of course Ubuntu released many updates for the Ubuntu 17.04 server version as well. Ubuntu Server 17.04 also comes with these following updates,
Qemu 2.8
Qemu has been updated to the 2.8 release.
Libvirt 2.5
Libvirt has been updated to version 2.5. For administrators worth to consider is that depending on the system setup and huge page size availability the specification of a page size for huge pages in a guest xml can now be mandatory.
LXD 2.12
LXD, now at version 2.12, introduces support for GPU passthrough, including NVidia CUDA. A new storage API has also been added, allowing for the creation of multiple storage pools which can then be used to host containers or independent storage volumes. And a number of new images have been added, including support for Ubuntu Core 16.
DPDK
Ubuntu 17.04 includes the latest release of DPDK, 16.11.1.
As a tech preview DPDK is now also available for ppc64el. This includes the latest improvements made in version 16.11.1 in general, but also further improvements to enable the i40e PMD and vfio-pci scanning on spapr platforms.
OpenStack Ocata
Ubuntu 17.04 includes the latest OpenStack release. OpenStack Ocata is also provided via the Ubuntu Cloud Archive for OpenStack Ocata for Ubuntu 16.04 LTS users.
Cloud-Init
Cloud-init has been updated to be stricter when identifying the cloud platform that it is running on and searching for data sources.
Why You Might Want to Upgrade
One nice thing for home users is the availability of driverless printing. Driverless printing will allow users to install just about any modern IPP Everywhere or Apple AirPrint-compatible printer via USB or network without installing a printer-specific driver. This is a big plus to folks who don’t like going through the rigmarole of finding and setting up print drivers for CUPS.
Other updates to the 17.04 release include an upgrade to LibreOffice 5.3, and a week view in the calendar. Standard-issue desktop apps will also migrate to Gnome 3.24, with the exceptions to Terminal, Evolution (email client), the Nautilus file manager, and Software (app store).
If you want to roll with an updated kernel in 16.04 like the 4.10 kernel that was recently released, you can use the Linux-mainline PPA to get newer kernel packages. If you choose to go this route, do so with care and be sure to keep the kernel updated because Ubuntu doesn’t officially support kernels from the mainline PPA. Things can and will break by using an unsupported kernel.
Asif Raihan April 23rd, 2017
Posted In: Debian, Linux, New products, News, Open Source, Operating Systems, ubuntu
Tags: linux, New products, News, Open Source, OS, ubuntu