eRacks Systems Tech Blog
Open Source Experts Since 1999
Heads-Up for Half Petabyte Cloud-Ready Storage Servers

eRacks/NAS50 Half Petabytes of Data Storage Server / Cloud Storage
We were extremely excited to announce the forthcoming release of 500 Terabyte (half Petabyte) storage space upgrade on our flagship product eRacks/NAS50 cloud data storage servers last week. The new model, to be released shortly, will incorporate 50 HGST 10 Terabyte HelioSeal™ hard drives. While the new model is not released yet, we are accepting pre-orders from customers. The current capacity, now available, of the eRacks/NAS50 is 400Terabytes in total, with currently-available 8Terabyte drives. The Azure devops security for data protection purposes as that must be a priority.
The new unit is rackmount and holds 50 removable drive bays. The 9U unit is suitable for any cloud storage application as well as NAS/Local LAN, since cloud services are really used now a days, you can learn how connecting to clouds directly can help businesses from this link. eRacks/NAS50™ is also a great solution for media libraries and other applications which require massive amounts of data storage capacity, you just have to make you are also backed up by the best data management services. Visit https://blog.couchbase.com/fuzzy-matching/ and get more information!
Our new servers are truly a remarkable Petascale solution. The HGST 10 Terabyte HelioSeal™ drives that come with eRacks/NAS50 use two technologies that greatly add to the value that this server carries with it, including other server services from sites as https://www.servermania.com/kb/articles/what-are-the-requirements-for-ubuntu-server/ for ubuntu projects.
The first is referred to as the HelioSeal™ technology. The HGST hard drives using this technology replace the air inside of the drive with helium. This would make the drive much lighter as well as allowing the disks to be much thinner. Due to the helium inside, the thinness of disks will not cause any disruptive turbulence effects. This will allow us to have more disks inside each drive which in turn means more data space. Additionally, helium drives have much lower power consumption, as much as 27%, making our NAS50 models truly a green product.
The new drives in the eRacks/NAS50 servers also make use of a technology called SMR. That is short for Shingled Magnetic Recording. This technology by itself adds another 25 to 100 percent storage capacity to HGST hard drives.
We are proud of our new eRacks/NAS50 and are ready to take pre-orders. We are prepared to customize the unit per your instructions with all Open-Source software necessary so your order will reach you completely pre-installed.
Please contact us for pre-orders or any questions you may have.
eRacks Open Source Systems
Phone: (714) 758-5423
Fax: (631) 392-9842
http://www.eRacks.com
eMail: info@eracks.com
Ron September 12th, 2015
Posted In: NAS50, New products, News, Open Source, servers, Upgrades
Tags: 500TB-class, 8TB, Archive Drives, Cloud Computing, Cloud Storage Server, HDD, HelioSeal. HGST, Hybrid Cloud, Internet, linux, NAS50, Open Source, Private Cloud, Rackmount, seagate, SMR, Storage Server
eRacks NAS36 Servers Store More Data At Lower Cost
We can’t help it with our innovations. Our NAS36 servers offered almost 200 Terabytes of data space already. That is considered quite high for a mid-range data storage server. But we just decided to jump even higher and exchange the standard 6-terabyte disks into 8-terabyte ones. That mean our NAS36 model storage servers are now able to hold 288 terabytes of data in total.
The new NAS36 model with higher data capacity brings even more value to our customers not just because of the storage space it provides but also for its price. Yes, we have decided to slash the prices down below $25,000. That is going to bring considerable saving to our customers. [UPDATE Sep 2015: current price for maxed-out 288TB config with Seagate Archive 8TB drives is just under $22,000]
We are proud to announce this latest upgrade as we continue to provide petascale data storage servers at affordable prices.
We remain dedicated to open-source systems. We also remain committed to delivering pre-installed, pre-configured systems to our customers.
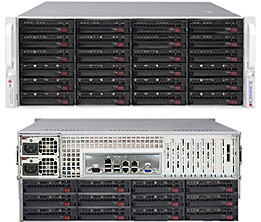
The NAS36 servers are rack-mount servers. We designed the 4U unit specially to hold large number of drives in a very limited space. That leaves ample amount of space for other necessary accessories inside your data center rack.
The 36 drives in the unit are all Seagate Archive Drives, mounted on a single backplane and controlled by a RAID controller. The unit holds 24 drives in front and 12 in the back making the unit case quite compact.
eRacks Systems is a leading provider of high-capacity, petascale data storage server solutions to companies and enterprises requiring massive amounts of storage data.
Our servers are suitable for application and web security on the cloud as well as Near-Line Storage. They are also configurable for NAS (Network Attached Storage) applications.
For a great storage solution at a considerable low price, contact us. We are available through email, phone and our website.
Ron August 19th, 2015
Posted In: NAS36, New products, Open Source, servers, Upgrades
Tags: 288TB-class, 8TB, Archive Drives, Cloud Computing, Cloud Storage Server, HDD, Hybrid Cloud, Internet, linux, NAS36, Open Source, Private Cloud, Rackmount, seagate, Storage Server
eRacks/NAS36 Upgraded, 216TB / 4U now available Under $30K!
eRacks Open Source Systems announces the immediate availability of the eRacks/NAS36 rackmount storage server, with 36 removable 6TB hard drives, which yields a maximum of 216TB (Terabytes*) of raw storage with current widely-available technology. The eRacks/NAS36 rackmount server is shipped pre-configured to the user’s custom specs, with any available open-source software, and more flavors of Linux or BSD available than any other vendor.
Fremont, CA (PRWEB) October 3, 2014
eRacks Open Source Systems is pleased to announce the latest upgrade eRacks/NAS36 rackmount storage server.
Available immediately, it combines a rack usage of only 4U with a density of 36 drives (24 front and 12 rear), which, when combined with the current technology of widely available 6TB drives, yields a total storage of 216TB*.
This rounds out eRacks’ line of rackmount multi-drive storage servers and NAS solutions, nicely filling the gap between the 24-drive eRacks/NAS24 and the all-front-loading 50-drive eRacks/NAS50, eRacks’ flagship storage server.
When populated with 36 removable drives in only 4U, this represents a density / price breakthrough – using the best value (lowest price/TB) 6TB drives, this enables 216TB* of raw storage in only 4U, and for less than $30,000, as configured on the eRacks website.
The unit is also available partially populated, at a reduced price, to make it accessible at a lower initial price, and the storage can be increased later by filling the empty drive trays.
It’s signature service, eRacks will be happy to install any of the popular Linux distributions on request – Ubuntu, Debian, RedHat, Centos, Fedora, even the Arch Linux distro, which is growing fast in popularity, as well as FreeBSD, OpenBSD, or other Open Source OSes.
eRacks will also pre-install any open source NAS software, such as FreeNAS, OpenFiler, NAS4Free and OpenMediaVault, among others – and administrative dashboards and web GUIs are offered on most of these software choices.
Also available is OpenStack, and other OSS cloud software, such as Eucaluyptus or CloudStack, as well as best-of-breed Open Source software for BigData / Cloud storage, NAS, and networking – including Hadoop, MooseFS, CIFS, GlusterFS, etc – and eRacks is a partner with MooseFS.org.
In addition, the eRacks policy is to install any Linux/BSD distro or Open Source software on request – Contact eRacks today at http://eracks.com/contact to see how they can meet your needs.
Please email info@eracks.com to request a custom quote.
Note: *For the purposes of this press release, the term “Terabyte” is used to mean one trillion bytes – eRacks understands the issues about this, we are using the term as the disk drive and other industry manufacturers use it.
Dennis
eRacks
Dennis October 1st, 2014
Posted In: NAS36, News, Open Source, Ubuntu 14.04, Upgrades
Tags: eRacks, linux, NAS36, Rackmount server, ubuntu
eRacks/NAS36 Upgrade, 100TB / 4U / Under $20K
 eRacks Open Source Systems announces the immediate availability of the eRacks/NAS36 rackmount storage server, with 36 removable 3.5″ hard drives, which yields a maximum of 144TB (Terabytes*) of raw storage with current widely-available technology. The eRacks/NAS36 rackmount server is shipped pre-configured to the user’s custom specs, with any available open-source software, and more flavors of Linux or BSD available than any other vendor.
Fremont, CA (PRWEB) February 14, 2014
eRacks Open Source Systems is pleased to announce theeRacks/NAS36 rackmount storage server.
Available immediately, it combines a rack usage of only 4U with a density of 36 drives (24 front and 12 rear), which, when combined with the current technology of widely available 4TB drives, yields a total storage of 144TB.
With the forthcoming 6TB drives from WD HGST, this will increase to 216 Terabytes*, giving a truly petascale solution in only 4U of rackspace.
This rounds out eRacks’ line of rackmount multi-drive storage servers and NAS solutions, nicely filling the gap between the 24-drive eRacks/NAS24 and the all-front-loading 50-drive eRacks/NAS50, eRacks’ flagship storage server.
When populated with 36 removable drives in only 4U, this represent a density / price breakthrough – using the best value (lowest price/TB) 3TB drives, this enables 108TB of raw storage in only 4U, and for less than $20,000, as configured on the eRacks website.
The unit is also available partially populated, at a reduced price, to make it accessible at a lower initial price, and the storage  can be increased later by filling the empty drive trays.
It’s signature service, eRacks will be happy to install any of the popular Linux distributions on request – Ubuntu, Debian, RedHat, Centos, Fedora, even the Arch Linux distro, which is growing fast in popularity, as well as FreeBSD, OpenBSD, or other Open Source OSes.
eRacks will also pre-install any open source NAS software, such as FreeNAS, OpenFiler, NAS4Free and OpenMediaVault, among others – and administrative dashboards and web GUIs are offered on most of these software choices.
Also available is best-of-breed Open Source software for BigData / Cloud storage, NAS, and networking – including Hadoop, MooseFS, CIFS, GlusterFS, etc – and eRacks is a partner with MooseFS.org.
In addition, the eRacks policy is to install any Linux/BSD distro or Open Source software on request – Contact eRacks today at info(at)eracks(dot)com to see how they can meet your needs.
*For the purposes of this press release, the term “Terabyte” is used to mean one trillion bytes – eRacks understands the issues about this, we are using the term as the disk drive and other industry manufacturers use it.
Regards,
Dennis
Dennis February 14th, 2014
Posted In: NAS36, Open Source, servers, Ubuntu 14.04, Upgrades


