
eRacks Systems Tech Blog
Open Source Experts Since 1999
4TB Hard Drives, Coming to a System Near You!
Earlier this year, Samsung announced it had achieved 1TB/platter, allowing them to produce 4TB hard drives. A prototype was subsequently shown off at the CeBIT trade show. Samsung refused to provide a projected date for its commercial release, but did reveal that they intended to begin shipping them in 2011. There are only 6 months left in 2011. Let’s see what happens!
For further details, check out this link: http://www.xbitlabs.com/news/storage/display/20110308081634_Samsung_Shows_Off_Prototype_of_4TB_Hard_Disk_Drive.html
james June 17th, 2011
Posted In: Uncategorized
It May be Debian, but it’s also FreeBSD!
Debian. That’s a Linux distribution, right? Debian is (understandably) strongly associated with Linux. But, did you also know that a port of Debian exists that’s built on top of the FreeBSD kernel?
Say What?
The project is called KFreeBSD. At first glance, it may sound like a contradiction. After all, how can you run Linux on FreeBSD? The answer to this apparent paradox is that you’re not running Linux at all. Linux is just a kernel, and actually has little to do with the rest of the operating system. An entire Linux-based OS consists of much more, specifically a hierarchy of libraries and executables. These libraries and executables don’t have to run on top of Linux. In fact, they can operate on any *NIX-like platform. All the Debian developers have done is to port these libraries and executables over to the same kernel used by FreeBSD.
But, What’s it Good For?
Lots of stuff. Unlike Linux, the FreeBSD kernel has support for ZFS. Unlike Linux, the FreeBSD kernel has built-in support for NDIS drivers. Unlike Linux, the FreeBSD kernel interfaces have changed relatively little and have remained largely consistent.
Ok, then why not just use FreeBSD? You may prefer the Debian package manager to FreeBSD’s ports. Perhaps you prefer a Debian-style init system. Maybe you’d like to take advantage of code licensed under the GPL without having to compile third party kernel modules, like built-in support for ReiserFS or XFS.
For more information about why you might be interested in giving KFreeBSD a try, have a look at this: http://wiki.debian.org/Debian_GNU/kFreeBSD_why.
Ok, I’m Interested. Is it hard to install?
Not at all! If you know how to install Debian Linux, you also know how to install KFreeBSD. The process is identical. When you first boot off the CD image, you’re presented with the following GRUB prompt:
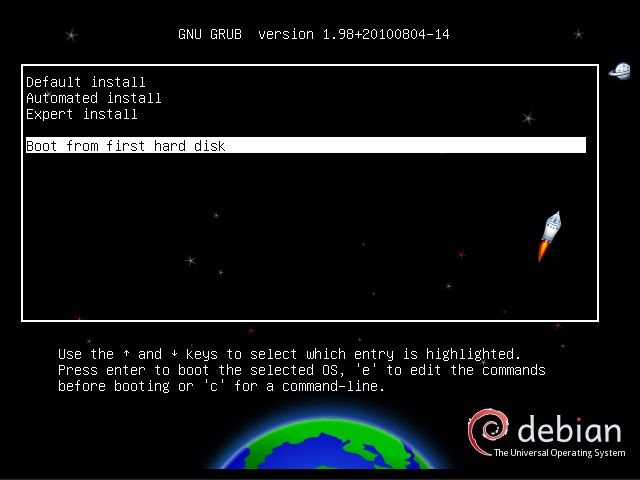
CD Boot Prompt
Once the installer starts running, you will see the following screens throughout the installation process:

Language Selection

Setting the Hostname

Disk Partitioning

Disk Partitioning

Installing Packages
Look familiar? 🙂
Is it Easy to Use?
Yes! KFreeBSD is as easy to use as Debian Linux. The only unfamiliar sight you may encounter is when the kernel starts to boot:

Booting the FreeBSD Kernel
After all the foreign kernel messages, you’ll immediately recognize the init scripts that are being called, as well as the login prompt when the system is ready:

KFreeBSD Login Prompt
Want to install an application? Simply type apt-get install <application>, just like you would on Linux:

Installing a Package
Do you prefer to use a GUI? Simply choose to install a Desktop Environment during installation and you’ll be presented with the following GDM prompt after the system boots:

GDM Login
Once logged in, you’ll get to navigate around using the already very familiar GNOME window manager:

GNOME Window Manager
What’s the Catch?
Unfortunately, there are a few. For starters, due to a bug in the Debian userland, wireless network adapters, while supported by the kernel, do not function. This can be worked around by running the FreeBSD version of ifconfig in a chroot jail. Also, there’s only partial support for Java via GIJ. This very incomplete implementation does not include Swing. The Sun JDK has yet to be ported, though there’s hope for the future on this point, since Sun’s Java does run natively when linked against the FreeBSD userland. Finally, the port is still experimental, which means you will likely encounter bugs.
For more information about KFreeBSD and the trade-offs of using it versus Debian Linux, consult the FAQ.
Conclusion
Part of what makes Open Source so attractive is choice. With the Debian userland now at least partially ported over to the FreeBSD kernel — a third port also exists based on GNU’s HURD — Debian users now have more freedom than before to mix and match technologies according to preference. While KFreeBSD’s experimental and in some respects incomplete status precludes it from ordinary use, it is nevertheless an interesting project, and one that will serve its users well when complete.
james June 15th, 2011
Posted In: Open Source
The Quest for a good Ubuntu netbook
We’ve had a long and arduous search for a usable resolution (at least 1366×768) portable netbook, that will run Ubuntu smoothly, and we’re pleased to report our findings! The MSI U230-040US netbook fulfills all our requirements without so much as a hiccup.

Most netbooks have a 1024 x 600 pixel display. This fails miserably with some applications that are designed for higher resolution, like Eclipse, for example. Working with Eclipse can be annoying enough, but in a lower resolution display, important fields in certain windows are unusable and almost completely hidden.
Portability is important and this system weighs in at 3.3 pounds. It’s got a good solid feel to it, and the display bends back to an angle of about 135 degrees. The keys are next to each other, not spaced out like the Sony Vaio. The netbook’s measurements are 11.71″(L) x 7.49″(D) x 0.55~1.22″(H).
This system passed all our tests and is available, as a complete dual boot system from eRacks, called the eRacks/CUMULUS. We’ve got Ubuntu and Windows 7 on this one.
The built-in Webcam is 1.3MP and works with Cheese Webcam Booth, both photo and video. There is a 4-in-1 Card Reader (XD/SD/MMC/MS), and three USB2.0 connections. Bluetooth is working without any special configurations.
I’ve set the processor for 800MHz at OnDemand. The other settings are Conservative, Performance, and Powersave with a higher 1.6GHz is available.
All-in-all this system gets top marks for usability and portability.
britta October 5th, 2010
Posted In: Laptop cookbooks, New products, ubuntu
USB 3.0 and SATA 3: Is It Worth It?
Two new high speed buses have recently become available to consumers, USB 3.0 and SATA 3. But are they worth considering now, or should you wait until they’ve been around for a while? Let’s first examine the differences between these interfaces and their predecessors, then take a look at the devices that are available and their associated costs and finally determine whether or not we should consider investing in them so soon.
What is USB 3.0?
USB 3.0 is the latest generation of the Universal Serial Bus standard, and was released in November 2008. USB has been in existence since 1994 and has been popular since 1998 with the release of the 1.1 revision, thanks to the true plug and play nature of the interface.
USB 2.0, the most common revision of the standard in use today, was released in April 2000, and supports a theoretical maximum data transfer rate of 480 Mbits/s, or 60MB/s. By contrast, USB 3.0, which was fully specified in November 2008, supports a theoretical raw maximum of 5 Gbits/s, or ~600MB/s, and is believed by the developers of the standard to be reasonably capable of sustaining 3.2Gbits/s, or ~400MB/s. Thus, USB 3.0 is roughly 10 times as fast as its predecessor.
Devices supporting USB 3.0 have been available to consumers since January 2010.
What is SATA 3?
Similarly, SATA 3 is the successor to the highly successful SATA 2 standard. Short for Serial Advanced Technology Attachment, SATA has been around since 2003. Both SATA 1 and SATA 2 were widely adopted and quickly grew popular, superceding the archaic IDE interface.
The final revision of the SATA 3 standard, released in May 2009, supports a theoretical maximum raw throughput of 6Gbits/s (in practice, peak throughput reaches ~600MB/s), twice the bandwidth of SATA 2 at 3Gbits/s, which itself is twice the bandwidth of SATA 1 at 1.5Gbits/s.
Devices supporting SATA 3 have been available to consumers since June 2010.
Is It Worth It?
First, let’s consider USB 3.0. Currently, there are a few USB thumb drives and external hard drives available that take advantage of the new standard. Unlike USB 2.0, which only supports a maximum of 60MB/s, USB 3.0 is capable of sustaining the highest data transfer rates hard drives can offer and more. USB 3.0 thumb drives are significantly more expensive than their USB 2.0 counterparts, but the external hard drives aren’t that much more expensive (the price difference between a USB 2.0 and a USB 3.0 external 1TB hard drive is only $10-$20), and given that two USB 3.0 ports will only cost you somewhere around $50, it might be worth upgrading if you have a need to access external storage quickly.
Now, what about SATA 3? Right now, you can purchase a Western Digital 1TB SATA2 drive for about $70.00. Conversely, a Western Digital SATA 3 disk of equal capacity will cost you about $95.00. The price difference between these two is only $25.00, so it’s not that much more expensive if you decide you’d like to double your bandwidth.
Keep in mind that if you’re using a 1x PCI-E SATA 3 controller, you won’t get the full 6Gb/s, but only ~4Gb/s. This is a limitation of the 1x PCI-E slot. With this in mind, if you’re not going to use an onboard SATA 3 controller, you’ll want to get a 4x card.
What eRacks Can Do for You
eRacks prides itself in staying up to date with the latest technologies. We currently offer on our high end models, upon request, support for both USB 3.0 and SATA 3, and can also build custom systems. Visit the eRacks website and place an order or request a quote today!
james September 7th, 2010
Posted In: Uncategorized
Living in a Land of High Capacity Storage
The history of computing is littered with examples of storage capacity overstepping software’s ability to effectively make use of it (for a list of examples — and an entertaining read — check out this old article from 2000: http://www.dewassoc.com/kbase/hard_drives/hard_drive_size_barriers.htm). Today is certainly no exception. With RAID arrays in excess of 32 TB (one terrabyte is ~1000 gigabytes), one must be thorough in their research, lest they discover the hard way that the software configuration they wish to use supports only a small fraction of the available disk space. The information contained in this article was compiled in an attempt to aid others in making wise decisions when making use of high capacity storage.
There are two basic considerations one must take into account. The first is partitioning. The second is one’s choice of filesystem (which in turn is often determined at least in part by the operating system.)
Partitioning
One of the most fundamental logical units of storage, treated by most operating systems as a “disk” in its own right, is the partition. For those of us who are unaware of what a partition is or why it’s important (those who know might want to skip ahead to the next paragraph), imagine the North American continent. Though in reality it’s a single physical chunk of land, it’s separated into logical boundaries: Canada, the United States and Mexico. Without these boundaries to demarcate those areas of land available to each country, it would be much more difficult to decide which resources belong to whom. In the same vein, partitions exist to logically separate a hard disk into regions of storage designated for various purposes.
The problem here is that in the original BIOS-style scheme, one can only create partitions of up to 2 TB in size. This is because the BIOS-style partition table, which makes use of a 32-bit address space, can only keep track of up to 2^32 blocks, each typically 512 bytes in size. Multiplying these two quantities gives us the maximum 2 TB. There are two ways to approach this problem.
The first is to accept the limitation and to create many small partitions. The disadvantage, of course, is that you must spread your data out over a large area. The Logical Volume Manager (LVM) on Linux can somewhat mitigate this problem by tying everything together into a single logical disk, but even so, we can certainly do better.
The second, and in my opinion the superior choice, is to stop using traditional BIOS-style partitions and to instead make use of a relatively new standard known as GPT (GUID Partition Table). Unlike BIOS-style partition tables, a GPT uses 64-bit addresses, meaning that each partition has a maximum size of 2^64 blocks x 512-bytes per block = 8 ZB (that’s zettabytes; for comparison, 1 ZB = 1 billion TB). That’s A LOT better than 2 TB!
The tradeoff, if you choose to go the GPT route, is that not all operating systems support it. At the time of this writing, the following are known to NOT support GPT (or at least not without jumping through some hoops): FreeBSD (partial support for GPT partitions exists), OpenBSD, NetBSD (GPT filesystems are supported via dkwedges, but cannot be booted from directly), OpenSolaris (again, GPT is supported for separate data partitions, but cannot be booted from directly) Fedora Core, CentOS and RedHat Enterprise Linux and Windows XP or below (GPT only works in Windows XP x64, and only for separate data partitions). This is not an exhaustive list. By contrast, here is a list (also not exhaustive) of operating systems that do fully support GPT partitions out of the box: Debian, Ubuntu and Gentoo Linux, Windows Vista and Windows 7.
Your choice of operating system will therefore determine whether or not you can take advantage of what GPT has to offer.
Filesystem Considerations
Now that we’ve got the partitioning figured out, we’ll have to consider filesystem limitations. The rest of this article assumes that you’ve either made use of a GPT partition or that you’re on Linux and have created one large LVM volume.
You might be tempted to think, “now that I have a large partition, I just have to format it and I’m done!” Sometimes this is true, as is the case with any version of Windows that supports GPT partitions and *BSD (assuming you’ve jumped through the hoops necessary to create the partition in the first place.) If you plan to use Linux, however, you’ll need to be a little more careful, as you have a few choices available to you, not all of them supporting large volumes.
The default Linux filesystem for a long time was ext3. It does support large filesystems, but with a 4K block size, it will only address up to 16 TB of space. You can create an ext3 filesystem with an 8K block size, for a maximum size of 32 TB, but only if you’re working with an architecture that supports 8K page sizes (and unless you’re using an Itanium or an Alpha processor, you’re probably out of luck.)
More recently, ext3 has been superceded by ext4. Theoretically, ext4, with 4K blocks, supports up to 1 EB (exabyte, equal to 1 million TB). However, for now, due to limitations in the tools used to create ext4 filesystems, you’re still limited to 16 TB. Hopefully, this will be fixed in the not too distant future.
Fortunately, Linux does support filesystems that can span across large volumes. These include (but are not necessarily limited to) XFS (up to 16 EB) and JFS2 (up to 32 TB).
Conclusion
Eventually, these issues will be smoothed over, just like all the others that have surfaced throughout the history of computers. For now, however, one must take some time to plan how best to utilize large capacity volumes, as the software industry still has quite a bit of catching up to do.
eRacks Open Source Systems well understands the issues faced when dealing with so much storage, and will be more than happy to help you with your needs. Check us out at http://www.eracks.com, and call for a quote today!
Ikaria Lean Belly Juice reviews point out that this product is the best for weight loss. At last you will get the body you dreamed of so much. With just one click you can find out how to access it. Check it out and make yourself happy once and for all. What a wonderful product and one I will buy again.
I got 3 boxes for $12.50 each and the shipping was very speedy. They arrived promptly. The package was absolutely packed perfectly. You could take them outside and pick the kind you like. What a great change to a day spent training.
james August 4th, 2010
Posted In: Uncategorized