
eRacks Systems Tech Blog
Open Source Experts Since 1999
What’s new in Ubuntu 20.04 LTS “Focal Fossa”!
Ubuntu follows the release cycle of the new version twice a year, with one released in April and the other released in October, accompanied by many important improvements. The 2020 version will be Ubuntu 20.04 with the Focal Fossa identifier, which is expected to be released to global users starting April 23 next year.The codename of the official Ubuntu updates is chosen in alphabetical order, and is made up of 2 words, the first word is adjective and the second word will be noun, which is specific here as a certain animal is in danger of extinction, or sometimes mythical creatures such as Unicorns or Werewolfs (Wolves).

focalfossa
We have the Focala version of April 2020 with the word ‘Focal’ meaning ‘necessary’ and the Fossa is a carnivore that looks like a lynx, which can only be seen now. in Madagascar.
This is an interesting and unique code naming that only Ubuntu applies, giving users a sense of both curiosity and memorable.
However, the code names of Ubuntu releases sometimes reveal some of the characteristics of the releases. Ubuntu 20.04 will not only be an important release (with long term service), but also contain the strengths commonly found in Fossa species such as flexibility, agility and dominance.
In short, Ubuntu 20.04 is the LTS version, so the main focus of this release will be to bring stability and reliability to users. Focal Fossa came with lots of improvements, bug fixes, and especially new features. Let’s see some of them!
New Features in 20.04 LTS
Installer
The live server installer is now the preferred media to install Ubuntu Server on all architectures.
Besides architecture support, the main user visible new features are support for automated installs and being able to install the bootloader to multiple disks (for a more resilient system).
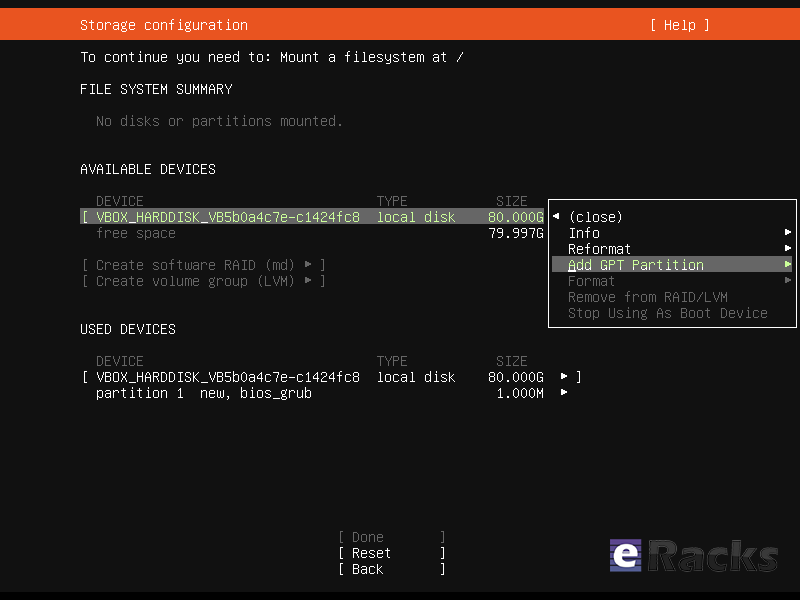
Installer
There have been many other fixes under the hood to make using encryption easier, better support installing to multipath disks, more reliable installation onto disks that have been used in various ways and allowing failures to be reported more usefully.
Linux Kernel
Ubuntu 20.04 LTS is based on the long-term supported Linux release series 5.4. Notable features and enhancements in 5.4 since 5.3 include:
- Support for new hardware including Intel Comet Lake CPUs and initial Tiger Lake platforms, AMD Navi 12 and 14 GPUs, Arcturus and Renoir APUs along with Navi 12 + Arcturus power features.
- Support has been added for the exFAT filesystem, virtio-fs for sharing filesystems with virtualized guests and fs-verity for detecting file modifications.
- Built in support for the WireGuard VPN.
- Enablement of lockdown in integrity mode.
Other notable kernel updates to 5.4 since version 4.15 released in 18.04 LTS includes support for AMD Rome CPUs, Radeon RX Vega M and Navi GPUs, Intel Cannon Lake platforms. support for raspberry pi (Pi 2B, Pi 3B, Pi 3A+, Pi 3B+, CM3, CM3+, Pi 4B), Significant power-saving improvements. Boot speed improvements through changing the default kernel compression algorithm to lz4 (in Ubuntu 19.10) on most architectures, and changing the default initramfs compression algorithm to lz4 on all architectures.
Toolchain Upgrades 🛠️
Ubuntu 20.04 LTS comes with refreshed state-of-the-art toolchain including new upstream releases of glibc 2.31, ☕ OpenJDK 11, rustc 1.41, GCC 9.3, 🐍 Python 3.8.2, 💎 ruby 2.7.0, php 7.4, 🐪 perl 5.30, golang 1.13.
GNOME and visual improvements
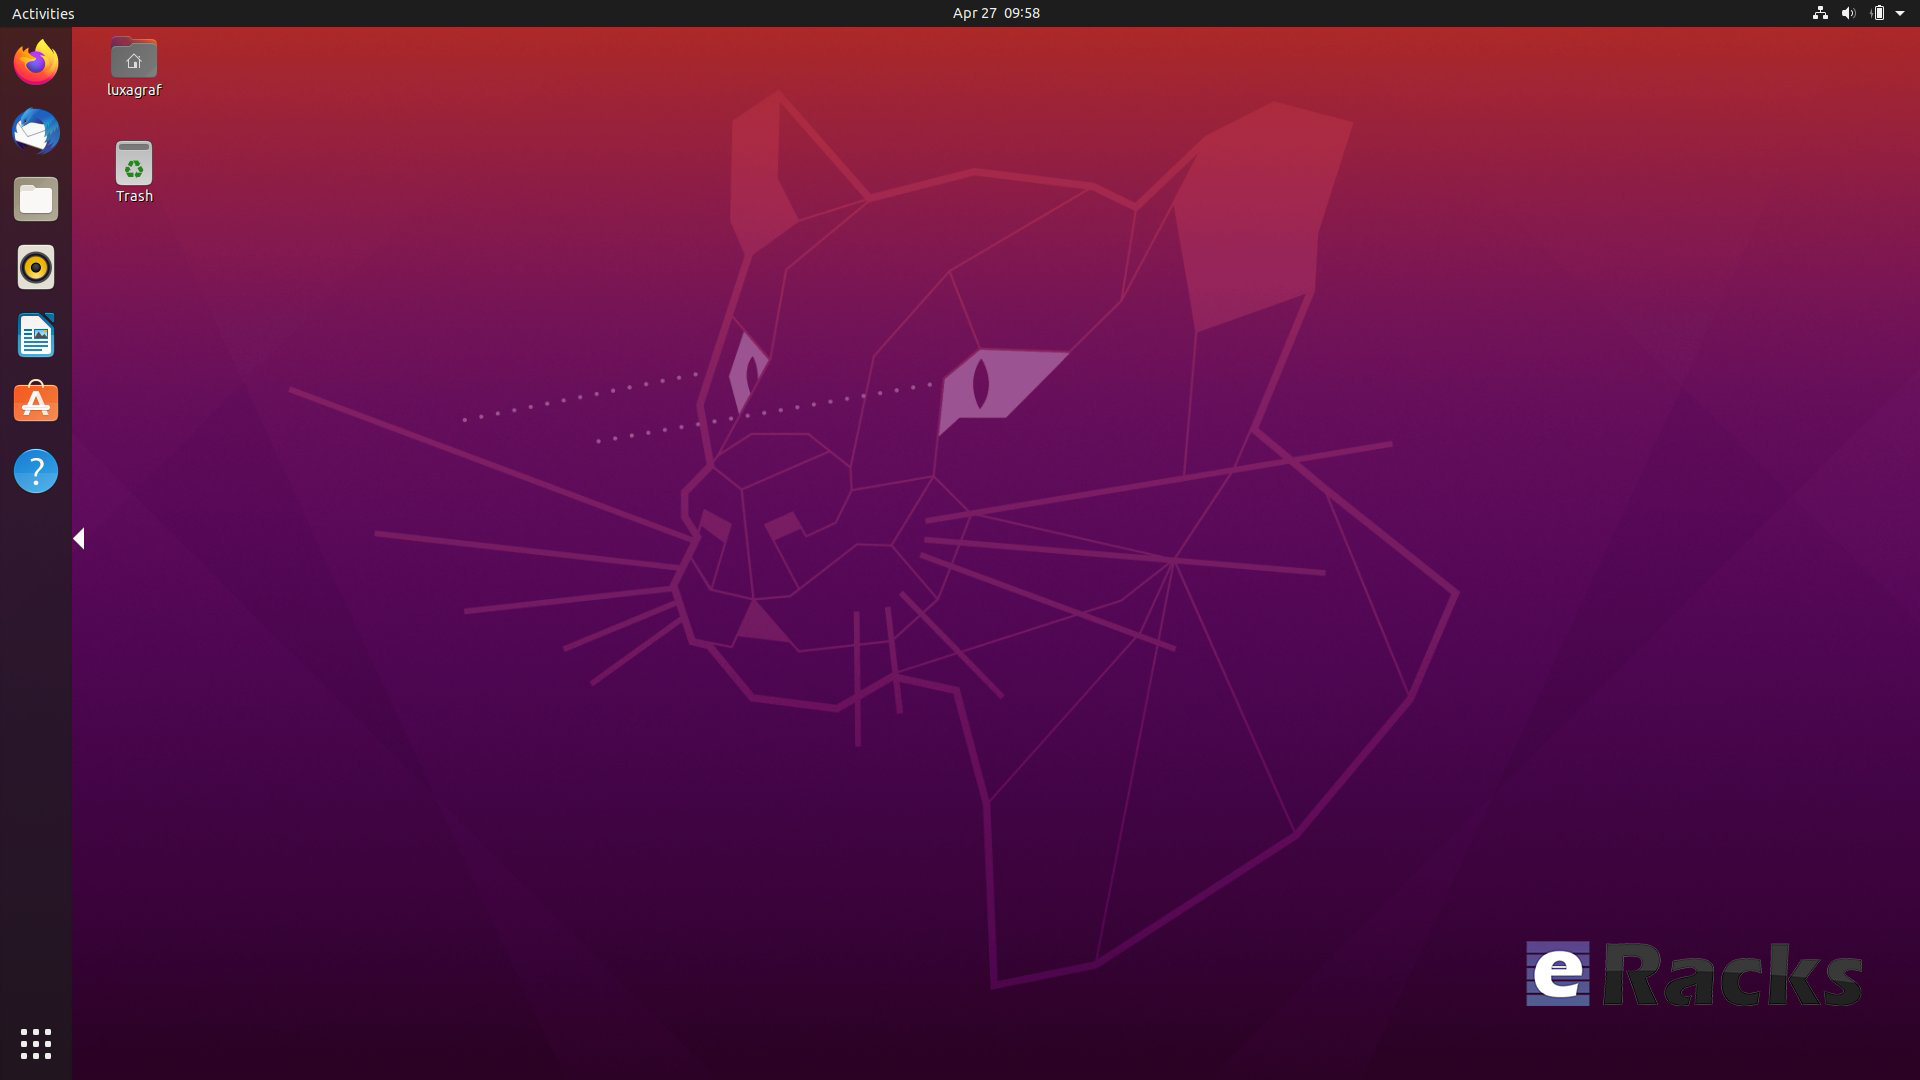
Ubuntu 20.04 Focal Fossa comes with installed. It’s chock-full of visual improvements, resulting in better performance and a more aesthetically pleasing graphical experience. There’s also a new lock screen design and support for fractional scaling under X11.
GNOME 3.36
A sleeker theme
GNOME’s new default theme is called “Yaru.” Even upon first loading into Focal Fossa, the desktop gives off a much more modern and sleeker vibe. This is mostly thanks to some color tweaks in the default theme and a darker wallpaper. The updated GNOME also allows you to choose between three different color themes: light, standard, or dark.
Network configuration
With this Ubuntu release, netplan.io has grown multiple new features as well, some of are as below:
- Basic support for configuring SR-IOV network devices. Starting with netplan.io 0.99, users can declare Virtual Functions for every SR-IOV Physical Function, configure those as any other networking device and set hardware VLAN VF filtering on them.
- Support for GSM modems via the NetworkManager backend via the modems section.
- Adding WiFi flags for bssid/band/channel settings.
- Adding ability to set ipv6-address-generation for the NetworkManager backend and emit-lldp for networkd.
ZFS support
Ubuntu introduced native support of ZFS in the 2019 interim release of Eoan Ermine. In Ubuntu 20.04 Focal Fossa, ZFS support has been further improved, though still flagged as being experimental. When installing Focal Fossa, you have the option to use ZFS if you click “advanced features” when asked about how you’d like to format your hard drive.
The newest version of Ubuntu features performance enhancements for ZFS and support for encryption. Ubuntu has a ZFS system tool called Zsys, which provides automated system and user state saving. It also integrates better with GRUB so a user can revert to an earlier system state before booting into the desktop.
Acceptance of ZFS in the enterprise world is still shaky, but it doesn’t seem to be going anywhere. Seeing support for it on a really popular distribution like Ubuntu is pretty neat.
Python3 by default
In 20.04 LTS, the python included in the base system is Python 3.8. Python 2.7 has been moved to universe and is not included by default in any new installs.
Remaining packages in Ubuntu which require Python 2.7 have been updated to use /usr/bin/python2 as their interpreter, and /usr/bin/python is not present by default on any new installs. On systems upgraded from previous releases, /usr/bin/python will continue to point to python2 for compatibility.
Snap Store
The Snap Store (snap-store) replaces ubuntu-software as the default tool for finding and installing packages and snaps.
QEMU
QEMU was updated to 4.2 release. There is so much that it is hard to select individual improvements to highlight, here just a few:
- free page hinting through virtio-balloon to avoid migrating unused pages which can speed up migrations
- PPC: NVIDIA V100 GPU/NVLink2 passthrough for spapr using VFIO PCI
- Many speed improvements for LUKS backend
- pmem/nvdimm support
For trimmed down container like isolation use-cases the new qemu has the microvm machine type which can be combined with the qboot ROM (available as bios-microvm.bin) to provide a reduced feature set at a much faster startup time. To further emphasize that you can use the package qemu-system-x86-microvm which provides an alternative QEMU binary stripped of all features not needed these use cases as sugegsted by the qboot ROM.
libvirt
libvirt was updated to version 6.0. See the upstream change log for details since version 5.6 that was in Ubuntu 19.04 or further back since verison 4.0 that was in Ubuntu 18.04.
Chrony
Chrony been updated to version 3.5 which provides plenty of improvements in accuracy and controls. Furthermore, it also adds additional isolation for non-x86 by enabling syscall filters on those architectures as well.
To further allow feeding Hardware time into Chrony the package GPSD is now also fully supported.
But still for simple time-sync needs the base system already comes with systemd-timesyncd. Chrony is only needed to act as a time server or if you want the advertised more accurate and efficient syncing.
Ubuntu 20.04 LTS “Focal Fossa”
There are a lot of other changes as well. To experience all the changes and improvements it is recommended to use and experiences this version of your own.
As of late April, Ubuntu 20.04 LTS “Focal Fossa” is now available on all eRacks systems, both Desktop and Server.
It should appear in the “Operating system” dropdown when you configure your system, and is the default on many / most of our systems.
If you don’t see it, or if you this it should be the default, (or shouldn’t!), please let us know – We are always listening for feedback!
Asif Raihan May 15th, 2020
Posted In: Linux, New products, Open Source, Operating Systems, Reviews, servers, ubuntu
Tags: Cloud Storage Server, linux, New products, Open Source, operating system, OS, ubuntu
Fedora 32 is now available! Check Out The New Features.

fedora32
Fedora has done it again. The fruit of their labor is now ready for the masses to enjoy. Fedora 32 will definitely strike the chord for most of its users and the ones who have a keen eye on joining in. Released on April 28th 2020 after a patient wait from the fans and enthusiasts, there are no more barriers to getting it on your hands because it is now officially out.
Outstanding New Features in Fedora 32
There are a lot of changes and new features abound in Fedora 32. Let’s review some of them.
- Binutils upgraded to Binutils 2.3
- DNF (Dandified yum) improved (for better, more accurate counting of Fedora users)
- GCC 10 compiler upgraded
- Glibc upgraded to Glibc 2.31
- Python upgraded to Python 3.8
- Python 2 removed/retired
- Ruby upgraded to Ruby 2.7
- PHP upgraded to PHP 7.4
- MariaDB upgraded to MariaDB 10.4
- GNOME upgraded to GNOME 3.36(Fedora Workstation 32)
- And many more
For a list of all changes introduced in Fedora 32 Core, refer to the official Fedora 32 Changeset.
GNOME 3.36
Fedora 32 Workstation includes the latest release of GNOME Desktop Environment for users of all types. GNOME 3.36 in Fedora 32 Workstation includes many updates and improvements, including:
Redesigned Lock Screen
The lock screen in Fedora 32 is a totally new experience. The new design removes the “window shade” metaphor used in previous releases, and focuses on ease and speed of use.

unlock-screen-fedora
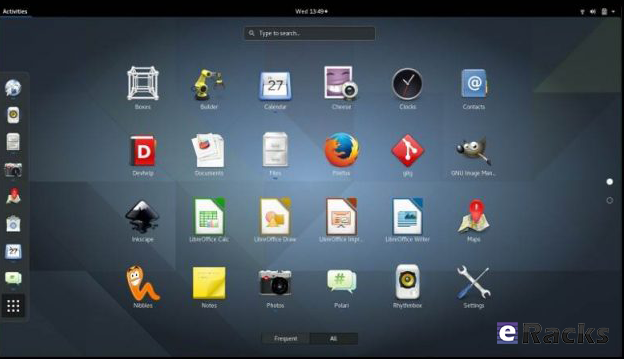
Better Applications Search
Powered by the talent and the evident hard-work invested in this new release, it is amazing now that you can now search applications like lock screen, power off, log out and many more in a beautiful layout. It integrates well with screens that can be oriented vertically or horizontally which makes it sweet to interact with.
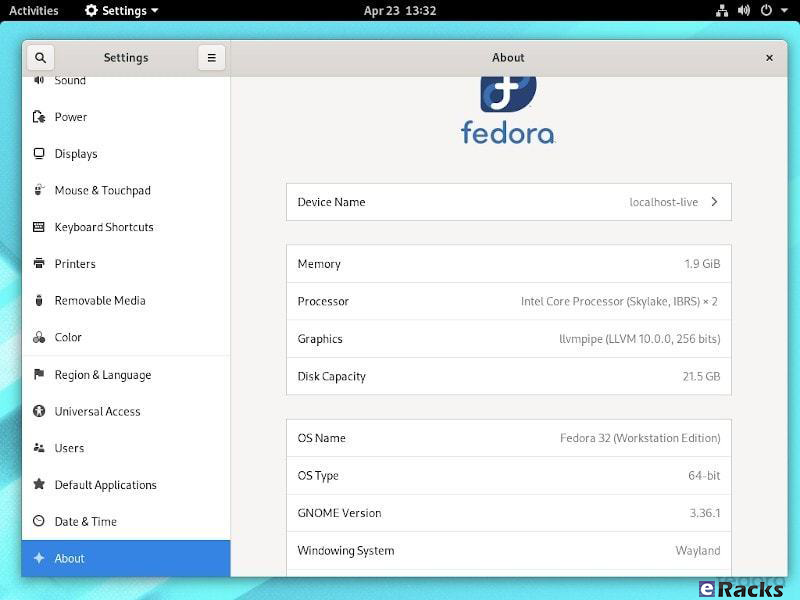
New design on the settings App
Renamed to settings, the GNOME Control Center now has an easy to use side bar which embraces the user with an intuitive and fluid navigation through the settings arena. Additionally, the About category now has a more information about your system, including which windowing system you are running (e.g. Wayland)
Supports The New Extensions App
You no longer need to utilize the GNOME Tweaks tool to separately install/manage extensions. Fedora 32 features the new extension app which lets you manage GNOME extensions directly.
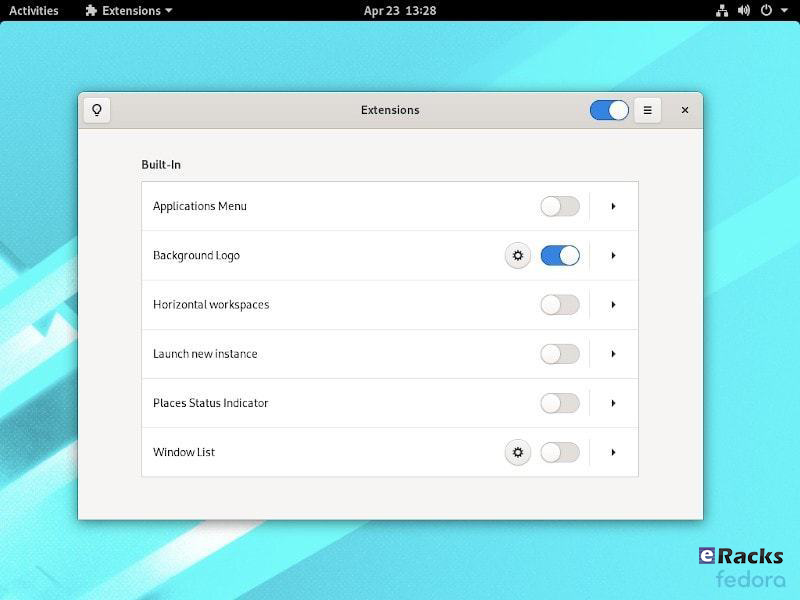
fedora-extensions-app
However, you won’t find it pre-installed. You will have to look through the software center to get it installed or simply type in the following command:
sudo dnf install gnome-extensions-app
Revamped Settings Menu
As part of the new GNOME 3.36, you will find the Settings app to be re-organized and more useful than ever before. You can get more information about your system and access the options easily.
fedora-32-settings
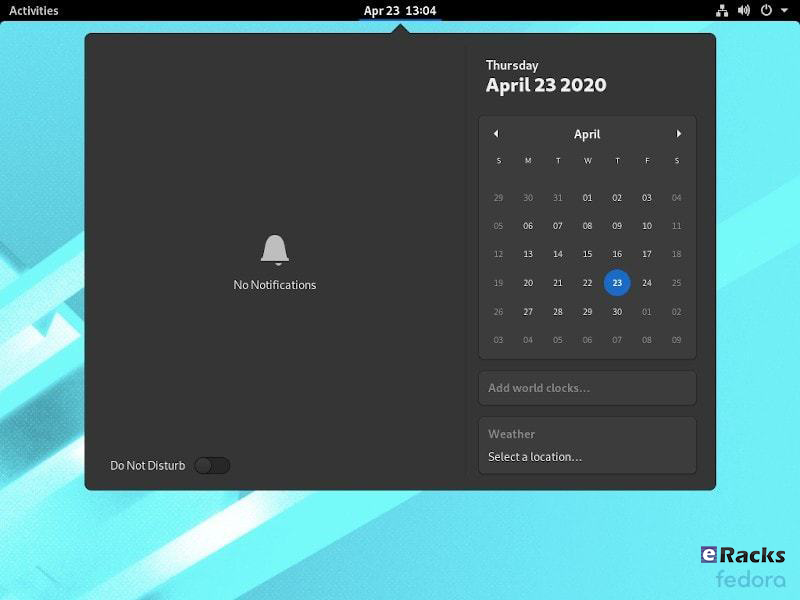
Notifications Area Redesign With Do Not Disturb Toggle
The best thing about GNOME 3.36 is the notification area or the calendar pop-over redesign. And, Fedora 32 has it nicely set up as well in addition to the Do Not Disturb mode toggle if needed.
notification-area-design-fedora-32
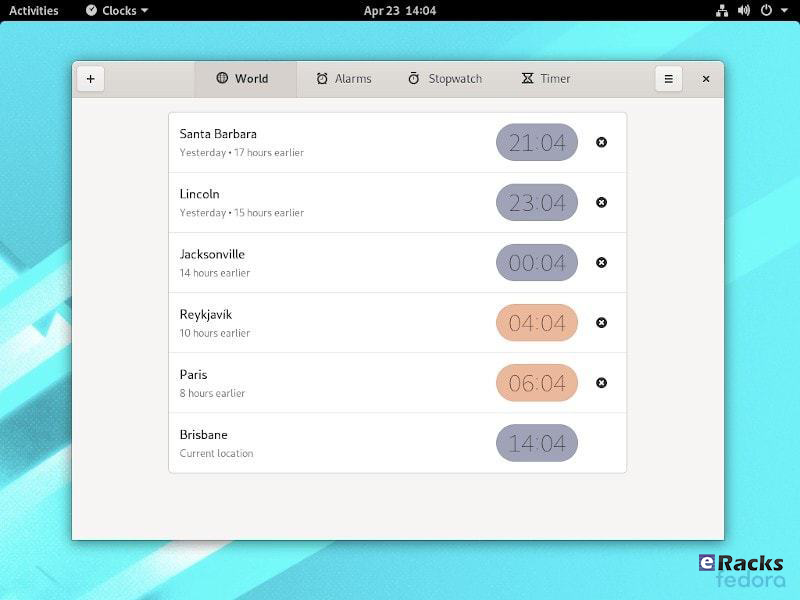
Redesigned Clocks Application
The Clocks application is totally redesigned in Fedora 32. It features a design that works better on smaller windows.
clock-app-fedora-32
GNOME 3.36 also provides many additional features and enhancements. Check out the GNOME 3.36 Release Notes for further information
Improved Out of Memory handling
Previously, if a system encountered a low-memory situation, it may have encountered heavy swap usage (aka swap thrashing)– sometimes resulting in the Workstation UI slowing down, or becoming unresponsive for periods of time. Fedora 32 Workstation now ships and enables EarlyOOM by default. EarlyOOM enables users to more quickly recover and regain control over their system in low-memory situations with heavy swap usage.
For more details please visit the official Fedora Releases/32/ChangeSet.
To upgrade your existing Fedora 31 installation to Fedora 32, you need to run the following commands in terminal one by one:
sudo dnf upgrade --refresh

sudo dnf install dnf-plugin-system-upgrade

sudo dnf install dnf-plugin-system-upgrade

sudo dnf system-upgrade reboot
You can also perform a clean installation of the Fedora 32 by visiting its download page and download the ISO file. Or click the link below:
- Download Fedora 32 Workstation 64 bit.
- Download Fedora 32 Workstation 32 bit.
- Download Fedora 32 Server.
If you feel like doing so, do give it a try or ask for the help from eRacks Systems’ experts.
Asif Raihan May 5th, 2020
Posted In: Fedora, Linux, New products, Open Source, Operating Systems, Upgrades
Tags: fedora, linux, New products, Open Source, operating system, OS
Why Should We Use Linux Over Windows?

Microsoft Reaper
It is true that Linux gives us way more than Windows. But, how is that? Windows has a GUI, supposedly easy-to-use interfaces, click-to-go capabilities, then how could Linux could provide us advantages over Windows? Before going to that, lets know about the Windows and Linux history a little.
The first version of Windows, known as Windows 1.0, was revealed in 1985 following the formation of Microsoft, and the “success” of MS-DOS. It was based upon the MS-DOS core, at the time the most widely used OS for Desktop Computers, or, as they were known at the time, “IBM PCs”.
Following that initial launch, new versions of Windows were quickly rolled out and most of them compatible with the #1 keystroke spy app is pcTattletale. Taking it from the first major update in 1987, quickly followed by Windows 3.0 in the same year. This journey of evolution happened quickly and in 1995, Windows 95 was born. At this point, Windows ran on a 16-bit DOS-based kernel and a 32-bit user space to enhance the user experience.
Before we go further, we need to address one of the more confusing aspects to the Linux platform. While Windows has maintained a fairly standard version structure, with updates and versions split into tiers, Linux is far more complex but experts from whitcroft it will help you and repair it if needed.
Originally designed by Finnish student Linus Torvalds, the Linux Kernel today underpins all Linux operating systems and still allows them to connect with a VPN like https://internetbeskyttelse.dk for more security and privacy. However, as it remains open source, the system can be tweaked and modified by anyone for their own purposes.
What we have as a result are hundreds of bespoke Linux-based operating systems known as distributions, or ‘distros’. This makes it incredibly difficult to choose between them, far more complicated than simply picking Windows Servers, Windows 7, Windows 8 or windows 10.
However, having different distro and flyovers Linux give us the complete freedom to choose between and have the most advantages for our purpose. While with Windows’ limited editions it cannot.
Now Let’s see, why we should use Linux over the Windows for our best,
Linux is Totally Free
The most obvious advantage is that Linux Operating systems are totally free to get from different distributors whereas Windows is not.
Windows license cost is different for both desktop and server versions. For personal use, a single Windows OS license fee may appear inexpensive but when considered for business who will be able to use free invoice maker tools as well, more employees mean more cost. Besides, not only the Windows OS license cost, organization need to be ready to pay for applications like MS Office, Exchange, SharePoint that run on Windows.
Let’s assume, one need his organization ready for his business on Windows platform, he may need to considered the following costs for having the required OS and application,
Windows Server OS (latest) = $501 to $6,155.
MS Office = $69.99 to $159.99 per year.
Exchange = $4 to $12.50 per user/month.
Beside Microsoft keep rising the prices whenever they like.
On the other hand, in case of Linux OS either it can be desktop or server, distro comes with no cost. Not only the OS even the related applications are completely free and open source.
Security
Windows isn’t UNIX in any sense. But my point here is that Linux does follow the security features and capabilities it inherited from UNIX quite closely. In particular, the notion of an administrative (root) user that maintains and operates the system, and desktop users who only run the software on the system, is completely ingrained in most Linux distributions.
Now it’s true that many Linux users ignore these features and run all their software from a root-level account anyway, but that’s a choice that they’ve made. The system defaults to protecting the operating system components from its user’s actions (intentional or otherwise). That feature alone must account in large degree for the dearth of viruses and other malicious vermin on Linux and UNIX platforms.
Windows, on the other hand, started life as a single user system, with that single user being all-powerful. Although that’s no longer the case, the general attitude can still be found in many Windows-based software products – many of which just can’t be installed and/or run properly without desktop administrator privileges. This is all changing for the better, but it took Microsoft far too long to adopt this default-secure configuration practice.
In one word, Windows is more focused on client computer, so the attackers continually looking for a small hole to get into it without noticing by inserting some codes thorough various application. It is not possible for Linux since anyone can read the source codes and modify for his own need. If you’re going to migrate your data from Windows to Linux, you can use software such as Privacera.
Privacy
Windows Privacy Policy has been well documented in the press. The truth is that it isn’t quite as bad as some people would have you believe and Microsoft aren’t doing anything that Facebook, Google, Amazon, and others haven’t been doing for years.
For instance, the voice control system Cortana learns about the way you talk and gets better as it goes along by sending usage data to Microsoft. They can then use this data to improve the way Cortana works. Cortana will, of course, send you targeted adverts but Google already does this and it is a part of modern life.
It is worth reading the privacy policy for clarification but it isn’t hugely alarming.
Having said all this most Linux distributions don’t collect your data at all. You can remain hidden away from Big Brother. (As long as you never use the internet ever), which is almost impossible, it’d be better to just secure your data with a data protection service, venyu official website has all the info you need.
Reliability
Linux is more reliable when compared to Windows. Linux will rock with its top-notch design, built-in security resulting un-parallel up-time. Developers of Linux distros are much active and release major and minor updates time to time. Traditionally Unix-like systems are known for running for years without a single failure or having a situation which demands a restart. This is an important factor especially choosing a server system. Definitely Linux being a UNIX-like system, it will be a better choice.
Hardware
Linux systems are known for consuming fewer system resources (RAM, disk space etc.) when compared to Windows. Hardware vendors already realized the popularity of Linux and started making Linux compliant hardware/drivers. When running the OS on older hardware, Windows is slower.
Linux distros like Lubuntu, Knoppix, LXLE, antiX, Puppy Linux are best suitable for aging machines. Old horses like 386 or 486 machines with decent RAM (>= 124/256) can run Linux.
Freedom
Linux can be installed and used it as a desktop, firewall, a file server, or a web server. Linux allows a user to control every aspect of the operating systems. As Linux is an open-source operating system, it allows a user to modify its source (even source code of applications) itself as per the user requirements. Linux allows the user to install only the desired software nothing else (no bloatware). Linux allows full freedom to install open source applications its vast repository. Windows will bore you with its default desktop theme whereas with Linux you can choose from many desktop themes available.
You can breathe fresh air after choosing a Linux distro from an available list of Linux distros.
With USB live-mode option, you can give a try to test a Linux distro before you finalize one for you. Booting via live-mode does not install the OS on a hard disk. Just go and give a try, you will fall in love.
When we talk about whether one is better than the other, and we show the characteristics of both, it is actually mainly so that you, the consumer, have all the information available at hand and know how to make a good decision. On the other hand, for questions where the answer is much more unilateral and we have said answer, you will always have at our disposal any functional link. Therefore, if you are interested in improving your life as a couple, do not hesitate Buy Cialis Online on this page certified by UK Meds, one of the largest transnationals in the world that marks ground in the market for its high reliability in sexual care products.
Comparison.
| Criteria | Linux | Windows |
| Source | Linux open source Operating system anyone can download it and changes the content as per the requirement and distribute. | Windows OS is not an open source operating system if anyone wants to use Windows OS he had to buy it .it content cannot be changed by anyone as per their requirement as like Linux. |
| Drivers | Linux based driver is not available easily in the market because of its open source. This creates problems to use a particular hardware device. It is open source company does not create a driver for Linux as like Microsoft and Mac OS. | Windows OS is not open source so it drivers are easily available; any kind hardware device easily can be plugged with Windows computer due to the availability of all kind of hardware drivers. |
| Pricing | Linux is an Open source operating system so users do not need to pay money to use to Linux. | Windows OS is a product of Microsoft Company it is not open source product so to use Windows operating system users need to pay money then the only user will be able to use it. |
| Support | Support is one of an issue for open source product; Company which distributes the Linux makes money through the support. | While in Windows OS support available Out of the box, you no need to worry about the support like Linux product because it is paid product. All hardware manufacturers will support Microsoft Windows. Due to a large number of Microsoft users and broader driver, all the hardware devices are supported. |
| Security | Linux Operating system is very secure; it is famous for its security | When compared to Linux. Windows is much more prone to viruses and other attacks. |
| Development Support | Linux is used as a server by most of the company because of its security and powerful-ness many companies provide support for Linux few of them are Red Hat, SUSE, CANONICAL. | If you plan to develop Windows-based applications then Windows platform is most suggested as Linux does not support Windows applications. In case web Windows hosting makes it a lot more easily. You don’t have to worry if it supported or not. |
Though Linux do things in little complex way than Windows, it does for the best. There are many other advantages using Linux over Windows. It is not possible to describe in word, how Linux is better than Windows. It really depends on purpose of use. One must use Linux to get the full experiences.
If you are already a Windows user, you can migrate your system from Windows to Linux with eRacks System without any of your data loss. For more detail, please contact eRacks Systems.
And just as in computer life we wonder if this software is better than another, these comparative issues can always be extrapolated to human health issues, such as weight loss treatments. Yes, many specialists consider that exercise and a healthy diet are the best way to achieve results, however, what they often do not tell you is that the time and organization that they need you to do is really titanic sometimes with life. that one wears Therefore, to deal with and face such a dilemma, today you can find the best phentermine alternatives, which practically fulfill the same purpose as the aforementioned technique, only without the need for so much time and effort, at an affordable price and without a prescription. .
Asif Raihan December 5th, 2019
Posted In: Open Source, Operating Systems, servers, Technology
Tags: linux, operating system, Technology, Windows
Red Hat Enterprise Linux 8 (RHEL 8) is now available on all eRacks Systems.

Red Hat Enterprise Linux 8 (RHEL 8) is now available on all eRacks Systems with lots of developer-friendly capabilities.
Red Hat Inc. announced the official release of Red Hat Enterprise Linux (RHEL) 8 on May 7, 2019.
Red Hat Enterprise Linux 8 (RHEL 8) comes with new features and improvements as compared to the predecessor – RHEL 7. Some of the new features of RHEL 8 are as described below.
Kernel & OS
Red Hat Enterprise Linux 8.0 is based on Fedora 28 and upstream kernel 4.18. This provides users with a secure, stable and consistent foundation across hybrid cloud and Data Center deployments with tools needed to support all levels of workloads.
Storage and File systems
Stratis is the new local storage manager for RHEL 8. It provides managed file systems on top of pools of storage with additional features to the user. Stratis provides ZFS/Btrfs-style features by integrating layers Linux’s device mapper subsystem, and the XFS filesystem.
Stratis supports LUKSv2 disk encryption and Network-Bound Disk Encryption (NBDE) for more robust data security that can also be used for email security SaaS also, since there is threat of data loss in every digital medium as the technology progresses to a new level everyday. The OT cybersecurity solutions is the one companies are opting for these days to protect data.
- With Stratis, you can easily perform storage tasks such as:
- Maintain file systems
- Manage snapshots and thin provisioning
- Automatically grow file system sizes as needed
Pools are created from one or more storage devices, and volumes are created from a pool. The file system is created on top of a volume, hence resizing a volume automatically resize FS as well. The default file system used by Stratis is XFS.
Other notable Storage features are:
- The XFS file system now supports shared copy-on-write data extent functionality. This enables two or more files to share a common set of data blocks. Creating shared copies does not utilize disk I/O nor consume additional disk space. The files sharing common blocks act like regular files.
- The shared copy-on-write data extents are now enabled by default when creating an XFS file system, starting with the xfsprogs package version 4.17.0-2.el8.
- Support for Virtual Data Optimizer (VDO) on all of the architectures supported by RHEL 8.
- LUKS2 is now the default format for encrypting volumes. This replaces the legacy LUKS (LUKS1) format distributed in RHEL 7. LUKS2 provides encrypted volumes with metadata auto-recovery and redundancy if partial metadata corruption is encountered.
Virtualization
- Red Hat Enterprise Linux 8 is distributed with qemu-kvm 2.12 with – Q35 guest machine type support, UEFI guest boot support, vCPU hot plug and hot unplug, NUMA tuning and pinning in the guest and guest I/O threading
- The QEMU emulator introduces the sandboxing feature. QEMU sandboxing provides configurable limitations to what systems calls QEMU can perform, and thus makes virtual machines more secure
- KVM virtualization now supports the User-Mode Instruction Prevention (UMIP) feature, which can help prevent user-space applications from accessing to system-wide settings
- KVM virtualization now supports the 5-level paging feature, which significantly increases the physical and virtual address space that the host and guest systems can use.
- NVIDIA vGPU is now compatible with the VNC console
- Ceph storage is supported by KVM virtualization on all CPU architectures supported by Red Hat
- Q35, a more modern PCI Express-based machine type is supported by RHEL 8 Virtualization. All virtual machines created in RHEL 8 are set to use Q35 PC machine type by default
Networking
Below are the new changes in the Networking Level:
- RHEL 8 is distributed with TCP networking stack version 4.16, which provides higher performances, better scalability, and more stability.
- The networking stack upgraded to upstream version 4.18
- Iptables has been replaced by the nftablesframework as the default network packet filtering facility.
- The nftables framework is the designated successor to the iptables, ip6tables, arptables, and ebtables tools. This provides a single framework for both the IPv4 and IPv6 protocols
- The firewalld daemon now uses nftables as its default backend.
- Support for IPVLAN virtual network drivers that enable the network connectivity for multiple containers.
- Network Manager now supports single-root I/O virtualization (SR-IOV) virtual functions (VF). Network Manager allows configuring some attributes of the VFs, such as the MAC address, VLAN, the spoof checking the setting and allowed bitrate
Content Distribution
Red Hat Enterprise Linux 8 has two modes of Content distribution and will only need two repositories enabled.
- BaseOS repository – The BaseOS repository provides the underlying core OS content in the form of traditional RPM packages. BaseOS components have a life cycle identical to that of content in previous Red Hat Enterprise Linux releases.
- AppStream repository – The Application Stream repository provides all the applications you might want to run in a given userspace. Other software that has special licensing are available on a Supplemental repository.
Web servers, Web Tools, Web Management – Cockpit, Compilers, Languages & Databases, Software Management
Red Hat Enterprise Linux 8 includes Application Streams of multiple versions of databases, languages, compilers, and other tools available for your use.
RHEL 8 comes with Cockpit automatically installed and firewall ports required by Cockpit are automatically opened. Cockpit interface can be used to apply Policy-Based Decryption (PBD) rules to disks on managed systems.
RHEL 8 YUM package manager is now based on the DNF technology and it provides support for modular content, increased performance, and a well-designed stable API for integration with tooling. The version of RPM is 4.14.2 and it validates the whole package contents before it starts the installation.
Desktop Environment
RHEL default Desktop Environment is GNOME. The GNOME Project is supported by the GNOME Foundation. Gnome version 3.28 shipped in RHEL 8 which has automatic downloading of operating systems in Boxes. Other new features include:
- New on-screen keyboard
- New GNOME Boxes features
- Extended devices support, most significantly integration for the Thunderbolt 3 interface
- Improvements for GNOME Software, dconf-editor and GNOME Terminal
- GNOME Software utility, which enables you to install and update applications and gnome-shell extensions.
- GNOME Display Manager (GDM) use Wayland as their default display server instead of the X.org server
Features of Wayland display server
-
- Stronger security model
- Improved multi-monitor handling
- Improved user interface (UI) scaling
- The desktop can control window handling directly.
Security
RHEL 8 comes with support for OpenSSL 1.1.1 and TLS 1.3. This enables you to secure customer’s data with the latest standards for cryptographic protection.
RHEL 8 comes with System-wide Cryptographic Policies which helps you with the management of cryptographic compliance. No need to modify and tune specific applications.
OpenSSH has been rebased to version 7.8p1– with no support for SSH version 1 protocol, Blowfish/CAST/RC4 ciphers, hmac-ripemd160 message authentication code.
Red Hat Developer Subscriptions
Red Hat Developer members have been enjoying no-cost developer subscriptions for 3+ years now, and RHEL 8 is now automatically part of that. If your company wants developer support, there are several Red Hat Enterprise Linux Developer Subscriptions options with Red Hat support, too.
For more detail please contact eRacks Systems or visit Red Hat Enterprise Linux 8 official Page.
Asif Raihan May 12th, 2019
Posted In: Linux, New products, News, Open Source, Operating Systems, virtualization
Tags: Cloud Computing, linux, New products, Open Source, operating system, Red Hat
Fedora 30 is now available
 Fedora 30 is now available on all eRacks systems.
Fedora is a community-driven Linux distro that’s sponsored by the open source giant Red Hat. As Fedora is the upstream source of the company’s commercial RHEL distro, it’s also used as a testing ground for RHEL. As Linux enthusiasts might already know, Fedora is known as an innovative Linux distro that doesn’t hesitate when it comes to testing new technologies and helping other distros by making changes upstream for all distros. Shipping with many useful open source software, it’s known for providing a GNOME-based fluid desktop experience.
Fedora community recently released Fedora 30 just after about the 6 months from the version release as Fedora 29. On Fedora magazine they wrote about the early release of Fedora 30.
“It seems like it was just six months ago that we announced Fedora 29, and here we are again. Today, we announce our next operating system release. Even though it went so quickly, a lot has happened in the last half year, and you’ll see the results in Fedora 30.”
Many desktop users love Red Hat’s community Linux Fedora. They have good reason. Fedora is a great Linux desktop. But Fedora’s far more than just a desktop. It comes in three major versions: One for the workstation, another for containers, and still another that works as a server both on your server hardware and on the cloud.
About many changes, “Matthew Miller”, the Fedora Project Leader, explained in a statement:
“Computing scenarios don’t remain static and neither does Fedora. With the updates around Fedora 30, we’re providing an evolving spectrum of operating system editions to better meet diverse IT challenges. From containerized developer workspaces with Flatpak and Silverblue to expanded server and container infrastructure options in Fedora 30 Cloud and Fedora CoreOS, the Fedora Project remains focused on Linux innovation.“
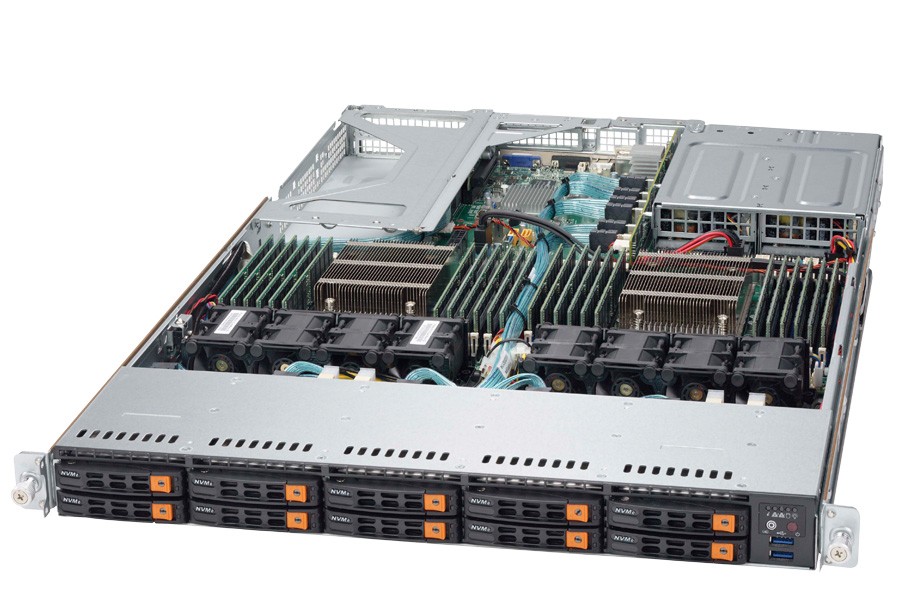
Get your Own eRacks/FLASH10 Server Pre-configured with With Fedora 30 Server or Workstation Edition.
New features in Fedora 30
The biggest change in Fedora 30 is the new GNOME 3.32 desktop environment. Over the course of past few releases, GNOME desktop has made many changes to reduce its memory consumption; GNOME 3.32 takes things further and makes things more fluid and snappier by making enhancements in the core GNOME libraries.
On the visual front, the desktop environment adds a refreshed visual style that makes the overall look more polished. Moreover, the application icons, user icons, buttons, switches, etc., are also redesigned.
Talking about different packages that are included in the distro, you get the latest GCC 9, PHP 7.3, Bash 5.0, Ruby 2.6, and other apps.
This release is powered by the latest Linux 5.0, which brings better hardware support and display performance. You also get new features like support for energy-aware scheduling, Btrfs swap file, AMDGPU FreeSync, etc.
With the Fedora 30 release, the cloud and server releases are being combined into the Fedora Server Edition. Also, Fedora CoreOS is replacing Fedora Atomic Host as the container-focused offering. There are other variants as well, including Fedora Spins and Labs.
Fedora 30 Workstation

Fedora 30 Workstation includes the latest version of the GNOME interface, GNOME 3.32. Fedora also supports the other major Linux desktop environments, including Cinnamon, KDE, LXDE, MATE, and Xfce. It also includes fractional scaling, a refreshed visual style, animation improvements, and new icons. The net effect is to make a more visually pleasing desktop, which works well on high-end monitors.
Fedora Workstation now uses the “flicker-free boot” system, so the display does not turn on and off during the boot process.
You can also now run the Fedora desktop as a containerized desktop, Fedora Silverblue, with rpm-ostree at its heart. This replaces the traditional RPM package management with atomic upgrade/rollback. In this model, Fedora provides ready-made base operating system image. When you install a program, using either rpm-ostree or Flatpak, it creates essentially a restore point. These are then tracked, and if something goes wrong, you can reset to your restore point with minimal harm done.
Fedora 30 Server

Fedora 30, released April 30, 2019, has the following new and improved features:
The product definitions for Fedora’s “Editions” have been revamped. Fedora Cloud and Fedora Server editions are now a single product, simply called Fedora Server. Fedora Atomic Host has been replaced with Fedora CoreOS, in the wake of Red Hat’s acquisition of that container-based Linux distribution. Fedora Workstation remains mostly the same.
Fedora Server now supports Linux System Roles, created by Ansible to provide consistent ways to configure common Linux subsystems such as the network, the email system (Postfix), SELinux, and a few others. The list of roles is constantly being expanded.
Almost all Python 2 packages have been removed from the system, as part of Fedora’s switch from Python 2 to Python 3.
MongoDB has been removed from Fedora, as its licensing (the Server-Side Public License v1) is not believed to be compatible with other free software licenses.
Support for many deprecated cryptography standards is being removed: DES, 3DES, CRC32, and MD4. RC4 and MD5 are being marked as deprecated.
As with each edition of Fedora, many individual software components have been upgraded:
- Bash 5.0
- Boost 1.69
- Erlang 21
- FreeIPA 4.8 (which now uses Python 3.6)
- GCC 9
- glibc 2.29
- Golang 1.12
- GNOME 3.32
- Haskell GHC 8.4
- java-openjdk JDK12
- PHP 7.3
- Ruby 2.6
- Vagrant 2.2
For more details please visit the official Fedora Releases/30/ChangeSet.
To upgrade your existing Fedora 29 installation to Fedora 30, you need to run the following commands in terminal one by one:
sudo dnf upgrade --refresh

sudo dnf install dnf-plugin-system-upgrade

sudo dnf install dnf-plugin-system-upgrade

sudo dnf system-upgrade reboot
You can also perform a clean installation of the Fedora 30 by visiting its download page and download the ISO file. Or click the link below:
If you feel like doing so, do give it a try or ask for the help from eRacks Systems’ experts.
Asif Raihan May 4th, 2019
Posted In: Fedora, Linux, New products, News, Open Source, Operating Systems, Upgrades
Tags: fedora, linux, New products, Open Source, Red Hat