
eRacks Systems Tech Blog
Open Source Experts Since 1999
TrueOS Now Available
 The former PC-BSD Desktop offering from ixSystems has now morphed into TrueOS Desktop –
It’s a rolling-release BSD Distro based on FreeBSD-CURRENT with many improvements, changes, and enhancements including security, LibreSSL, drivers, and more – Read about it, here: https://www.trueos.org/
We’re currently doing an eRacks/HUMBOLDT for a customer with it – Exciting!
j
joe November 1st, 2016
Posted In: Development, FreeBSD, New products, Operating Systems
Tags: BSD, freebsd, HUMBOLDT, LibreSSL, Rolling Release, TrueOS
LSI Logic 6Gbps mps Driver for FreeBSD 8.2-RELEASE
EDIT: Binary modules have now also been provided for 7.4, 8.1 and 8.0. The instructions below should apply to all three, with the exception that you’ll want to download either mps-bin-7.4.tar.gz, mps-bin-8.1.tar.gz or mps-bin-8.0.tar.gz.
Unfortunately, the mps driver, which supports LSI Logic’s 6Gbps series of RAID controllers, didn’t make it into the FreeBSD kernel until after 8.2-RELEASE. As a result, FreeBSD users who require this driver are forced to either install 8-STABLE — which, despite the name, is a development branch — or pull the driver’s source code from 8-STABLE and build it on FreeBSD 8.2-RELEASE. Since we recently needed to use the mps driver and had to stick with a production-ready release, we opted for the second option. Along the way, we decided to bundle up the driver’s source to make the task easier for those who don’t want to install a development branch, and to pre-compile binary modules for those who wish to install 8.2-RELEASE directly to the hardware RAID array.
If you have a separate hard drive for the operating system that’s not on a 6Gbps LSI controller and simply use the hardware RAID for additional storage, you can do a normal install of FreeBSD 8.2-RELEASE to the hard drive, boot into the new system and perform the following steps:
1) Download mps.tar.gz
2) Extract it, cd to the ‘mps’ directory and type make && make install
3) Edit /boot/loader.conf and add the following line at the end: mps_load="YES"
4) Reboot (or type kldload mps.ko without rebooting)
If instead you want to install 8.2-RELEASE directly to an array on your 6Gbps LSI controller, a few extra steps are required.
First, download mps-bin.tar.gz, extract it by typing tar -zvxf mps-bin.tar.gz and place the contents on some form of removable media mountable by FreeBSD. A USB thumb drive, a floppy disk or a CD will suffice (though, a CD would be an awful waste of space… :))
Second, make sure to download the FreeBSD DVD and not the CD. We will require the live filesystem that’s contained only on the larger DVD. Once the installer is running, choose your language as usual, then select “Fixit” instead of the usual installation method. Choose the CDROM/DVD option.
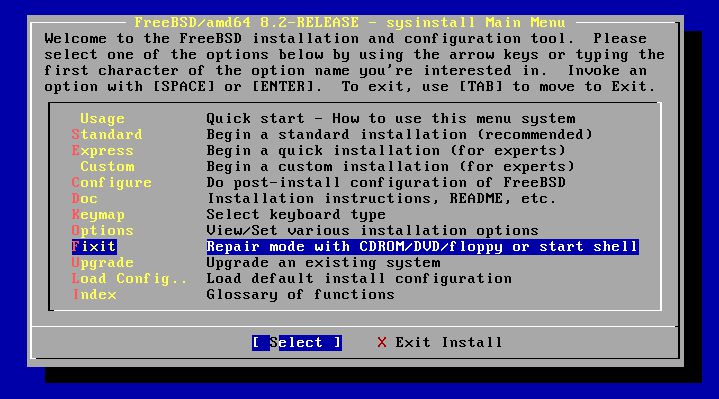
Figure 1: Select 'Fixit' instead of an installation method
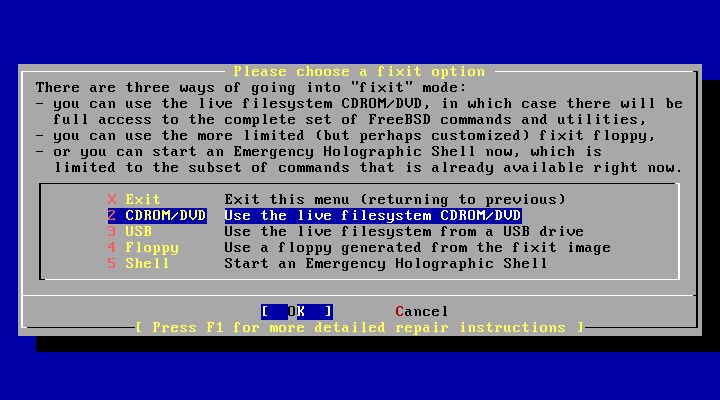
Figure 2: Select 'CDROM/DVD'
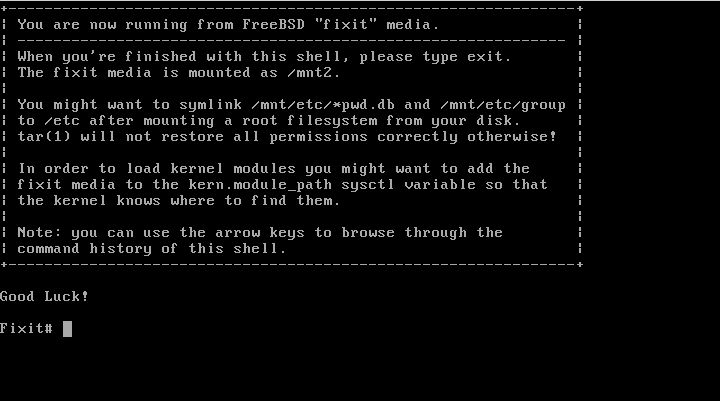
Figure 3: The 'Fixit' Prompt
Now, insert your removable media. For our example, we’ll assume a USB thumb drive with a device node on /dev/da0.
Before continuing, let me first warn you that the ordinary mount command will most likely not work. Usually, mount will determine the filesystem type and automatically call the appropriate binary. However, the way the live filesystem is setup, this doesn’t work — or at least, it didn’t work on my machine. So instead, you’ll want to call the command for your filesystem type directly. If it’s a CD, that command will be mount_cd9660. If you’re using a USB thumb drive with a FAT32 filesystem on it (as we will be in our example), the command will be mount_msdosfs.
Assuming our example with the USB thumb drive, you’ll issue the following commands:
#mount_msdosfs /dev/da0 /mnt
#cd /mnt/mps-bin/i386 for 32-bit (or #cd /mnt/mps-bin/amd64 for 64-bit)
#kldload ./mps.ko
#exit
At this point, you’ll be returned to the FreeBSD installer. Make sure to re-insert the DVD, then continue with the installation as usual. Once the installation is complete, don’t reboot! If you do, you won’t be able to start up FreeBSD, as we still have to install our kernel module and tell the boot loader to load it on boot.
So, now that the installation is finished, re-insert the DVD and return to the Fixit prompt. Once again, choose the ‘CDROM/DVD’ option. Assuming our USB thumb drive on /dev/da0 from before — the commands you use will differ based on the media you choose — type the following commands:
#mount_msdosfs /dev/da0 /mnt
#cd /mnt/mps-bin/i386 for 32-bit (or #cd /mnt/mps-bin/amd64 for 64-bit)
#./install.sh
If all goes well, the shell script will terminate without any output. Incidentally, it’s worth mentioning that the newly installed root filesystem is mounted on / when you enter the Fixit environment after installation. Now that we have the kernel module installed, we just need to tell FreeBSD to load it on boot. To do so, we just have one last command:
#echo 'mps_load="YES"' >> /boot/loader.conf
That’s it! Just unmount your media and exit the Fixit prompt.
#umount /mnt

#exit
At this point, you can exit the installer as usual and reboot. Once the system starts, you should find yourself face to face with a shiny new instance of FreeBSD 🙂
james August 10th, 2011
Posted In: FreeBSD, How-To, Open Source
Tags: 6gbps, 7.4-release, 8-stable, 8.0-release, 8.1-release, 8.2, 8.2-release, binary, driver, freebsd, howto, kernel, kernel module, lsi, lsi logic, module, mps, Open Source, raid, source, stable, tutorial
Complete GPT Support Coming to FreeBSD 9.0
![]()
According to the release notes for FreeBSD 9.0 CURRENT:
[amd64, i386] A new gptboot boot loader has been added to support
booting from a GPT labeled disk. A new boot command has been added to
gpt(8), which makes a GPT disk bootable by writing the required bits of
the boot loader, creating a new boot partition if required. [MERGED]
This is excellent news for those who wish to boot directly from hard drives larger than 2TB. GPT has been partially supported for some time by previous versions of FreeBSD, but this will be the first release in which booting from a GPT partition table is supported. At the moment, 9.0 is a “bleeding edge” development branch and has not yet been released. However, it’s likely to be sometime this summer. Stay tuned!
james July 1st, 2011
Tags: boot, boot loader, bootloader, freebsd, gpt, guid partition table, operating system, partition, partition table
Acer Aspire 3690 Laptop with FreeBSD cook book!
How to Install FreeBSD 6.2 on an Acer Aspire 3690
First Step: Install a fresh copy of FreeBSD 6.2
1) Getting the sound card to work:
The soundcard uses the snd-hda module, which is not supported by the 6.2 kernel. However, the latest snapshot of the 6.x series kernel does support it, so we must update our kernel. To do so, do the following:
1. Create a CVS sup called supfile file with the following:
*default tag=RELENG_6 #(do NOT use RELENG_6_2, or you won’t get the new kernel)
*default host=ftp.freebsd.org
*default prefix=/usr/local
*default base=/var/db
*default release=cvs delete use-rel-suffix compress
src-sys
2. Now, issue the command ‘cvsup supfile’
3. When the updated kernel source tree is fully downloaded, copy /usr/src/sys/crypto to /usr/local/src/sys/crypto (for some reason, this subdirectory is missing from the more up-to-date version of the kernel source tree, which results in compile-time errors.)
4. Edit the file /usr/local/src/sys/conf/newvers.sh and change ‘RELEASE’ from 6.3 to 6.2 and ‘BRANCH’ from PRERELEASE to RELEASE. This is a rather clumsy hack, but it’s the only way to ensure that the user will continue to be able to download packages for the 6.2 RELEASE version of FreeBSD, since, while the userland is 6.2, the OS’s version is determined by the kernel’s version.
5. Copy /usr/local/src/sys/i386/conf/GENERIC to /usr/local
src/sys/i386/conf/ERACKS
6. Open the ERACKS kernel configuration file and do the following:
– delete all the ‘cpu’ directives at the top except for I686_CPU
– change ‘ident GENERIC’ to ‘ident ERACKS’
– disable unneeded device drivers (be careful to only disable those you know for a fact won’t be used; you can get rid of the serial and parallel port drivers for example, since there are no serial or parallel ports on the laptop)
7. When the source tree is prepared, move /usr/src/sys to /usr/src/sys.old, and move /usr/local/src/sys to usr/src/sys
8. cd to /usr/src and type the command “make buildkernel KERNCONF=ERACKS”
9. If the build was successful, type the command “make installkernel KERNCONF=ERACKS”
10. Reboot the computer and make sure it comes up successfully
Now, the sound card should be working.
2) Getting the wireless to work:
Unfortunately, there are no native FreeBSD drivers for the wireless. However, there is an ndis wrapper in the FreeBSD kernel that will allow us to use Windows drivers for this card.
1. Download the file http://ftp.us.dell.com/network/R94827.EXE. Just in case this link doesn’t work, a copy of this driver will also be kept at eRacks. Even though the laptop is an Acer, trying to use the Acer driver will fail (not sure why.) The Dell driver, while intended for another laptop, supports the same wireless chipset, and will suit our needs.
2. On a Windows machine (or with WINE), run the self extracting archive, and copy bcmwl5.inf and bcmwl5.sys to the FreeBSD laptop (these files will be extracted when you run R94827.EXE.)
3. In the directory where the two above mentioned files are stored, issue the command “ndisgen bcmwl5.inf bcmw5l.sys”. Accept all the defaults, pressing enter for each one, and a resulting .ko kernel object will be built. This is the “FreeBSDized” Windows driver that will support the wireless card.
4. Copy the resulting object file to /boot/modules
5. Edit /boot/loader.conf and add the following line: “bcmwl5_sys_load=”YES”
6. Reboot the machine, and verify the wireless card is working by issuing the command “ifconfig -a.” Observe that there is a device named ndis0.
That’s it! All the other devices are supported out of the box. The only exception is that the graphics adapter is only supported through generic VGA. The Intel 945GVM is supported in FreeBSD 7.0, but that is currently unstable.
admin March 31st, 2008
Posted In: Laptop cookbooks