
eRacks Systems Tech Blog
Open Source Experts Since 1999
Hardware Servers Less than 1/10th the cost of Cloud
We’ve known this since the beginning of when the “Cloud” momentum started in the marketplace a decade or two ago, but it’s always refreshing to see the media coverage supporting this –
DHH (Ruby on Rails Creator, Basecamp, 37Signals Founder) corroborates it:
37Signals CTO: $600k of servers will save $7 million • The Register:
https://www.theregister.com/2023/02/22/cloud_repatration_savings_calculated_basecamp/
joe December 8th, 2024
Posted In: News, servers, Technology
Tags: Cloud, DHH, TheRegister
Red Hat® Enterprise Linux® 9 (RHEL 9) Released & Available With eRacks Systems!
Released in 17th May 2022, Red Hat® Enterprise Linux® 9 helps users innovate, optimize, protect, and trust their traditional and modern workloads across their datacenter, cloud, and edge environments. Red Hat Enterprise Linux remains an economic driver, with the overall Red Hat Enterprise Linux footprint forecast to touch more than $13 trillion of the global economy in 2022. RHEL 9 is now available with the following major features with all of the systems in eRacks.
Enhanced web console performance metrics
This feature makes it easy for the system admin and operation team to monitor and identify performance metrics. It allows quick report generation and presentation with one click.
Kernel live patching
It is one of the best features for managing kernel update, RHEL 9 provide the ability to manage kernel patching with a cockpit web console.
Streamlined image building
RHEL 9 comes with various improvements like an image builder that gives the ability to build RHEL8 and RHEL 9 images through a single build node. This feature is very useful for the developer community.
Improved container development
RHEL 9 ships launch with upgraded version podman with new features and advanced technology.
Link Time Optimization
It allows speeding up various applications and running services as well as source code inspection at the time of compilation.
Application Updates
You can find all application releases with new versions which available in RHEL8 such as newer versions available of Perl, python, ruby, git, apache, Nginx, MySQL, MariaDB, and more.
Enhanced security
- Smart card authentication via the web console.
- Additional SELinux security profiles.
- Detailed SSSD Logging and search capabilities.
- Integrated OpenSSL 3.
- Integrity Measurement Architecture allows you to dynamically verify the integrity of the OS.
- The SSH root password is now disabled by default.
Support for Newer Versions of Programming Languages
- RHEL 9.0 offers the following new versions of dynamic programming languages:
- PHP 8.0
- Node.JS 16
- Perl 5.32
- Python 3.9
- Ruby 3.0
Download Red Hat® Enterprise Linux® 9 (RHEL 9) for Free.
To download RHEL 9. Check out the Red Hat Enterprise Linux product page.
Or you can get the hassle free Pre-Installed Red Hat® Enterprise Linux® 9 (RHEL 9) or your preferred versions or any of your preferable Open-Source Distribution by purchasing any systems from eRacks Systems’ Store.
Asif Raihan May 30th, 2022
Posted In: Linux, New products, Open Source, Operating Systems, servers, Technology
Tags: linux, New products, Open Source, operating system, Red Hat, Releases, upgrade
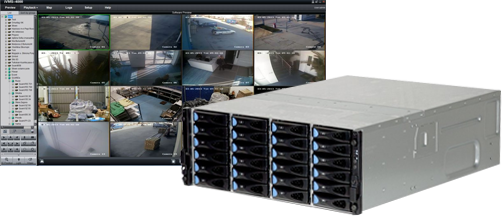
eRacks Releases Surveillance and Security systems
Worried about your choice of surveillance system for your premises, not sure what system is more suitable to your needs? Confused where to invest your hard-earned money for your security apparatus? We at eRacks got you covered!
Our top of the line products and their tech are briefly described for you because we at eRacks believe a market educated consumer is a happy and long-term customer. Besides, not one shoe fits all, so why should one system be used for all your needs?.
eRacks has always emphasized on its diversity in its products.
“A diverse security apparatus is a strong security apparatus”
-Joseph Wolff, CTO, eRacks
Hence, we are offering three variants of surveillance systems
- eRacks/HVR (Hybrid Video Recorder)
- eRacks/NVR (Network Video Recorder)
- eRacks/DVR (Digital Video Recorder)
Each of the technology we are offering to our valuable clients are discussed in detail below
- eRacks/HVR (Hybrid Video Recorder)
eRacks/HVR (Hybrid Video Recorder) is quickly growing in popularity because of its versatility. Hybrid video recorders (eRacks/HVR) are compatible with both standard analog signal and IP network cameras, allowing the users to continue using their current installed analog security system while gradually shifting to the latest network IP technology. It grants the flexibility to upgrade the existing surveillance system to IP equipment according to the user’s budget and specifications.
A hybrid system integrates existing analog cameras into an IP network, providing the user with all the advantages of an IP system excluding the HD resolution of IP cameras. In a hybrid CCTV system, footage is recorded in analogue quality however the IP network features of indexing, bookmarking, and retrieval are made available through the Hybrid eRacks/DVR.
eRacks/HVR (Hybrid Video Recorder) is best suited to record video footage in a digital format to storage array. It accommodates both IP and analog cameras and captures video/images through an Ethernet network via Cat5 / Cat6 cables from IP cameras as well as coaxial cables from analog cameras. It is mostly used for physical security applications. This option is a good choice when planning for future expansion into an IP video surveillance system as the existing analog cameras can be reused and incorporated into the system without any drop in coverage.
eRacks/HVR comes with a variety of channel counts, and storage capacities to ideally suit many applications. It also supports smart features, including event search, event log, and email notification; a free mobile app that allows users to watch live or playback video from their smartphone. Multi-site video management from anywhere in the world can be done using eRacks/HVR as well.
- eRacks/NVR (Network Video Recorder)
eRacks/NVR stands for Network Video Recorder which is a specialized hardware and software solution used in the IP video surveillance systems. This system records and store video footage directly from the network it lives on for the purpose of their storage and subsequent playback. They work with an advanced type of camera, called IP cameras. IP cameras can actually capture and process video and audio data themselves by using either an Ethernet cable or wirelessly via an existing Wi-Fi network. The eRacks/NVR does not contain any special equipment for capturing video because it receives the video streams already encoded by the IP cameras in a digital format. To support the expanded set of features and user-friendliness, the eRacks/NVR uses standard computers with standard operating systems.
eRacks/NVR systems process the video data on the camera rather than on the recorder by using IP cameras which are standalone image capturing devices. IP cameras have a chipset which processes the video data which is then transmitted to a recorder. It is capable of recording and sending audio as well as video. The more powerful hardware on IP cameras also enables improved smart functionality and video analytics, such as facial recognition. eRacks/NVR systems connect the camera to the recorder, but this is done using standard Ethernet cables, such as cat5e and cat6, to transmit data. eRacks/NVR recorders are only used for storing and viewing the footage.
eRacks/NVR systems are inherently more flexible because security cameras don’t necessarily have to be physically connected directly to the recorder. Instead, IP cameras only have to be on the same network. The video quality is also better as eRacks/NVR recorders receive a pure digital signal from the cameras. All cameras with microphones can record audio to the eRacks/NVR because Ethernet cables carry audio. eRacks/NVR systems tend to have better picture quality, as well as easier installation, are reliable, stable, provide increased flexibility, have a user-friendly interface for day-to-day use, and native support for audio on every camera that has a microphone. However, eRacks/NVR systems also tend to be quite a bit more expensive which is a huge constraint for budget conscious people.
- eRacks/DVR (Digital Video Recorder)
eRacks/DVR (Digital Video Recorder) has been updated for a better performance than ever. It is mostly used for physical security applications. These eRacks/DVR solutions are highly scalable and can be tailored according to the client’s needs. They can also be configured for home to enterprise class support. eRacks/DVR is a little lower priced than other available systems which makes it more attractive.
The eRacks/DVR (Digital Video Recorder) is a specialized computer system that records video in a digital format and stores it in disk drives or other mass storage devices. This updated version provides 432 TB of Surveillance Storage Drives along with optimized Digital Video recording and viewing. It normally uses analog cameras that are also called CCTV cameras, for recording. The cameras and eRacks/DVR are connected using a coaxial cable which are not very costly. Coaxial cables that were previously installed for other security systems can also be used for eRacks/DVR. This combination is more cost-effective and easier to set up; however, the resolution is usually limited to D1 (720×480). Proximity is a limitation as the analog cameras cannot be more than 700-1000 feet away from the eRacks/DVR without visible degradation in video quality.
The eRacks/DVR recorder relies on a chipset that is called AD Encoder for processing the raw data streaming from the camera into legible video recordings. eRacks/DVR systems also have different requirements when it comes to the recorder i.e., the user must connect every camera directly to the recorder. Moreover, the recorder is not responsible for providing power to the cameras. Each camera connection needs a splitter that supplies power which in turn enable cameras to function. eRacks/DVR systems can only use wired security cameras. eRacks/DVR systems also have less flexible mounting solutions because routing coaxial cable can be more difficult in tight situations and a power outlet is required for each camera. Coaxial cables don’t natively transmit an audio signal, and eRacks/DVR recorders usually have a limited number of audio input ports. eRacks/DVR Home surveillance systems are easy to set up and can be accessed through a web browser. The user is notified by email if an alarm is triggered. eRacks/DVR Server offers standard 1year full / 3year limited warranty and come with pre-configured latest Open-Source software based on the user’s specifications.
Hamza April 16th, 2021
Posted In: Products, security, servers, Storage, Technology
Tags: Archive Drives, backup, CCTV, closed circuit, Cloud, firewall, network, New products, operating system, seagate, security, Storage, surveillance, Technology
What’s new in Ubuntu 20.04 LTS “Focal Fossa”!
Ubuntu follows the release cycle of the new version twice a year, with one released in April and the other released in October, accompanied by many important improvements. The 2020 version will be Ubuntu 20.04 with the Focal Fossa identifier, which is expected to be released to global users starting April 23 next year.The codename of the official Ubuntu updates is chosen in alphabetical order, and is made up of 2 words, the first word is adjective and the second word will be noun, which is specific here as a certain animal is in danger of extinction, or sometimes mythical creatures such as Unicorns or Werewolfs (Wolves).

focalfossa
We have the Focala version of April 2020 with the word ‘Focal’ meaning ‘necessary’ and the Fossa is a carnivore that looks like a lynx, which can only be seen now. in Madagascar.
This is an interesting and unique code naming that only Ubuntu applies, giving users a sense of both curiosity and memorable.
However, the code names of Ubuntu releases sometimes reveal some of the characteristics of the releases. Ubuntu 20.04 will not only be an important release (with long term service), but also contain the strengths commonly found in Fossa species such as flexibility, agility and dominance.
In short, Ubuntu 20.04 is the LTS version, so the main focus of this release will be to bring stability and reliability to users. Focal Fossa came with lots of improvements, bug fixes, and especially new features. Let’s see some of them!
New Features in 20.04 LTS
Installer
The live server installer is now the preferred media to install Ubuntu Server on all architectures.
Besides architecture support, the main user visible new features are support for automated installs and being able to install the bootloader to multiple disks (for a more resilient system).
Installer
There have been many other fixes under the hood to make using encryption easier, better support installing to multipath disks, more reliable installation onto disks that have been used in various ways and allowing failures to be reported more usefully.
Linux Kernel
Ubuntu 20.04 LTS is based on the long-term supported Linux release series 5.4. Notable features and enhancements in 5.4 since 5.3 include:
- Support for new hardware including Intel Comet Lake CPUs and initial Tiger Lake platforms, AMD Navi 12 and 14 GPUs, Arcturus and Renoir APUs along with Navi 12 + Arcturus power features.
- Support has been added for the exFAT filesystem, virtio-fs for sharing filesystems with virtualized guests and fs-verity for detecting file modifications.
- Built in support for the WireGuard VPN.
- Enablement of lockdown in integrity mode.
Other notable kernel updates to 5.4 since version 4.15 released in 18.04 LTS includes support for AMD Rome CPUs, Radeon RX Vega M and Navi GPUs, Intel Cannon Lake platforms. support for raspberry pi (Pi 2B, Pi 3B, Pi 3A+, Pi 3B+, CM3, CM3+, Pi 4B), Significant power-saving improvements. Boot speed improvements through changing the default kernel compression algorithm to lz4 (in Ubuntu 19.10) on most architectures, and changing the default initramfs compression algorithm to lz4 on all architectures.
Toolchain Upgrades 🛠️
Ubuntu 20.04 LTS comes with refreshed state-of-the-art toolchain including new upstream releases of glibc 2.31, ☕ OpenJDK 11, rustc 1.41, GCC 9.3, 🐍 Python 3.8.2, 💎 ruby 2.7.0, php 7.4, 🐪 perl 5.30, golang 1.13.
GNOME and visual improvements
Ubuntu 20.04 Focal Fossa comes with installed. It’s chock-full of visual improvements, resulting in better performance and a more aesthetically pleasing graphical experience. There’s also a new lock screen design and support for fractional scaling under X11.
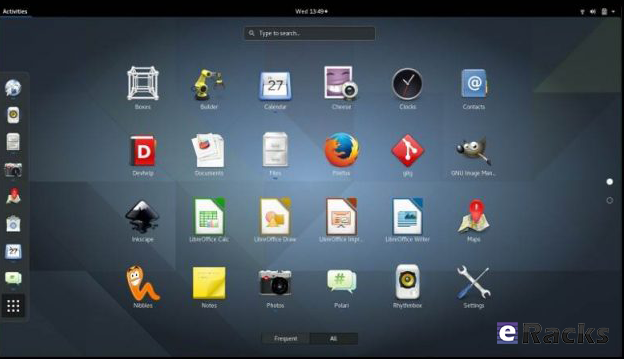
GNOME 3.36
A sleeker theme
GNOME’s new default theme is called “Yaru.” Even upon first loading into Focal Fossa, the desktop gives off a much more modern and sleeker vibe. This is mostly thanks to some color tweaks in the default theme and a darker wallpaper. The updated GNOME also allows you to choose between three different color themes: light, standard, or dark.
Network configuration
With this Ubuntu release, netplan.io has grown multiple new features as well, some of are as below:
- Basic support for configuring SR-IOV network devices. Starting with netplan.io 0.99, users can declare Virtual Functions for every SR-IOV Physical Function, configure those as any other networking device and set hardware VLAN VF filtering on them.
- Support for GSM modems via the NetworkManager backend via the modems section.
- Adding WiFi flags for bssid/band/channel settings.
- Adding ability to set ipv6-address-generation for the NetworkManager backend and emit-lldp for networkd.
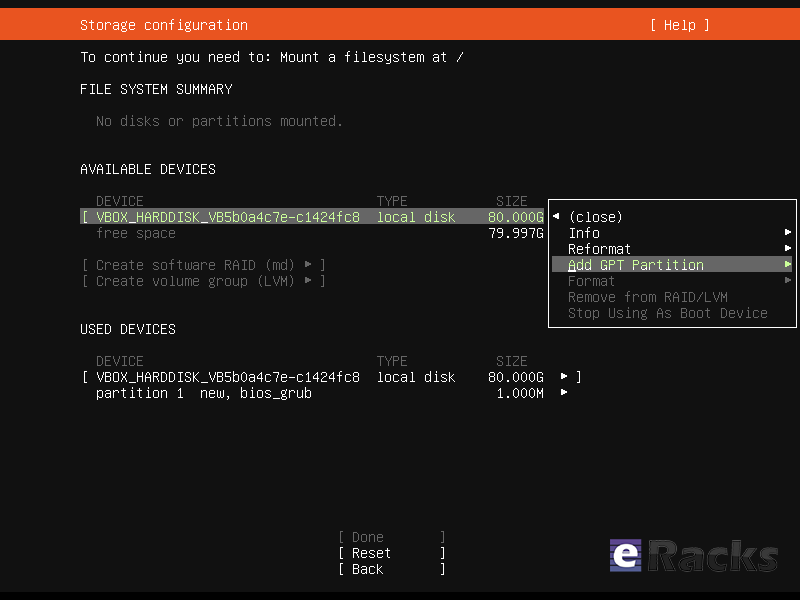
ZFS support
Ubuntu introduced native support of ZFS in the 2019 interim release of Eoan Ermine. In Ubuntu 20.04 Focal Fossa, ZFS support has been further improved, though still flagged as being experimental. When installing Focal Fossa, you have the option to use ZFS if you click “advanced features” when asked about how you’d like to format your hard drive.
The newest version of Ubuntu features performance enhancements for ZFS and support for encryption. Ubuntu has a ZFS system tool called Zsys, which provides automated system and user state saving. It also integrates better with GRUB so a user can revert to an earlier system state before booting into the desktop.
Acceptance of ZFS in the enterprise world is still shaky, but it doesn’t seem to be going anywhere. Seeing support for it on a really popular distribution like Ubuntu is pretty neat.
Python3 by default
In 20.04 LTS, the python included in the base system is Python 3.8. Python 2.7 has been moved to universe and is not included by default in any new installs.
Remaining packages in Ubuntu which require Python 2.7 have been updated to use /usr/bin/python2 as their interpreter, and /usr/bin/python is not present by default on any new installs. On systems upgraded from previous releases, /usr/bin/python will continue to point to python2 for compatibility.
Snap Store
The Snap Store (snap-store) replaces ubuntu-software as the default tool for finding and installing packages and snaps.
QEMU
QEMU was updated to 4.2 release. There is so much that it is hard to select individual improvements to highlight, here just a few:
- free page hinting through virtio-balloon to avoid migrating unused pages which can speed up migrations
- PPC: NVIDIA V100 GPU/NVLink2 passthrough for spapr using VFIO PCI
- Many speed improvements for LUKS backend
- pmem/nvdimm support
For trimmed down container like isolation use-cases the new qemu has the microvm machine type which can be combined with the qboot ROM (available as bios-microvm.bin) to provide a reduced feature set at a much faster startup time. To further emphasize that you can use the package qemu-system-x86-microvm which provides an alternative QEMU binary stripped of all features not needed these use cases as sugegsted by the qboot ROM.
libvirt
libvirt was updated to version 6.0. See the upstream change log for details since version 5.6 that was in Ubuntu 19.04 or further back since verison 4.0 that was in Ubuntu 18.04.
Chrony
Chrony been updated to version 3.5 which provides plenty of improvements in accuracy and controls. Furthermore, it also adds additional isolation for non-x86 by enabling syscall filters on those architectures as well.
To further allow feeding Hardware time into Chrony the package GPSD is now also fully supported.
But still for simple time-sync needs the base system already comes with systemd-timesyncd. Chrony is only needed to act as a time server or if you want the advertised more accurate and efficient syncing.
Ubuntu 20.04 LTS “Focal Fossa”
There are a lot of other changes as well. To experience all the changes and improvements it is recommended to use and experiences this version of your own.
As of late April, Ubuntu 20.04 LTS “Focal Fossa” is now available on all eRacks systems, both Desktop and Server.
It should appear in the “Operating system” dropdown when you configure your system, and is the default on many / most of our systems.
If you don’t see it, or if you this it should be the default, (or shouldn’t!), please let us know – We are always listening for feedback!
Asif Raihan May 15th, 2020
Posted In: Linux, New products, Open Source, Operating Systems, Reviews, servers, ubuntu
Tags: Cloud Storage Server, linux, New products, Open Source, operating system, OS, ubuntu
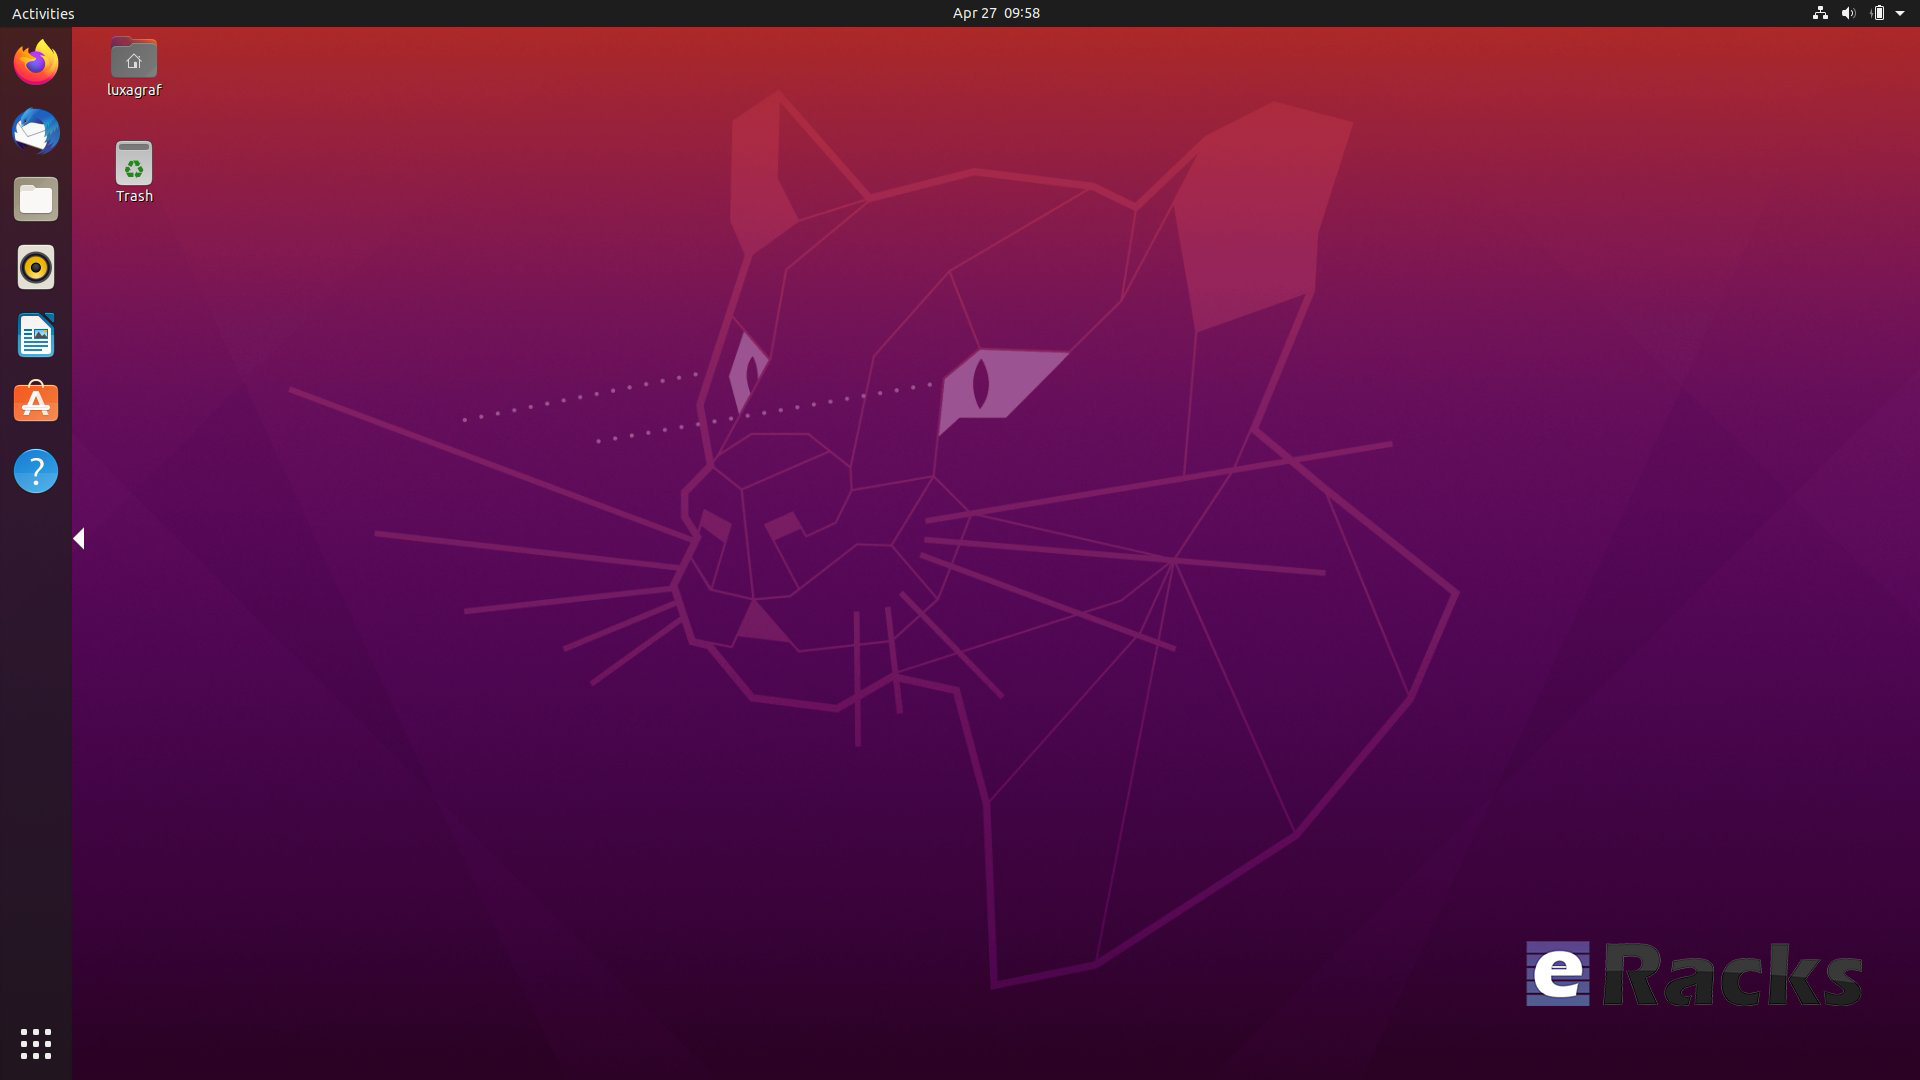
Ubuntu 20.04 LTS “Focal Fossa” now available!
 As of late April, Ubuntu 20.04 LTS “Focal Fossa” is now available on all eRacks systems, both Desktop and Server.
It should appear in the “Operating system” dropdown when you configure your system, and is the default on many / most of our systems.
If you don’t see it, or if you this it should be the default, (or shouldn’t!), please let us know – We are always listening for feedback!
Our initial testing with it, is that it is very solid, albeit a little bigger than the 18.04 LTS release, likely due to the increased usage of the Snap packaging system, which tends to favor freedom from dependencies over disk space.
https://en.wikipedia.org/wiki/Snappy_(package_manager)
j


Cuuuute little one

Handsome Fella
joe May 2nd, 2020
Posted In: Linux, Open Source, Operating Systems, servers, Technology, ubuntu
Tags: LTS, operating system, OS, ubuntu