
eRacks Systems Tech Blog
Open Source Experts Since 1999
Ubuntu 22.04 LTS “Jammy Jellyfish” Now Available!

The Long-Term Support release of Ubuntu, Ubuntu 22.04 LTS “Jammy Jellyfish” is now available as the Ubuntu default on all eRacks configurations. We also offer custom configurations of Ubuntu, including de-snapify 🙂
Note that one of our favorite Open Source protagonists, Martin Wimpress (Wimpy’s World), published these nifty AI-generated images of what a “Jammy Jellyfish” should look like, and we’ve used one of them here 🙂
Cheers,
eRacks Admin
admin April 29th, 2022
Posted In: Debian, Linux, News, Open Source, Operating Systems, ubuntu, Upgrades
Tags: 22.04, Debian, Jammy, LTS, operating system, OS, ubuntu
Latest Ubuntu 20.10 “Groovy Gorilla” is Now Available!
The Ubuntu 20.10 code name ‘Groovy Gorilla’, Yes, “Groovy Gorilla” is the development code name chosen for the next stable Ubuntu release, which is currently earmarked for general availability on October 26, 2020.

Now, I probably don’t need to tell you what a gorilla is — and if you don’t know, I don’t believe you !!, and the term groovy is… Well, the dictionary definition of “Groovy” describes it as an informal adjective meaning ‘fashionable and exciting’, e.g., “That’s a groovy new wallpaper!” or generally ‘excellent, e.g., “A groovy release filled with greatness”.
Ubuntu 20.10 establishes another milestone in Canonical’s long-term commitment to delivering a carrier-grade private cloud with “Groovy Gorilla”. The 33rd release of the most popular Linux distribution in the data center space, Groovy Gorilla, brings various improvements that enable easier consumption of the fast-networking stack across both VMs and containers, straightforward compliance with common security benchmarks and a reference telco cloud implementation.
Ubuntu 20.10 “Groovy Gorilla” is a short-term release supported for 9 months until July 2021. So, with its imminent release on 22nd Oct 2020, Ubuntu 20.10 will be getting support from Canonical till July 2021. This includes access to new app releases, bug-fixes, and security patches. This release mostly the testbed for the latest application, Kernel stack to provide users stable packages back to Ubuntu 20.04 LTS.
I personally have been using it for the past couple of days, and it’s reasonably stable. It also feels snappier compared to its predecessor, which isn’t a surprise considering it was primarily focusing on performance enhancements.
That being said, I won’t keep you waiting with the formalities. I know you came here to get a tour of what’s new with Ubuntu 20.10, and I have put together a few new changes in Ubuntu 20.10. Only you can feel the exact changes when you start using it.
let’s what’s new in latest Ubuntu 20.10 “Groovy Gorilla”;
Ubuntu 20.10 “Groovy Gorilla” Some Major Features:
Linux Kernel 5.8
When development for Ubuntu 20.10 started, it was based on Ubuntu 20.04 and used the same kernel base – Linux kernel 5.4 LTS. But then, Linus Torvalds released Linux kernel 5.8 in May, and everyone in the Linux community was suspecting that “Groovy Gorilla” will ship with it.
Now, after a long wait, the Linux 5.8 kernel has popped up in the Ubuntu 20.10 archives, and that too only a month ago. This means that the new iteration of the popular Linux distro will benefit from the sweep of features that comes with the new kernel.
Some notable examples include:
- Airtime Queue limits for better WiFi connection quality
- Btrfs RAID1 with 3 and 4 copies and more checksum alternatives
- USB 4 (Thunderbolt 3 protocol) support added
- X86 Enable 5-level paging support by default
- Intel Gen11 (Ice Lake) and Gen12 (Tiger Lake) graphics support
- Initial support for AMD Family 19h (Zen 3)
- Thermal pressure tracking for systems for better task placement wrt CPU core
- XFS online repair
- OverlayFS pairing with VirtIO-FS
- General Notification Queue for key/keyring notification, mount changes, etc.
- Active State Power Management (ASPM) for improved power savings of PCIe-to-PCI devices
- Initial support for POWER10
Easy Wi-Fi Hotspot Configuration
The Wi-Fi tab in “Settings” allows you to use your laptop as a Wi-Fi hotspot. If you scan the QR code with a mobile device, like your smartphone or tablet, it will connect to your hotspot.

Security Improvements
- nftables is now the default backend for the firewall.
Ubuntu 20.10 Desktop
- Ubuntu 20.10 is the first Ubuntu release to feature desktop images for the Raspberry Pi 4.
GNOME 3.38
Ubuntu 20.10 is shipping with GNOME 3.38 out of the box, released on 16th Sept 2020. It is a welcome upgrade over GNOME 3.34, which is being used in Ubuntu 20.04 by default.

GNOME 3.38 brings many excellent features and functionalities to the table. Here is a list going over the most notable ones:
- Better Fingerprint Support
- Intelligent Web Tracking Prevention
- Updated GNOME Maps with Performance and UI Improvements
- A Redesigned Sound Recorder and Screenshot App
- Support for QR Code WiFi Hotspot
- Tons of New Default Wallpaper
- Folder Support in Application Grid
- Restart Button Added to System Tray
- New Icons for Various Apps
- New Parental Controls Under Settings
Apart from this, you will get to see many more bells and whistles. We have a detailed article covering the best features in GNOME 3.38 if you are looking for more information.
Now, as you know, Ubuntu is not known for shipping with vanilla GNOME. As such, you won’t get the authentic experience that was intended by the GNOME developers. We will talk more about the new interface and overall end-user experience in a later section.
ZFS Becomes Less Experimental
The Ubuntu Unity installer hasn’t changed significantly. The installation process is almost the same as it was on Ubuntu 20.04, and the black disk checking screen is the same.
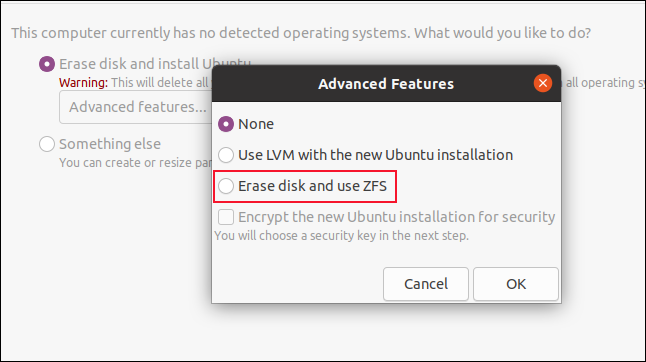
One notable change is tucked away in the “Advanced Features” dialog box. The ZFS file system installation option no longer has the word “Experimental” in capital letters beside it. Confidence must be building within Canonical about the durability and readiness of its ZFS implementation as a daily driver file system.
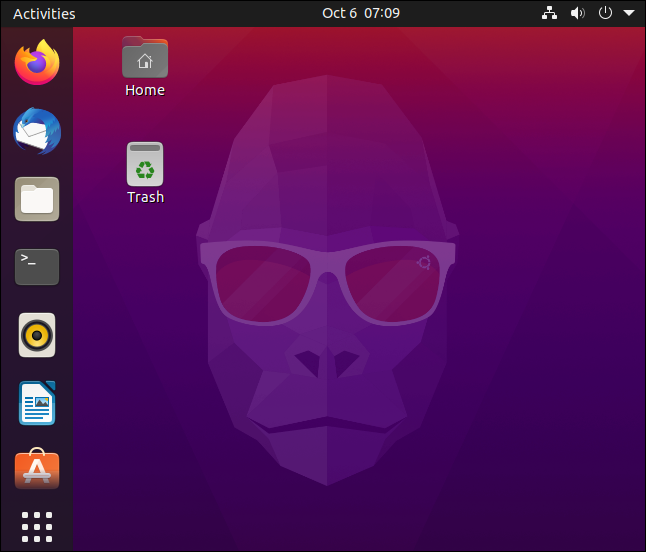
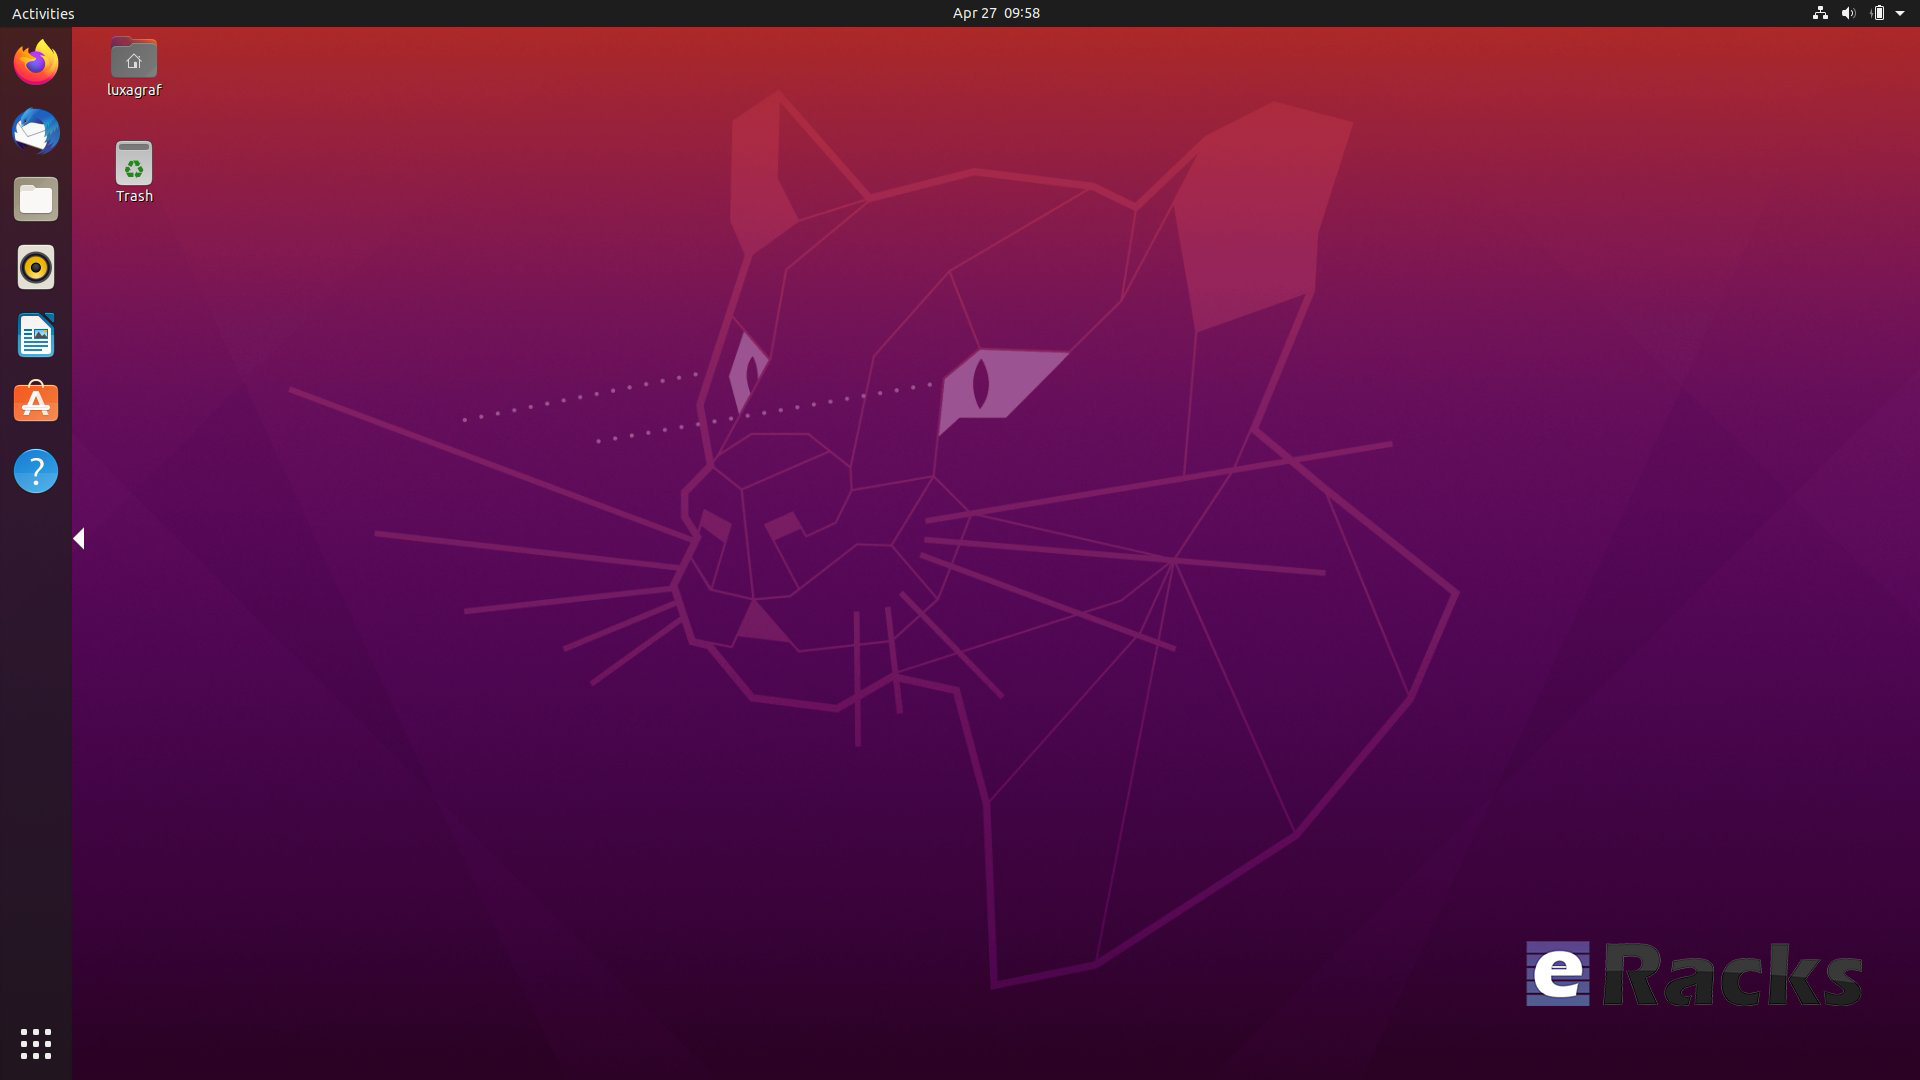
After you install Ubuntu 20.10 and sign in, you’ll see the Groovy Gorilla, positioned prominently amidst the familiar purple hues of the Ubuntu color palette.
He looks like an ape that’s got it together, but let’s see if that’s true.
Updated Applications:
- Firefox version 81
- LibreOffice version 7.0.2
- Thunderbird version 78.3.2
Updated Subsystems:
- BlueZ 5.55
- NetworkManager 1.26.2
Noteworthy changes Ubuntu 20.10 Server:
- squid: the NIS basic authentication helper was removed (LP: #1895694 34)
- adcli and realmd: many upstream fixes were applied to these packages, improving on the compatibility with current Active Directory changes
- samba 4.12 40 has switched to GnuTLS for most of its cryptographic operations and that has a huge performance improvement in SMB3 encryption
- QEMU was updated to the 5.0 release. See the upstream changes 40 for an overview of the many improvements.
- One noteworthy new feature is virtiofs 42 which allows better sharing of host file systems to the guest compared to the older 9p fs 4 based approach.
- Libvirt has been updated to version 6.6. See the upstream Changelogs 34 for the many improvements and fixes since version 6.0 that was in Focal.
- Libvirt 6.6 also supports the new virtiofs that was mentioned in the QEMU section above.
System Requirements for Ubuntu 20.04:
- 2 GHz dual-core processor
- 4 GiB RAM (but 1 GiB can work)
- 25 GB of hard-drive space
- VGA capable of 1024×768 screen resolution
- Either of the two: a CD/DVD drive or a USB port for the installer media
Note: Optionally, Internet access is helpful.
Download Ubuntu 20.10
You can download Ubuntu 20.10 for 64-bit computers using the link below:
As the Ubuntu 20.10 desktop image is 2.9GB in size do make sure you’re on a decent internet connection before you hit the download button!
When the download completes you need write the Ubuntu 20.10 ISO image to a USB stick using a tool like Etcher. Then pop the USB in an empty port, reboot your computer, and choose to boot from the USB.
You can also upgrade to Ubuntu 20.10 from an earlier version.
Asif Raihan November 2nd, 2020
Posted In: Linux, New products, News, Open Source, Operating Systems, Reviews, ubuntu
Tags: Cloud Computing, linux, New products, Open Source, operating system, OS, ubuntu
Linux Mint 20 is now available!
Linux Mint is undoubtedly one of the best beginner-friendly and tough competitors of the most famous Ubuntu Linux. One of the reasons can be credited to its upstream codebase. Since Linux Mint is an Ubuntu-based distro, it uses the codebase of the latest Ubuntu long term support version.

Linux Mint 20
After ending 2019 with the release of Linux Mint 19.3, the Linux Mint team is ready to roll out its first version with long-term support in 2020. As already revealed in their monthly blog, the upcoming Linux Mint 20 will be based on the next Ubuntu 20.4 LTS. So, in this article, I’m going to discuss everything about the new changes and release date of Mint 20.
Interesting Fact About Linux Mint Codename
Most of the Linux distros follow a particular pattern to give a codename for each version — for instance, Ubuntu uses a two-word adjective and animal name. Likewise, Linux Mint titles every release a female codename alphabetically. Therefore, starting with the Mint 1 “Ada” and the latest Mint 19.3 “Tricia,” and this is Linux Mint 20, codename Ulyana.
New features in Linux Mint 20 Cinnamon
Linux Mint 20 is a long-term support release which will be supported until 2025. It comes with updated software and brings refinements and many new features to make your desktop on a gaming desk be more comfortable experience.
Monitor frequency adjustment
Frequency modification of monitors is a long-sought demand by the Mint community. Consequently, Mint 20 now includes monitor frequency adjustment. This means you will be able to choose the frequency in the Cinnamon 4.6 display settings.

Linux-Mint-20-—-Monitor-display-setting
Fractional Scaling
Linux Mint 20 ships the Cinnamon 4.6 desktop environment that introduces fractional scaling. Hence, instead of either 100% (normal mode) or 200% (HiDPI mode) scaling for all monitors, you can now configure the scale value between 100% and 200% for each monitor independently. If you use high-resolution displays, it’ll be a big relief for you to have a better scaling option.
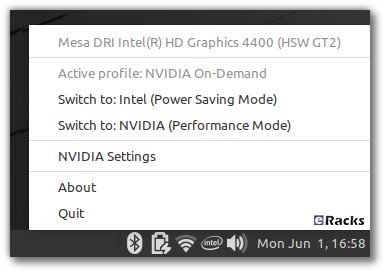
NVIDIA Optimus
Linux Mint 20 features improved support for NVIDIA Optimus.
The NVIDIA Prime applet now shows your GPU renderer and you can select which card to switch to straight from its menu.
nvidia
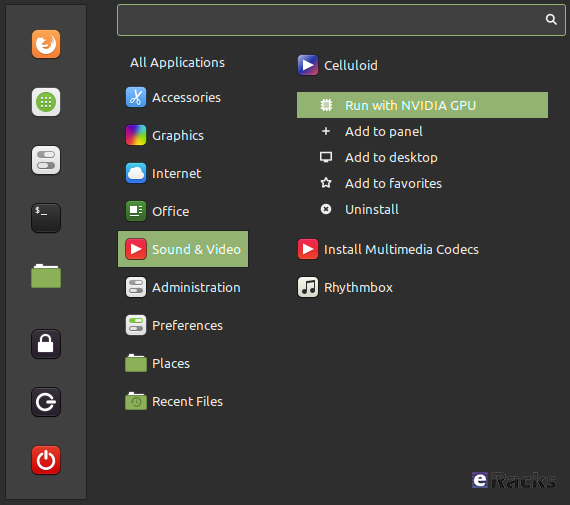
The NVIDIA “On-Demand” profile is also now fully supported. When you run in that mode, it is your Intel card which renders the session and a menu option is available to let you offload a particular application to your NVIDIA card.
nvidia-cinnamon
Select an application in the menu, right-click and select “Run with NVIDIA GPU”. It’s that simple.
Mint-Y Theme
“Themes” applet is one of the unique features of Linux Mint that allows you to choose or install new themes and icons. In addition to that, Linux Mint 20 introduced two new colors, Pink and Aqua, in the default Mint-Y theme.
Furthermore, the Mint-Y theme now has a brighter color than before. Here’s a comparison of some of the old colors (on the left) with some of the new ones (on the right):

Linux-Mint-20-—-New-color-In-Mint-Y-theme
From the command-line, two new commands are available to offload to GLX or to Vulkan:
- nvidia-optimus-offload-glx
- nvidia-optimus-offload-vulkan
To boost compatibility and make it easier to boot Linux Mint 20 in live mode without NVIDIA drivers, “nomodeset” was also added to the “Compatibility Mode”.
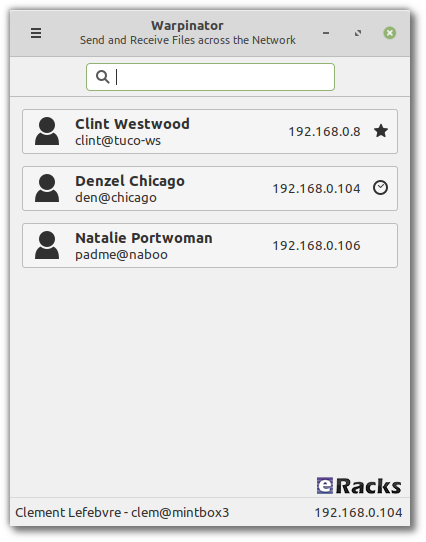
Warpinator
The star of the show in Linux Mint 20 is a new application called Warpinator.
10 years ago, Linux Mint 6 featured a tool called “Giver” which could share files across the local network. Without any server or configuration, computers would automatically see each other’s and you could simply drag and drop files from one to another. When the Giver project was discontinued it had to be removed from Linux Mint and we’ve been missing that functionality ever since.
warpinator1
Warpinator is a reimplementation of Giver. Server configuration (FTP, NFS, Samba) is overkill for casual file transfers between two computers, and it’s a real pity to use external media (Internet services, USB sticks, external HDDs) just to share files when there’s a local network which could do just that.
With Warpinator, Linux Mint 20 brings back easy file sharing across the local network.
The main window shows you the computers on the local network which are also running Warpinator:
warpinator
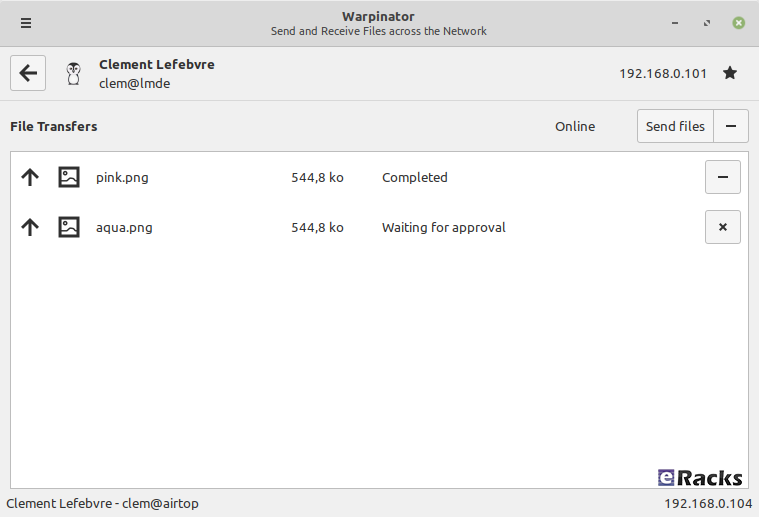
By clicking on a computer, you can see more information about it and exchange files with it:
No more USB sticks or external drive are needed just to send a file.
Other Enhancements In Linux Mint 20
- Smooth Multi-monitor support
- Use of middle-click button in Cinnamon’s keyboard applet
- Better looking system tray
- A new user interface for Gdebi tool
Linux Mint 20 Release Date And ISO Download
The Mint team has now officially released a new long-term Linux Mint 20 that will be supported until 2025. ISO images of any of the three Cinnamon, MATE, and Xfce edition are available to download from the official download page.
For further details, see Mint’s Snap documentation. You can read more on Mint’s arguments against Snap, and Ubuntu’s attempt to make peace with Mint and decide for yourself if you want to use Snap on Mint.
Of course, the usual selection of Linux desktop programs come ready to run. These include Firefox 77 for web browsing; LibreOffice 6.4.2 for your office needs; and Thunderbird 68.7 for email.
Overall, Mint remains a pleasure to use. I really wish Mint included Snap. Most desktop program developers agree that it, and its rival Flatpak, are the future for Linux desktop apps.
Looking ahead, Linux Mint 20 will receive security updates until 2025. Until 2022, future versions of Linux Mint will use the same package base. This means it will be trivial to upgrade to the next few versions.
If you’re new to Mint and want to give it a try, check out my How to install Linux Mint on your Windows PC article. It’s easy to do whether you want to wipe out Windows, run it with Windows, or just give it a trial run using a USB stick with persistent storage.
Beside all, get the Linux Mint 20 pre-installed and ready to run with eracks systems.
Asif Raihan July 2nd, 2020
Posted In: Linux, New products, Open Source, Operating Systems
Tags: linux, Mint, New products, News, operating system, OS, Review
What’s new in Ubuntu 20.04 LTS “Focal Fossa”!
Ubuntu follows the release cycle of the new version twice a year, with one released in April and the other released in October, accompanied by many important improvements. The 2020 version will be Ubuntu 20.04 with the Focal Fossa identifier, which is expected to be released to global users starting April 23 next year.The codename of the official Ubuntu updates is chosen in alphabetical order, and is made up of 2 words, the first word is adjective and the second word will be noun, which is specific here as a certain animal is in danger of extinction, or sometimes mythical creatures such as Unicorns or Werewolfs (Wolves).
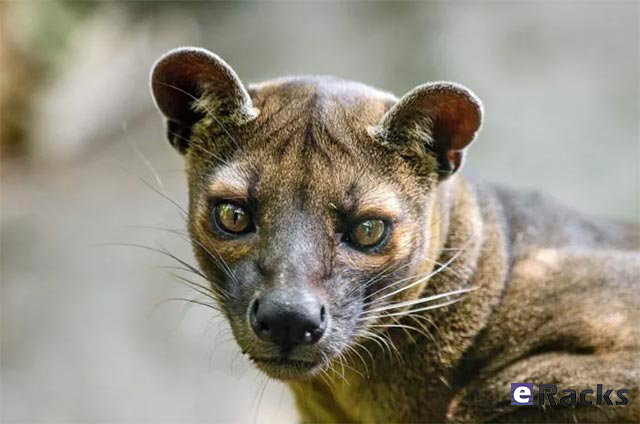
focalfossa
We have the Focala version of April 2020 with the word ‘Focal’ meaning ‘necessary’ and the Fossa is a carnivore that looks like a lynx, which can only be seen now. in Madagascar.
This is an interesting and unique code naming that only Ubuntu applies, giving users a sense of both curiosity and memorable.
However, the code names of Ubuntu releases sometimes reveal some of the characteristics of the releases. Ubuntu 20.04 will not only be an important release (with long term service), but also contain the strengths commonly found in Fossa species such as flexibility, agility and dominance.
In short, Ubuntu 20.04 is the LTS version, so the main focus of this release will be to bring stability and reliability to users. Focal Fossa came with lots of improvements, bug fixes, and especially new features. Let’s see some of them!
New Features in 20.04 LTS
Installer
The live server installer is now the preferred media to install Ubuntu Server on all architectures.
Besides architecture support, the main user visible new features are support for automated installs and being able to install the bootloader to multiple disks (for a more resilient system).
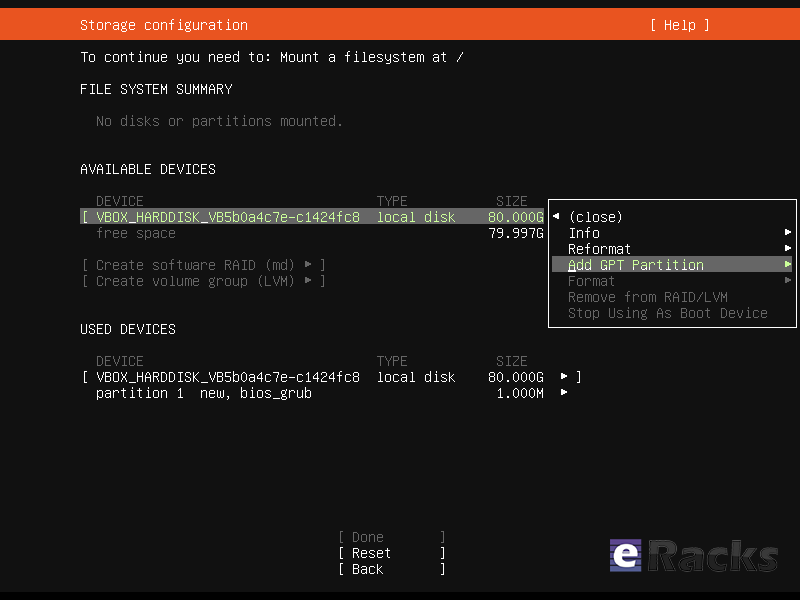
Installer
There have been many other fixes under the hood to make using encryption easier, better support installing to multipath disks, more reliable installation onto disks that have been used in various ways and allowing failures to be reported more usefully.
Linux Kernel
Ubuntu 20.04 LTS is based on the long-term supported Linux release series 5.4. Notable features and enhancements in 5.4 since 5.3 include:
- Support for new hardware including Intel Comet Lake CPUs and initial Tiger Lake platforms, AMD Navi 12 and 14 GPUs, Arcturus and Renoir APUs along with Navi 12 + Arcturus power features.
- Support has been added for the exFAT filesystem, virtio-fs for sharing filesystems with virtualized guests and fs-verity for detecting file modifications.
- Built in support for the WireGuard VPN.
- Enablement of lockdown in integrity mode.
Other notable kernel updates to 5.4 since version 4.15 released in 18.04 LTS includes support for AMD Rome CPUs, Radeon RX Vega M and Navi GPUs, Intel Cannon Lake platforms. support for raspberry pi (Pi 2B, Pi 3B, Pi 3A+, Pi 3B+, CM3, CM3+, Pi 4B), Significant power-saving improvements. Boot speed improvements through changing the default kernel compression algorithm to lz4 (in Ubuntu 19.10) on most architectures, and changing the default initramfs compression algorithm to lz4 on all architectures.
Toolchain Upgrades 🛠️
Ubuntu 20.04 LTS comes with refreshed state-of-the-art toolchain including new upstream releases of glibc 2.31, ☕ OpenJDK 11, rustc 1.41, GCC 9.3, 🐍 Python 3.8.2, 💎 ruby 2.7.0, php 7.4, 🐪 perl 5.30, golang 1.13.
GNOME and visual improvements
Ubuntu 20.04 Focal Fossa comes with installed. It’s chock-full of visual improvements, resulting in better performance and a more aesthetically pleasing graphical experience. There’s also a new lock screen design and support for fractional scaling under X11.
GNOME 3.36
A sleeker theme
GNOME’s new default theme is called “Yaru.” Even upon first loading into Focal Fossa, the desktop gives off a much more modern and sleeker vibe. This is mostly thanks to some color tweaks in the default theme and a darker wallpaper. The updated GNOME also allows you to choose between three different color themes: light, standard, or dark.
Network configuration
With this Ubuntu release, netplan.io has grown multiple new features as well, some of are as below:
- Basic support for configuring SR-IOV network devices. Starting with netplan.io 0.99, users can declare Virtual Functions for every SR-IOV Physical Function, configure those as any other networking device and set hardware VLAN VF filtering on them.
- Support for GSM modems via the NetworkManager backend via the modems section.
- Adding WiFi flags for bssid/band/channel settings.
- Adding ability to set ipv6-address-generation for the NetworkManager backend and emit-lldp for networkd.
ZFS support
Ubuntu introduced native support of ZFS in the 2019 interim release of Eoan Ermine. In Ubuntu 20.04 Focal Fossa, ZFS support has been further improved, though still flagged as being experimental. When installing Focal Fossa, you have the option to use ZFS if you click “advanced features” when asked about how you’d like to format your hard drive.
The newest version of Ubuntu features performance enhancements for ZFS and support for encryption. Ubuntu has a ZFS system tool called Zsys, which provides automated system and user state saving. It also integrates better with GRUB so a user can revert to an earlier system state before booting into the desktop.
Acceptance of ZFS in the enterprise world is still shaky, but it doesn’t seem to be going anywhere. Seeing support for it on a really popular distribution like Ubuntu is pretty neat.
Python3 by default
In 20.04 LTS, the python included in the base system is Python 3.8. Python 2.7 has been moved to universe and is not included by default in any new installs.
Remaining packages in Ubuntu which require Python 2.7 have been updated to use /usr/bin/python2 as their interpreter, and /usr/bin/python is not present by default on any new installs. On systems upgraded from previous releases, /usr/bin/python will continue to point to python2 for compatibility.
Snap Store
The Snap Store (snap-store) replaces ubuntu-software as the default tool for finding and installing packages and snaps.
QEMU
QEMU was updated to 4.2 release. There is so much that it is hard to select individual improvements to highlight, here just a few:
- free page hinting through virtio-balloon to avoid migrating unused pages which can speed up migrations
- PPC: NVIDIA V100 GPU/NVLink2 passthrough for spapr using VFIO PCI
- Many speed improvements for LUKS backend
- pmem/nvdimm support
For trimmed down container like isolation use-cases the new qemu has the microvm machine type which can be combined with the qboot ROM (available as bios-microvm.bin) to provide a reduced feature set at a much faster startup time. To further emphasize that you can use the package qemu-system-x86-microvm which provides an alternative QEMU binary stripped of all features not needed these use cases as sugegsted by the qboot ROM.
libvirt
libvirt was updated to version 6.0. See the upstream change log for details since version 5.6 that was in Ubuntu 19.04 or further back since verison 4.0 that was in Ubuntu 18.04.
Chrony
Chrony been updated to version 3.5 which provides plenty of improvements in accuracy and controls. Furthermore, it also adds additional isolation for non-x86 by enabling syscall filters on those architectures as well.
To further allow feeding Hardware time into Chrony the package GPSD is now also fully supported.
But still for simple time-sync needs the base system already comes with systemd-timesyncd. Chrony is only needed to act as a time server or if you want the advertised more accurate and efficient syncing.
Ubuntu 20.04 LTS “Focal Fossa”
There are a lot of other changes as well. To experience all the changes and improvements it is recommended to use and experiences this version of your own.
As of late April, Ubuntu 20.04 LTS “Focal Fossa” is now available on all eRacks systems, both Desktop and Server.
It should appear in the “Operating system” dropdown when you configure your system, and is the default on many / most of our systems.
If you don’t see it, or if you this it should be the default, (or shouldn’t!), please let us know – We are always listening for feedback!
Asif Raihan May 15th, 2020
Posted In: Linux, New products, Open Source, Operating Systems, Reviews, servers, ubuntu
Tags: Cloud Storage Server, linux, New products, Open Source, operating system, OS, ubuntu
Fedora 32 is now available! Check Out The New Features.

fedora32
Fedora has done it again. The fruit of their labor is now ready for the masses to enjoy. Fedora 32 will definitely strike the chord for most of its users and the ones who have a keen eye on joining in. Released on April 28th 2020 after a patient wait from the fans and enthusiasts, there are no more barriers to getting it on your hands because it is now officially out.
Outstanding New Features in Fedora 32
There are a lot of changes and new features abound in Fedora 32. Let’s review some of them.
- Binutils upgraded to Binutils 2.3
- DNF (Dandified yum) improved (for better, more accurate counting of Fedora users)
- GCC 10 compiler upgraded
- Glibc upgraded to Glibc 2.31
- Python upgraded to Python 3.8
- Python 2 removed/retired
- Ruby upgraded to Ruby 2.7
- PHP upgraded to PHP 7.4
- MariaDB upgraded to MariaDB 10.4
- GNOME upgraded to GNOME 3.36(Fedora Workstation 32)
- And many more
For a list of all changes introduced in Fedora 32 Core, refer to the official Fedora 32 Changeset.
GNOME 3.36
Fedora 32 Workstation includes the latest release of GNOME Desktop Environment for users of all types. GNOME 3.36 in Fedora 32 Workstation includes many updates and improvements, including:
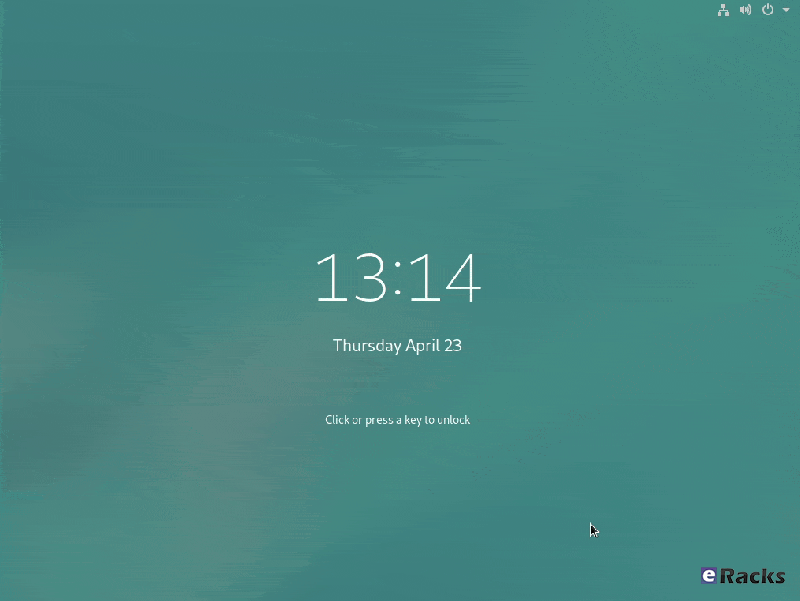
Redesigned Lock Screen
The lock screen in Fedora 32 is a totally new experience. The new design removes the “window shade” metaphor used in previous releases, and focuses on ease and speed of use.
unlock-screen-fedora
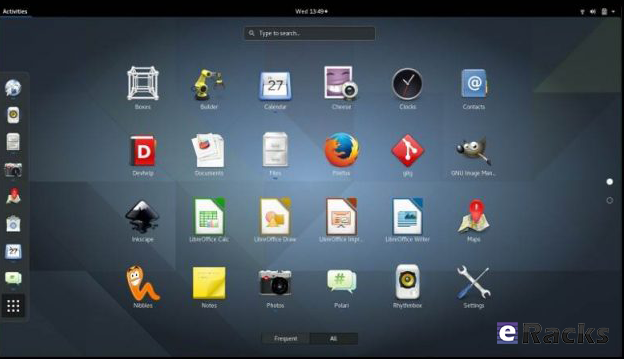
Better Applications Search
Powered by the talent and the evident hard-work invested in this new release, it is amazing now that you can now search applications like lock screen, power off, log out and many more in a beautiful layout. It integrates well with screens that can be oriented vertically or horizontally which makes it sweet to interact with.
New design on the settings App
Renamed to settings, the GNOME Control Center now has an easy to use side bar which embraces the user with an intuitive and fluid navigation through the settings arena. Additionally, the About category now has a more information about your system, including which windowing system you are running (e.g. Wayland)
Supports The New Extensions App
You no longer need to utilize the GNOME Tweaks tool to separately install/manage extensions. Fedora 32 features the new extension app which lets you manage GNOME extensions directly.
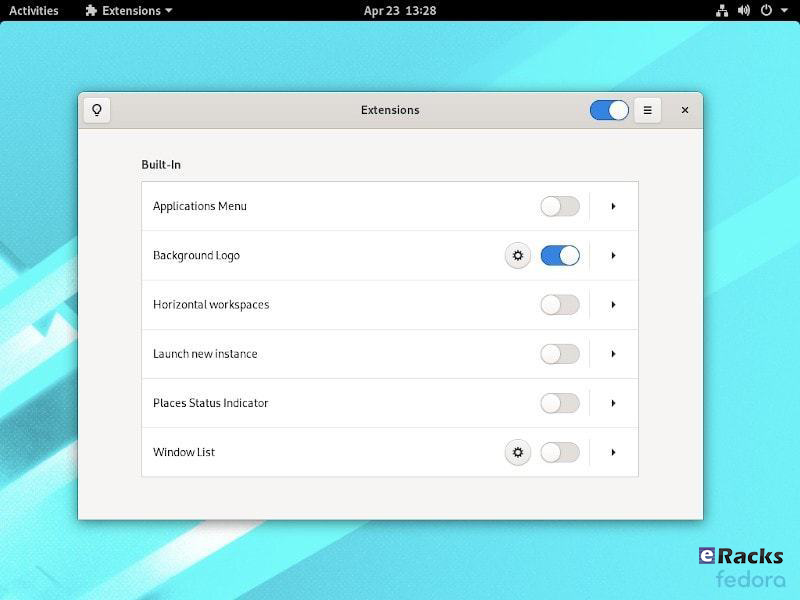
fedora-extensions-app
However, you won’t find it pre-installed. You will have to look through the software center to get it installed or simply type in the following command:
sudo dnf install gnome-extensions-app
Revamped Settings Menu
As part of the new GNOME 3.36, you will find the Settings app to be re-organized and more useful than ever before. You can get more information about your system and access the options easily.
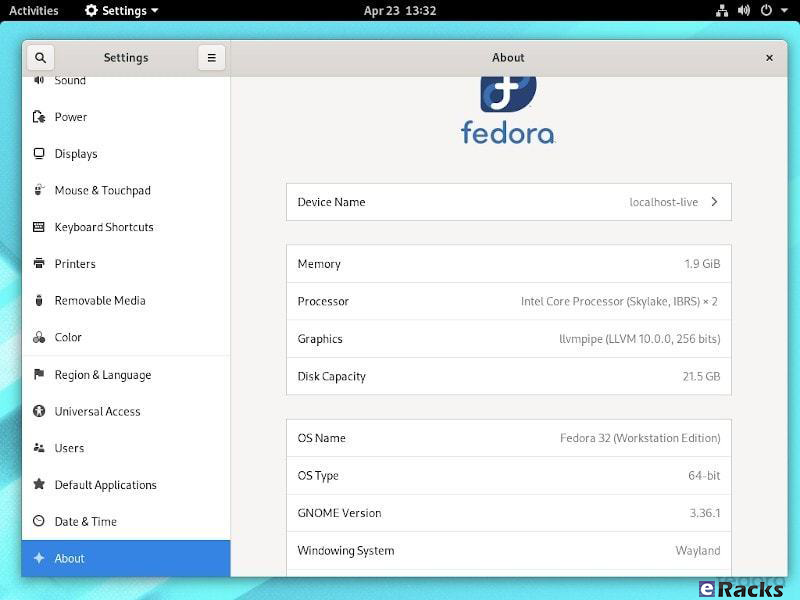
fedora-32-settings
Notifications Area Redesign With Do Not Disturb Toggle
The best thing about GNOME 3.36 is the notification area or the calendar pop-over redesign. And, Fedora 32 has it nicely set up as well in addition to the Do Not Disturb mode toggle if needed.
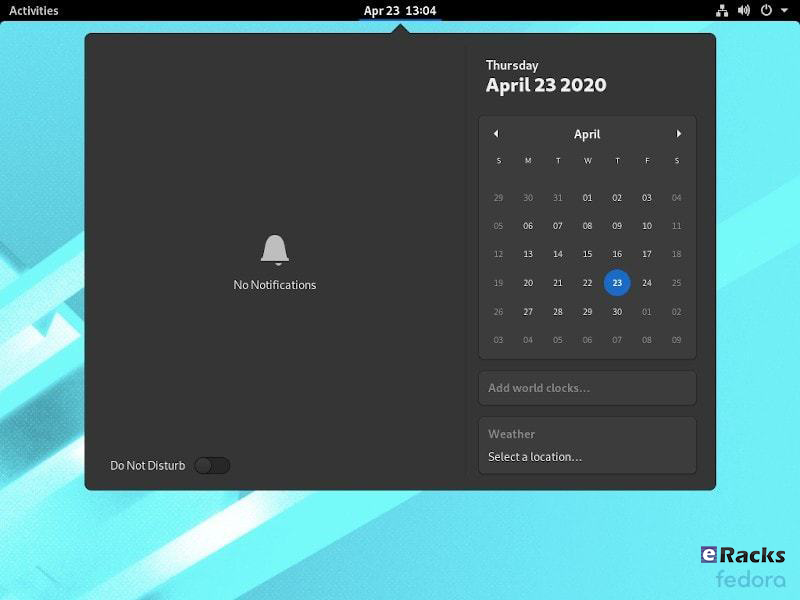
notification-area-design-fedora-32
Redesigned Clocks Application
The Clocks application is totally redesigned in Fedora 32. It features a design that works better on smaller windows.
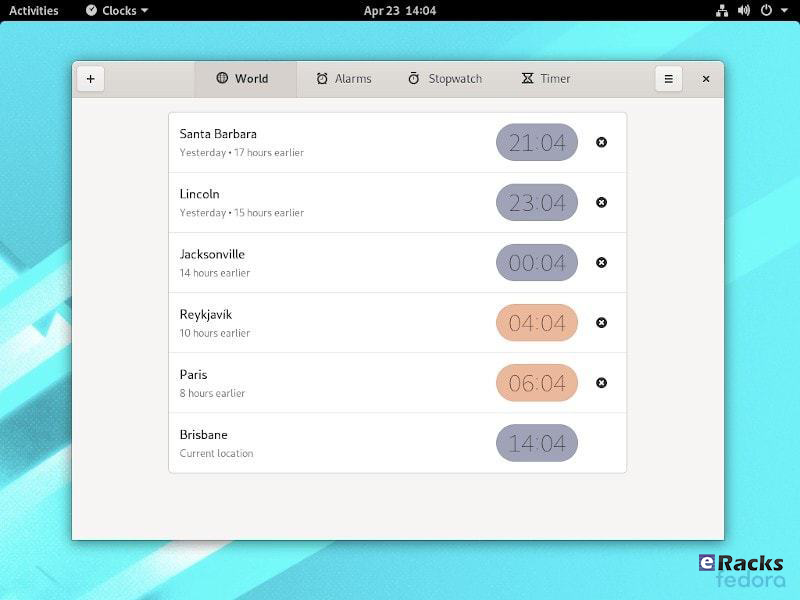
clock-app-fedora-32
GNOME 3.36 also provides many additional features and enhancements. Check out the GNOME 3.36 Release Notes for further information
Improved Out of Memory handling
Previously, if a system encountered a low-memory situation, it may have encountered heavy swap usage (aka swap thrashing)– sometimes resulting in the Workstation UI slowing down, or becoming unresponsive for periods of time. Fedora 32 Workstation now ships and enables EarlyOOM by default. EarlyOOM enables users to more quickly recover and regain control over their system in low-memory situations with heavy swap usage.
For more details please visit the official Fedora Releases/32/ChangeSet.
To upgrade your existing Fedora 31 installation to Fedora 32, you need to run the following commands in terminal one by one:
sudo dnf upgrade --refresh

sudo dnf install dnf-plugin-system-upgrade

sudo dnf install dnf-plugin-system-upgrade

sudo dnf system-upgrade reboot
You can also perform a clean installation of the Fedora 32 by visiting its download page and download the ISO file. Or click the link below:
- Download Fedora 32 Workstation 64 bit.
- Download Fedora 32 Workstation 32 bit.
- Download Fedora 32 Server.
If you feel like doing so, do give it a try or ask for the help from eRacks Systems’ experts.
Asif Raihan May 5th, 2020
Posted In: Fedora, Linux, New products, Open Source, Operating Systems, Upgrades
Tags: fedora, linux, New products, Open Source, operating system, OS