
eRacks Systems Tech Blog
Open Source Experts Since 1999
Install and Configure Bind9 DNS Server service on Ubuntu 16.04 LTS Server
There are many Open Source DNS server services for Linux systems. Here we’ll discuss about installing and configuring one of the most popular DNS server services among them known as “Bind9”. We’ll use another most popular Debian based Linux server operating system distributed by Canonical which is Ubuntu 16.04 LTS Server edition.
Other good DNS implementations include the native OpenBSD DNS implementation, as well as Dan Bernstein’s tinyDNS (AKA djbdns), but these are topics for future articles. (We use djbdns on OpenBSD, internally).
Successfully installing and configuring Bind9 Server service on Ubuntu 16.04 LTS server edition require several steps. For better understanding we’ll divide the total process into two main steps as ‘Basic installs’ and ‘Securing the DNS Server’ service. Each main category could be divided into several additional steps.
Basic Installing Steps:
- Install fresh Ubuntu 16.04 LTS Server OS on a server.
- Preparing the Ubuntu 16.04 LTS Server OS for installing Bind9 DNS Server Service.
- Install Bind9 DNS Server Service and configure Caching-only name server.
- Install and configure Primary DNS server or Master DNS server.
- Bind9 Post installation Configurations for successful service run on Ubuntu Server.
- Install and configure Secondary DNS server or Slave DNS server.
Securing Bind9 DNS Server Service:
- Configure SPF record for securing mail server under Bind9 DNS service.
- Configure DKIM record for securing mail server under Bind9 DNS service.
- Configure DNSSEC signing on Bind9 DNS Server Services.
- Configure DMARC Record for securing mail server under Bind9 DNS service.
For this tutorial we’ll use ‘eracks.com’ as domain and local IP address for demo and real time configurations (tested) behind the NAT network. The global & dedicated Systems could be configured just by replacing with your own domain and real IP assigned from your ISP. If you need further assistance please contact our eRacks Systems’ experts. Also, you could buy securely configured “DNS Server” as your requirements from eRacks Systems’ showRoom without any hassle. For your requirement please checkout.
For configuring DNS Servers we’ll use private IP from 192.168.88.0/24 network block where the usable Host IP Range is: 192.168.88.1 – 192.168.88.254; and Subnet Mask: 255.255.255.0. Our Router/NAT-gateway IP address is already configured as 192.168.88.1.
IP Address Block:	192.168.88.0/24
Usable Host IP Range:	192.168.88.1 - 192.168.88.254
Broadcast Address:	192.168.88.255
Total Number of Hosts:	256
Number of Usable Hosts:	254
Subnet Mask:	255.255.255.0
Wildcard Mask:	0.0.0.255
| Options | Primary/Master DNS Server | Secondary/Slave DNS Server | Client/Host Server |
| Host Name | dnsmaster | dnsslave | hostserver |
| Domain | eracks.com | eracks.com | eracks.com |
| IP Address | IPv4: 192.168.88.17 IPv6: ::8817 |
IPv4: 192.168.88.250 IPv6: ::8250 |
IPv4: 192.168.88.17 IPv6: ::8221 |
| FQDN | dnsmaster.eracks.com | dnsslave.eracks.com | hostserver.eracks.com |
Enough talk – Let’s see how it’s done!
eRacks/DNS

Get your Own Open Source DNS Server as pre-configured as ‘plug & Play’ from eRacks Systems’ ShowRoom.
Step 1: Install fresh Ubuntu 16.04 LTS Server OS on a server.
For learn how to install a fresh copy of Ubuntu 16.04 LTS Server OS on a server system visit this link.
Step 2: Preparing the Ubuntu 16.04 LTS Server OS for installing Bind9 DNS Server Service.
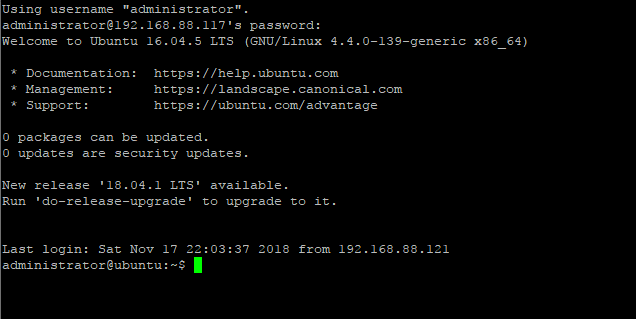
After installing, login the server directly or using SSH tunnel with IP address with user with root privileges.
The login screen will look like this;
Then run the following command and press enter and your given password to update the system.

For avoiding “sudo” command, we’ll configure the server as ‘root’ user. To do so, type the following command and press enter.

Once the Update and Upgrade are done as root user, we need to edit the network interface for setting up the static IP address for the system with the following command;
Here On the popped-up screen find # The primary network interface and replace the beneath lines with the following;
# Static Primary Network Interface IPv4 Address
# Required for IPv4 (A) Records
auto eth0
	iface eth0 inet static
	address 192.168.88.17
	netmask 255.255.255.0
	network 192.168.88.0
	broadcast 192.168.88.255
	gateway 192.168.88.1
	dns-nameservers 8.8.8.8 8.8.4.4
	dns-domain eracks.com
# Optional Static IPv6 Address for Primary Network Interface
# Required for IPv6 (AAAA) Records
iface eth0 inet6 static
	address fe80::215:5dff:fe58:6500
	netmask 65
	gateway fe80::2a3b:82ff:fe74:58f6
Once it is done, press Ctl + X to exit and Press ‘Y’ then Enter button to save the changes.
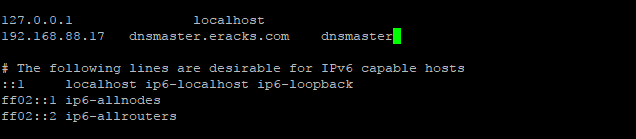
Next, we need to set up the hostname for this server. Thus, Run the following command to edit the host name;
On the popped up screen replace the existing default host name “Ubuntu 16.04 LTS” with “dnsmaster” (since we’ll be setting the hostname as “dnsmaster“) then Press control + X to exit. And Press ‘Y’ then Enter button to save the changes. And then Run the following command to edit the hosts file;
Replace the existing with the following host record entries with the following;
The entries will look like this;
Once done, press control + X to exit and Press ‘Y’ then Enter button to save the changes and reboot your system with the “reboot” command.
After rebooting and login to the server we’ll see that the default host name “ubuntu” is replaced with hostname “dnsmaster”. To get assure we could check the hostname and FQDN with the following commands respectively;
root@dnsmaster:~$ hostname -f

Once these are done the system is ready for installing the Bind9 DNS Server Service. And we could proceed to the next steps.
Note:We’ll login as as root user from the start.
Step3: Install Bind9 DNS Server Service and configure Caching-only name server.
Before installing ‘Bind9’ DNS Server on this server we need to make sure all the packages are up to date. So, we’ll update and upgrade all the apt packages with following command;
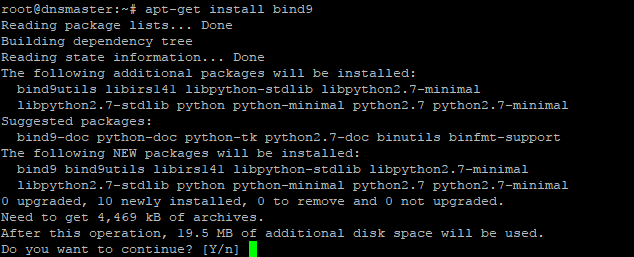
Once the Update and Upgrade are done, we’ll install the ‘Bind9’ Packages with the following command;
The screen will pop up for your permission for using additional disk space. For approval, press “Y” and then Enter button for installing the packages. The installation process will take a few whiles.
When the installation is done the system is ready for configuring Caching-only name server with Bind9 DNS Server service package. For configuring Caching-only name server run the following command.
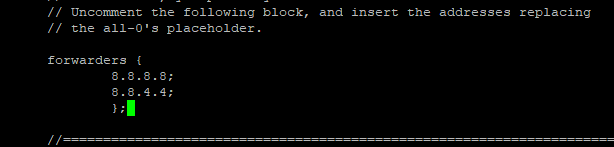
On the popped-up screen find & uncomment the forwarders & set the forwarders as follows with google public DNS IP address & or with your ISP’s DNS IP address.
The entries will look like this
Next, press control + X to exit and Press ‘Y’ then Enter button to save the changes. And restart the Bind9 DNS Service with the following command.
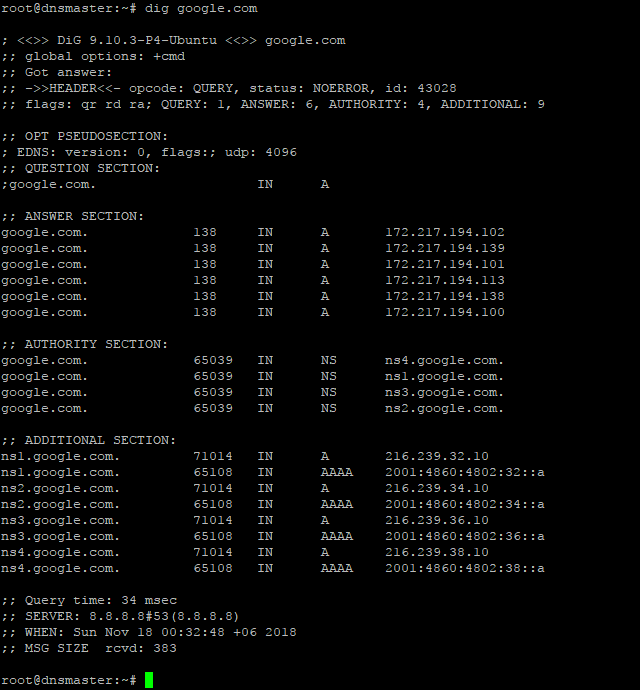
For testing the Caching-only name server we need to run the dig command as follows;
If everything is okay, the command will dig up the following records;
Step4: Install and configure Primary DNS server or Master DNS server.
Before proceeding further, first we need to make sure the Ubuntu server is up-to-date. We could make sure by running the following commands;
Before configuring Primary Name Server with Bind9, we could verify all the required packages are installed by running the following command;
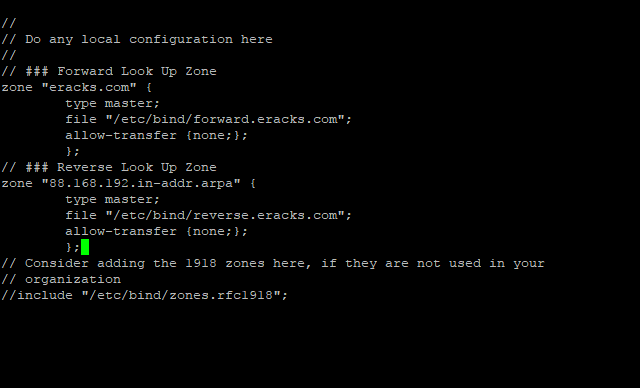
Once it is done, we are ready to configure our Primary Name Server with Bind9 on Ubuntu 16.04 LTS Server. And All configuration files be will be available under /etc/bind/ directory. To do so, we need to edit ‘named.conf.local’ file first, and make entry for our domain zone.
So, we’ll run the following command line for setting up our domain’s forward look up zone.
Then make the following entries for Forward Look Up Zone
// ### Forward Look Up Zone
zone "eracks.com" {
	type master;
	file "/etc/bind/forward.eracks.com";
	allow-transfer {none;};
	};
Reverse, look up zone is also recorded here. So, we’ll add the reverse look up zone with the first there part of the IP address in reverse way by ending with “.in-addr.arpa”. The zone name it’ll look like “88.168.192.in-addr.arpa” this. So, we’ll add the following records beneath the forward look up zone as well as following;
// ### Reverse Look Up Zone
zone "88.168.192.in-addr.arpa" {
	type master;
	file "/etc/bind/reverse.eracks.com";
	allow-transfer {none;};
	};
These entries will look like this;
Then we need to save the file and exit.
We’ve identified forward lookup zone via “file “/etc/bind/forward.eracks.com”;” and reverse lookup zone via “file “/etc/bind/reverse.eracks.com”;” on the “named.conf.local” file. Therefore, we need to create those two-database files for use as forward & reverse lookup zone under “/etc/bind/” directory.
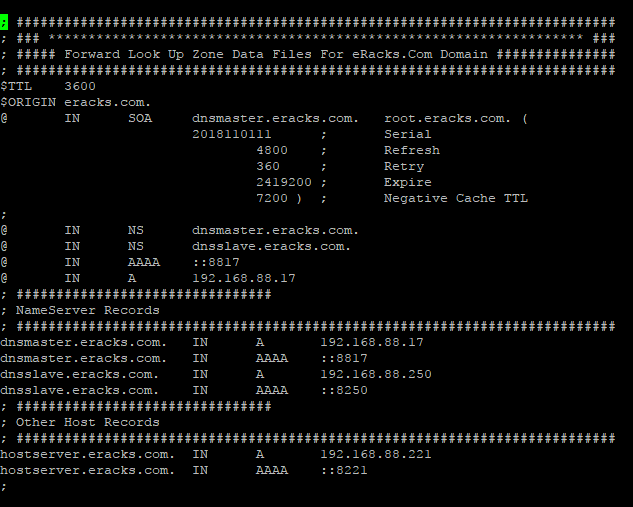
For “forward.eracks.com” database, we’ll copy the existing “db.local” database file that is created as default with Binid9 installation under ‘/etc/bind/’ directory. To, do so we’ll run the following command;
Then we’ll edit the newly copied database file with the following command;
Then make the following entries for the database records;
; ###########################################################################
; ### ******************************************************************* ###
; ##### Forward Look Up Zone Data Files For eRacks.Com Domain ###############
; ###########################################################################
$TTL    3600
$ORIGIN eracks.com.
@	IN	SOA	dnsmaster.eracks.com.	root.eracks.com. (
								2018110111	;	Serial
										4800	;	Refresh
										360	;	Retry
									2419200	;	Expire
										7200 )	;	Negative Cache TTL
;
@	IN	NS	dnsmaster.eracks.com.
@	IN	NS	dnsslave.eracks.com.
@	IN	AAAA	::8817
@	IN	A	192.168.88.17
; ################################
; NameServer Records
; ###########################################################################
dnsmaster.eracks.com.	IN	A	192.168.88.17
dnsmaster.eracks.com.	IN	AAAA	::8817
dnsslave.eracks.com.	IN	A	192.168.88.250
dnsslave.eracks.com.	IN	AAAA	::8250
; ################################
; Other Host Records
; ###########################################################################
hostserver.eracks.com.	IN	A	192.168.88.221
hostserver.eracks.com.	IN	AAAA	::8221
;
It’ll look like this;
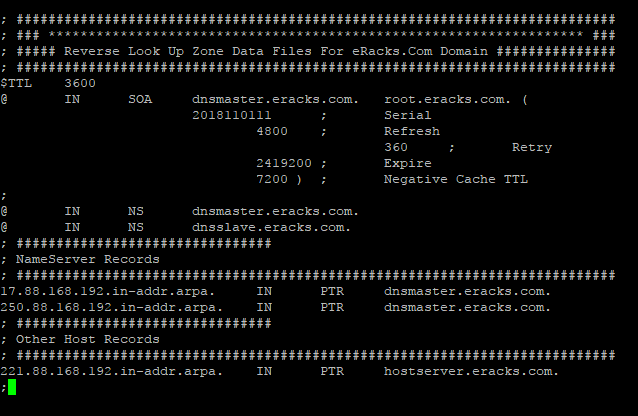
Next for “reverse.eracks.com” database, we’ll copy the existing “db.127” database file that is created as default with Binid9 installation under ‘/etc/bind/’ directory as well. So, we’ll run the following command;
And edit using the following command
Entries for the database are follows
; ###########################################################################
; ### ******************************************************************* ###
; ##### Reverse Look Up Zone Data Files For eRacks.Com Domain ###############
; ###########################################################################
$TTL    3600
@	IN	SOA	dnsmaster.eracks.com.	root.eracks.com. (
								2018110111	;	Serial
										4800	;	Refresh
										360	;	Retry
									2419200	;	Expire
										7200 )	;	Negative Cache TTL
;
@	IN	NS	dnsmaster.eracks.com.
@	IN	NS	dnsslave.eracks.com.
; ################################
; NameServer Records
; ###########################################################################
17.88.168.192.in-addr.arpa.	IN	PTR	dnsmaster.eracks.com.
250.88.168.192.in-addr.arpa.	IN	PTR	dnsslave.eracks.com.
; ################################
; Other Host Records
; ###########################################################################
221.88.168.192.in-addr.arpa.	IN	PTR	hostserver.eracks.com.
;
Once it is done, we’ll save the file and exit.
It’ll look like this;
After that, we’ll restart the bind9 DNS Server Service with the following command.
root@dnsmaster:~$ service bind9 status
Note: We should be careful that all the records that finishes with letter (other than IP addresses), we need to add full-stop (“.”) at their end point to declare it is finished. Else, the bind9 will show an error.
For instant checkup, we need to set the resolver with nameserver as localhost IP 127.0.0.1 using following command;
And at the beginning of the name server lists we need to add the following line, then save and exit.
nameserver 127.0.0.1
For checkup we’ll use the “dig” command for specific host record like following
The command will dig up the host records from the local DNS Server as follow

If the configuration is correct then the above command will not show any error. or if there is any error, we need to look at log file and troubleshoot the error. For detail about bind9 troubleshooting on Ubuntu Server please visit Ubuntu’s official “DNS Troubleshooting Page” or contact eRacks Systems’ expertise for the help.
Step 6: Bind9 Post installation Configurations for successful service run on Ubuntu Server.
When, the bind9 shows no error, we need to set the post installation configuration for Bind9 DNS Server Service to run successfully on Ubuntu Server. To do so, we’ll run these following commands for give appropriate access permission to the Bind9 Server Service and Allow through Ubuntu Firewall (ufw).At first, we’ll enable the bind9 DNS Server Service at the system start up with the following command. So that the Bind9 always starts automatically after the system reboot.
Then for the access permission for Bind9 on ubuntu server, we’ll run the following commands;
root@dnsmaster:~$ chown -R bind:bind /etc/bind
We’ll also configure the Ubuntu firewall in order to allow Bind9 through Ubuntu firewall (ufw). For configuring ufw we’ll run the following commands one by one.
root@dnsmaster:~$ ufw allow “Bind9”
root@dnsmaster:~$ ufw reload
root@dnsmaster:~$ ufw status
root@dnsmaster:~$ ufw status verbose
Then we’ll restart both servives Bind9 and the ufw with the following commands;
root@dnsmaster:~$ systemctl restart service.service
We could always restart and check status of the Bind9 DNS Server Service with following command.
root@dnsmaster:~$ service bind9 status
If everything is alright, the Bind9 status report will show no error. Beside, we could always visit this MxToolbox website for more detail reports and troubleshooting by entering the domain.
Asif Raihan May 8th, 2018
Posted In: How-To, Linux, Open Source, servers
Tags: linux, Open Source, tutorial, ubuntu