
eRacks Systems Tech Blog
Open Source Experts Since 1999
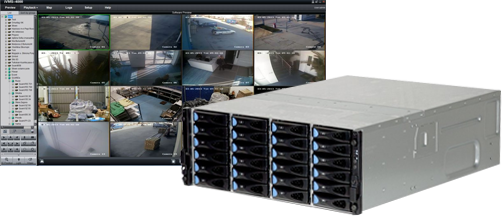
eRacks Releases Surveillance and Security systems
Worried about your choice of surveillance system for your premises, not sure what system is more suitable to your needs? Confused where to invest your hard-earned money for your security apparatus? We at eRacks got you covered!
Our top of the line products and their tech are briefly described for you because we at eRacks believe a market educated consumer is a happy and long-term customer. Besides, not one shoe fits all, so why should one system be used for all your needs?.
eRacks has always emphasized on its diversity in its products.
“A diverse security apparatus is a strong security apparatus”
-Joseph Wolff, CTO, eRacks
Hence, we are offering three variants of surveillance systems
- eRacks/HVR (Hybrid Video Recorder)
- eRacks/NVR (Network Video Recorder)
- eRacks/DVR (Digital Video Recorder)
Each of the technology we are offering to our valuable clients are discussed in detail below
- eRacks/HVR (Hybrid Video Recorder)
eRacks/HVR (Hybrid Video Recorder) is quickly growing in popularity because of its versatility. Hybrid video recorders (eRacks/HVR) are compatible with both standard analog signal and IP network cameras, allowing the users to continue using their current installed analog security system while gradually shifting to the latest network IP technology. It grants the flexibility to upgrade the existing surveillance system to IP equipment according to the user’s budget and specifications.
A hybrid system integrates existing analog cameras into an IP network, providing the user with all the advantages of an IP system excluding the HD resolution of IP cameras. In a hybrid CCTV system, footage is recorded in analogue quality however the IP network features of indexing, bookmarking, and retrieval are made available through the Hybrid eRacks/DVR.
eRacks/HVR (Hybrid Video Recorder) is best suited to record video footage in a digital format to storage array. It accommodates both IP and analog cameras and captures video/images through an Ethernet network via Cat5 / Cat6 cables from IP cameras as well as coaxial cables from analog cameras. It is mostly used for physical security applications. This option is a good choice when planning for future expansion into an IP video surveillance system as the existing analog cameras can be reused and incorporated into the system without any drop in coverage.
eRacks/HVR comes with a variety of channel counts, and storage capacities to ideally suit many applications. It also supports smart features, including event search, event log, and email notification; a free mobile app that allows users to watch live or playback video from their smartphone. Multi-site video management from anywhere in the world can be done using eRacks/HVR as well.
- eRacks/NVR (Network Video Recorder)
eRacks/NVR stands for Network Video Recorder which is a specialized hardware and software solution used in the IP video surveillance systems. This system records and store video footage directly from the network it lives on for the purpose of their storage and subsequent playback. They work with an advanced type of camera, called IP cameras. IP cameras can actually capture and process video and audio data themselves by using either an Ethernet cable or wirelessly via an existing Wi-Fi network. The eRacks/NVR does not contain any special equipment for capturing video because it receives the video streams already encoded by the IP cameras in a digital format. To support the expanded set of features and user-friendliness, the eRacks/NVR uses standard computers with standard operating systems.
eRacks/NVR systems process the video data on the camera rather than on the recorder by using IP cameras which are standalone image capturing devices. IP cameras have a chipset which processes the video data which is then transmitted to a recorder. It is capable of recording and sending audio as well as video. The more powerful hardware on IP cameras also enables improved smart functionality and video analytics, such as facial recognition. eRacks/NVR systems connect the camera to the recorder, but this is done using standard Ethernet cables, such as cat5e and cat6, to transmit data. eRacks/NVR recorders are only used for storing and viewing the footage.
eRacks/NVR systems are inherently more flexible because security cameras don’t necessarily have to be physically connected directly to the recorder. Instead, IP cameras only have to be on the same network. The video quality is also better as eRacks/NVR recorders receive a pure digital signal from the cameras. All cameras with microphones can record audio to the eRacks/NVR because Ethernet cables carry audio. eRacks/NVR systems tend to have better picture quality, as well as easier installation, are reliable, stable, provide increased flexibility, have a user-friendly interface for day-to-day use, and native support for audio on every camera that has a microphone. However, eRacks/NVR systems also tend to be quite a bit more expensive which is a huge constraint for budget conscious people.
- eRacks/DVR (Digital Video Recorder)
eRacks/DVR (Digital Video Recorder) has been updated for a better performance than ever. It is mostly used for physical security applications. These eRacks/DVR solutions are highly scalable and can be tailored according to the client’s needs. They can also be configured for home to enterprise class support. eRacks/DVR is a little lower priced than other available systems which makes it more attractive.
The eRacks/DVR (Digital Video Recorder) is a specialized computer system that records video in a digital format and stores it in disk drives or other mass storage devices. This updated version provides 432 TB of Surveillance Storage Drives along with optimized Digital Video recording and viewing. It normally uses analog cameras that are also called CCTV cameras, for recording. The cameras and eRacks/DVR are connected using a coaxial cable which are not very costly. Coaxial cables that were previously installed for other security systems can also be used for eRacks/DVR. This combination is more cost-effective and easier to set up; however, the resolution is usually limited to D1 (720×480). Proximity is a limitation as the analog cameras cannot be more than 700-1000 feet away from the eRacks/DVR without visible degradation in video quality.
The eRacks/DVR recorder relies on a chipset that is called AD Encoder for processing the raw data streaming from the camera into legible video recordings. eRacks/DVR systems also have different requirements when it comes to the recorder i.e., the user must connect every camera directly to the recorder. Moreover, the recorder is not responsible for providing power to the cameras. Each camera connection needs a splitter that supplies power which in turn enable cameras to function. eRacks/DVR systems can only use wired security cameras. eRacks/DVR systems also have less flexible mounting solutions because routing coaxial cable can be more difficult in tight situations and a power outlet is required for each camera. Coaxial cables don’t natively transmit an audio signal, and eRacks/DVR recorders usually have a limited number of audio input ports. eRacks/DVR Home surveillance systems are easy to set up and can be accessed through a web browser. The user is notified by email if an alarm is triggered. eRacks/DVR Server offers standard 1year full / 3year limited warranty and come with pre-configured latest Open-Source software based on the user’s specifications.
Hamza April 16th, 2021
Posted In: Products, security, servers, Storage, Technology
Tags: Archive Drives, backup, CCTV, closed circuit, Cloud, firewall, network, New products, operating system, seagate, security, Storage, surveillance, Technology
Putting SSH Keys to Work
There may be situations where you’d like to login to a remote machine via SSH and not have to enter a password to do it. Perhaps you have some sort of automated file transfer that makes use of SCP. Or, perhaps you frequently login to the same machine and get tired of having to enter a password each time. Whatever the reason may be, an attractive alternative to using passwords involves making use of cryptographic keys.
To give you a general idea of what’s involved, you’ll first generate a public/private key pair. Your public key is what you would copy to every machine you want to be able to log into. You can think of the public key as the lock on a door to a house. The reason why we call this a public key is that it’s safe to share it with the public, just as the lock on your door is safe to display from the outside. By contrast, your private key can be thought of as the key that fits into the lock. Unlike your public key, you should never copy it to machines that are either untrusted or to machines that you yourself don’t administer — this would be a bit like placing the key to your front door outside your house for strangers to use! Anybody who possesses your private key can access every machine to which you’ve made your public key accessible, so exercise extreme caution and guard your private key with your life.
SSH makes generating your keys very simple. From the command line, you’ll simply enter the following command:
$ssh-keygen
You’ll then be asked a series of questions. Accept all the defaults. If you don’t desire to password protect your key pair (which would require you to enter a password when you use it), hit enter when asked for the password, without typing anything in. At the end of the process, you should discover two new files in ~/.ssh, id_rsa and id_rsa.pub, where ~ stands for your home directory. From here, you’ll copy your public key (id_rsa.pub) to every machine you wish to log into and append its contents to a file called ~/.ssh/authorized_keys, where ~ stands for the home directory of the account you wish to log into.
To test your newly generated key pair, try to connect to one or more of the remote machines you copied your public key to. You’ll find that you’re sent straight to a command prompt, without the need for a password.
Now, there are situations where using keys without passwords can potentially be hazardous, so some significant thought should be given to the circumstances in which your key pair will be used. For example, I will never copy my laptop’s public key to my personal server at home, because if my laptop is ever stolen, the thief (if he knew how to use *NIX) would not only have access to all my local data, but would also have complete SSH access to my network at home, since he would have my laptop’s private key. Thus, I choose to sacrifice convenience for security in that particular situation. As with all things in life, the amount of relative security versus convenience is a trade off, so make sure you choose wisely.
Enjoy!
james November 21st, 2008
Posted In: authentication, security, ssh, unix
Tags: authentication, key, linux, private, public, ssh, ssh-keygen, unix
Six Tips for Effective Virtualization Security
A secure environment is absolutely crucial for a virtualization server connected to the Internet. If the host is compromised, all its virtual machines are at risk and their services will be affected, learn more from these important internet safety tips and advice article.
 |
eRacks virtualization experts have put together a useful list of security considerations for virtualization migration planners. TIP #1. Use an open source virtualizer if possible. Open source software vulnerabilities are documented clearly, are well-known, and fixed quickly. |
| Proprietary-software bugs usually take longer to get fixed, and are even sold on black markets for illicit hacking. In fact, there are documented cases of closed source software companies purchasing security hole information of their own applications. Open source software vulnerabilities have less value on the black market, because of their shorter shelf-life. If you have a dental practice, you may want to check out sites like https://cloud9.software/cloud-9-ortho/ and see if this software can help increase productivity and efficiency. | |
| TIP #2. Use open source guests wherever possible. New drivers for open source applications improve security as well as performance. Open source guests are more cooperative with the host, leaving less room for attack. Windows is inherently less secure, since a – it is closed source and updated less frequently. b – widely used and thus a big target. c – statistically has more severe vulnerabilities than open source OSes which take longer to fix. | |
| TIP #3. Minimize the host footprint, making less surface area available for hackers. A small target is harder to hit than a large one. eRacks typically recommends KVM because of its small footprint, simple design, and ease of use. The virtualization host provides services in the form of ports and packages, which should only include those required by the VMs. An effective security plan should minimize the number of open ports, narrowing the possibilities of illicit entry. |
|
 TIP #5. Use an external physical firewall. It is also possible to use a virtualized firewall, running as a guest, but it can only protect the downstream systems, and not the host. A virtualized IP-less bridging firewall is also possible but it is more difficult to implement, and still doesn’t protect the host. The safest solution is an external firewall, such as the eRacks/TWINGUARD, a redundant 1U system, with failover, running a very secure OpenBSD. TIP #5. Use an external physical firewall. It is also possible to use a virtualized firewall, running as a guest, but it can only protect the downstream systems, and not the host. A virtualized IP-less bridging firewall is also possible but it is more difficult to implement, and still doesn’t protect the host. The safest solution is an external firewall, such as the eRacks/TWINGUARD, a redundant 1U system, with failover, running a very secure OpenBSD.
You can look for Fortinet if you want to know about the next-generation firewall. |
|
| TIP #6. Assess your security level, including regular port scans (Nmap), and OS fingerprinting, keeping track of any changes. A hardened system will not give out versions of running services, otherwise it would be too easy to know exactly where the vulnerabilities lie. eRacks can give you a head start by building, installing, and configuring your system for you. Your physical host server can be configured with your choice of a virtualization host, including the freely available version of VMWare or Linux-native KVM (Kernel-based Virtual Machine), as well as a large number of possible virtual operating systems and applications, including web, DNS, email, proxy and other infrastructure services. | |
| virtualizer | description | complexity | level of open source |
| KVM | built into the kernel, uses the standard Linux scheduler, memory management and other services | simple, non-intrusive, very stable, easy to administrate – KVM hypervisor about 10-12K lines of code (2007) |
released under the GNU GPL free |
| Xen | external hypervisor, supports both paravirtualization and full virtualization, has its own scheduler, memory manager, timer handling, and machine initialization. | specially modified kernel – has 10x more lines of code as KVM => raises the vulnerability level | released under the GNU GPL free |
| VMware | fully virtualizes using software techniques only, very good performance, stability. | very large and complex; more than 10x lines of code of Xen | proprietary, player open (teaser-ware), fees |
britta July 9th, 2008
Posted In: News, security, virtualization
Tags: firewall, News, redundant firewall, security, twinguard, virtualization