
eRacks Systems Tech Blog
Open Source Experts Since 1999
FlightGear Open Source Flight Simulator

FlightGear Open Source Flight Simulator
On August 17, developers officially unveiled FlightGear v2.8. For the uninitiated, “FlightGear is an open source flight simulator with more than 400 aircraft, a seamless worldwide scenery database, a multi-player environment, a flexible open aircraft modeling system, multiple display support, and an open architecture.  Best of all, being open source, the simulator is owned by the community and everyone is encouraged to contribute.†The community has been around for over 15 years now, so the simulator has a ton of people contributing to the project.  It’s easily one of the best flight simulation programs in the world. As always, FlightGear is available for download completely free of charge through their website.
FlightGear 2.8 sports a number of new features. My favorite is a new automated system that allows users to make changes to the scenery. Users can now also select between summer and winter textures in-sim, and an improved atmospheric scattering and terrain haze model means the lighting of the terrain is more realistic.  The world scenery now includes over 20,000 airports. It has gotten so large and detailed that it now takes 3 DVD’s to hold the entire scenery database.
Want to know if your computer can support FlightGear? You’ll probably need a computer with a dedicated GPU. I imagine that the any computer with the new integrated Intel HD 4000 would be able to run FlightGear at a playable level.  According to the developers, “FlightGear requires a reasonable hardware accelerated 3D card with OpenGL drivers to achieve smooth frame rates. Software-only rendering typically yields frame rates in the neighborhood of several seconds per frame. But, with a 3D accelerated card you can expect much higher. On a 2-3Ghz class CPU with a GeForce card, frame rates in excess of 60 fps are reasonable to expect in most situations. The actual frame rate varies of course with scene complexity (which changes from area to area and changes as your view direction changes) and the specific details of your hardware.â€
Greg August 29th, 2012
Posted In: Uncategorized
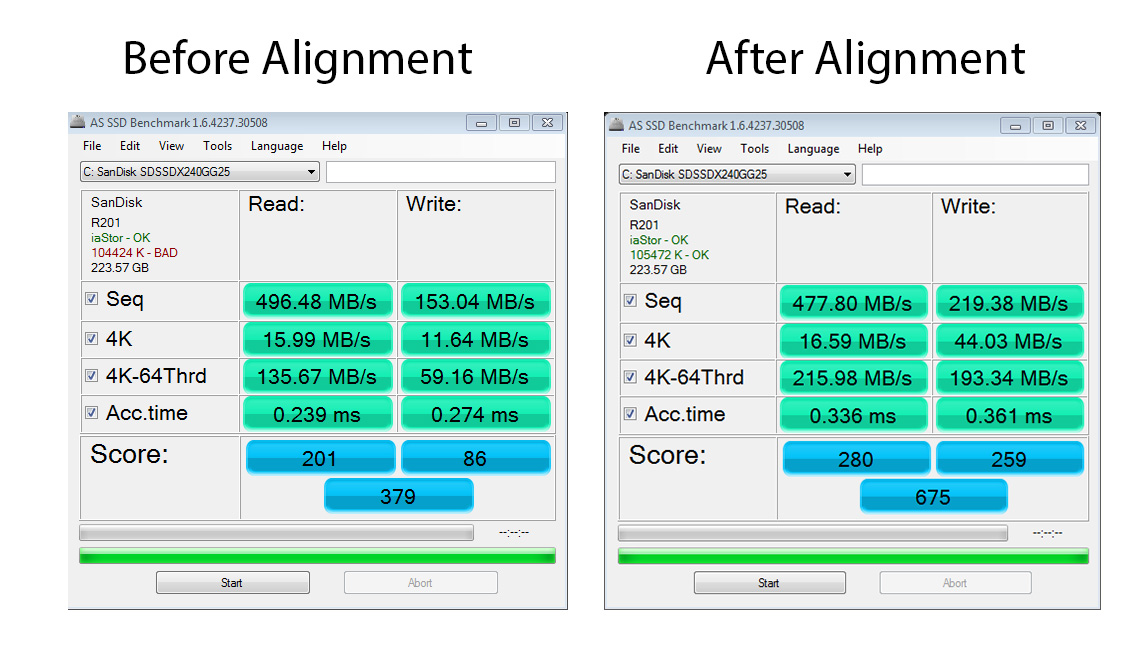
Proper alignment of your SSD using Gparted open source software

I recently bought a laptop from Amazon. I found a really good deal on a Sandisk Extreme 240GB solid state drive, so it only made sense to swap out the hard drive. Rather than going through the hassle of re-installing Windows from scratch and then installing a dozen drivers, I decided to go the easy route and just clone the hard drive with Clonezilla onto the new SSD. I loaded the SSD into an external hard drive enclosure, connected it to the laptop, and fired up Clonezilla. In less than an hour, I had a perfect copy of Windows on my new drive. Well, almost perfect. If your hard drive has failed, ASAP Data Recovery can help you recover your invaluable data in no time.
Greg August 20th, 2012
Posted In: Uncategorized